wood1
Explorer Addict
- Joined
- May 3, 2007
- Messages
- 2,917
- Reaction score
- 5
- City, State
- North of Edmonton
- Year, Model & Trim Level
- '93 XLT, Cayman Green RIP
Hello folks, I had the day off so I thought that I would spend part of the day changing the driver's side radius arm bushing on my 1st gen. I had already changed the passenger side or rather a buddy of mine did it while I watched. (He's a licenced mechanic, I am a hack) He used a air chisel and cut off the rivets which I thought took fairly long, dropped the bracket, changed the bushing and bolted the bracket back on.
I went out last week and bought some grade 8 bolts for the driver's side, but when I took the wheel off today I though that it might be easier to simply drop the axle and pull/push it ahead to change the bushing rather than the other method.
My day started with snapping off the lower shock mount from the radius arm... should have heated it up obviously...
I removed the radius arm nut without too much trouble, unbolted the front driveshaft, found that I had to disconnect the sway bar, and pull the caliper, no problem there...
I then stuck a sissor jack in between the radius arm bushing bracket and the coil spring seat, (I had already cut the little crank-arm off of the jack so I could slide a socket on) and turned the sissor jack with a ratchet until the threaded end of the radius arm popped out. I changed the bushing, then when I tried to get that same threaded end back in the hole in the bushing bracket I just couldn't get it to go. The end was outboard of the hole and was not going in.
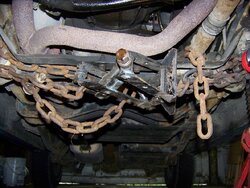
After scratching my head for a few minutes and remembering that my come-along had been sacrificed some time back pulling a control arm back in line on a car I was fixing to sell, I came up with the poor-man's come-along.
As disturbing as it looks it worked quite nicely.
Anyway, spent another hour messing around cutting off the shock mount and drilling it, used a 9/16 grade 8 bolt 2.5 inches long and bolted the new shock on. I left the shoulder portion of the shock mount so it would hold the bolt from moving around. The biggest drill bit I had was 1/2 so I had to ream out the hole. Next purchase will be a few larger drill bits I think. I did use thread locker and plan on welding the bolt to the radius arm as soon as I can catch my buddy at his garage. It should be more than strong enough for a couple days, probably would be fine without welding it, but what the heck, it won't cost me anything.
I think it would have only taken a couple hours if I hadn't snapped off the shock mount.
I went out last week and bought some grade 8 bolts for the driver's side, but when I took the wheel off today I though that it might be easier to simply drop the axle and pull/push it ahead to change the bushing rather than the other method.
My day started with snapping off the lower shock mount from the radius arm... should have heated it up obviously...
I removed the radius arm nut without too much trouble, unbolted the front driveshaft, found that I had to disconnect the sway bar, and pull the caliper, no problem there...
I then stuck a sissor jack in between the radius arm bushing bracket and the coil spring seat, (I had already cut the little crank-arm off of the jack so I could slide a socket on) and turned the sissor jack with a ratchet until the threaded end of the radius arm popped out. I changed the bushing, then when I tried to get that same threaded end back in the hole in the bushing bracket I just couldn't get it to go. The end was outboard of the hole and was not going in.
After scratching my head for a few minutes and remembering that my come-along had been sacrificed some time back pulling a control arm back in line on a car I was fixing to sell, I came up with the poor-man's come-along.
As disturbing as it looks it worked quite nicely.
Anyway, spent another hour messing around cutting off the shock mount and drilling it, used a 9/16 grade 8 bolt 2.5 inches long and bolted the new shock on. I left the shoulder portion of the shock mount so it would hold the bolt from moving around. The biggest drill bit I had was 1/2 so I had to ream out the hole. Next purchase will be a few larger drill bits I think. I did use thread locker and plan on welding the bolt to the radius arm as soon as I can catch my buddy at his garage. It should be more than strong enough for a couple days, probably would be fine without welding it, but what the heck, it won't cost me anything.
I think it would have only taken a couple hours if I hadn't snapped off the shock mount.