aldive
Elite In Memoriam
- Joined
- January 17, 2001
- Messages
- 24,667
- Reaction score
- 28
- Year, Model & Trim Level
- 1999 XLT
My remote entry system has been acting up and finally stopped working. Not a great calamity but a royal pain in the arse when one is accustomed to using the remote.
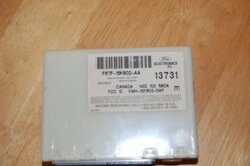
The culprit in this situation was the RAP module ( Remote Anti-theft Personality module ). The little “black box” ( which is actually white ) controls the anti-theft system and the keyless entry system. The RAP module “talks” to the GEM ( General Electronics Module ) to request that the interior lights be turned ON/OFF with use of the keyless entry remote transmitter, and the GEM converses with the RAP to notify when the door is opened.
Ford, in its inestimable insight, located this module behind the left side rear quarter trim panel. Regrettably, they didn’t make the access hatch a little longer or simply place the RAP module more toward the rear. This plastic panel must be removed to take out the RAP module.
The RAP module, Ford part number F87Z15604AA, cost me $179.12 shipped to my door ( with sales tax ) from Torrie at Fast Parts Network ( http://www.fastpartsnetwork.com/ ). The new RAP module comes with a plastic card with the permanent 5 digit code for one’s records.
The first step in the install was to detach the negative battery cable.
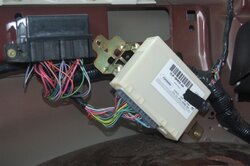
This was followed by the removal of the driver’s side quarter trim panel. First, the liftgate scuff plate was loosened on the driver’s side by prying up the pins with a panel removal tool. Then the rear power lock switch assembly was then removed and the electrical connector disconnected. Next, my 115v duplex outlet ( http://www.explorerforum.com/forums/showthread.php?t=37851&highlight=power+outlet ) and 12v outlet were removed. This was followed by pulling the carpet back slightly and removing the 3 rear quarter trim panel screws. The 6 pin-type retainers were then removed with a panel tool. Subsequently, the bolt holding the seat belt guide was removed with a Torx T-50 bit followed by removing the seat belt anchor nut ( 18mm ). The seat belt was threaded through the quarter panel and then the quarter trim panel was removed to gain access to the RAP module.
The two electrical connectors on the RAP module were then disconnected. The RAP module was secured with two hex head screws ( 7/32” ) that were detached and the RAP module removed. The two metal mounting brackets were then removed from the RAP module and positioned on the new one.
To install the new RAP module, the above procedure was reversed.
Be sure to make note of the 5 digit code number on the sticker on the new RAP module ( I put it in a notebook with passwords and codes and stored it in my safe ). This was needed to program a new custom keypad entry code ( note: the factory code will also still work ).
To program a new access code:
1. Enter the permanent code ( from the RAP module sticker ) on the keyless entry keypad on the driver’s door.
2. Press the 1/2 button within 5 seconds of last digit of permanent code. (This alerts system to accept new code.)
3. Enter alternate 5-digit code. Do not exceed 5 seconds between entering digits or between pressing the 1/2 button and entering the first digit.
4. Verify that the new code works.
All of the remotes must be reprogrammed in order to function with the new RAP module.
To program the remotes:
1. Make sure that the anti-theft system is not armed or triggered.
2. Turn the ignition switch from OFF to RUN eight times within ten seconds, ending in RUN. If the RAP module has successfully entered program mode, it will lock and then unlock all doors.
3. Press any button on a keyless entry remote transmitter and the doors will lock and then unlock to confirm that each keyless entry remote transmitter has been programmed.
4. If the door locks do not respond for any keyless entry remote transmitter, wait several seconds and press the button again
5. Turn the ignition switch to the OFF position, or wait up to 20 seconds after step 2, to exit program mode. If a key less entry remote transmitter has been programmed (or reprogrammed), the RAP module will lock and unlock all doors one last time to confirm
6. Note: when the first remote is programmed, all existing remotes are erased.
7. Repeat for each transmitter.
The straightforward install took only 1 hour at a leisurely pace. The most time consuming and pain in the arse part was the removal/replacement of the rear quarter trim panel.
Oh what a pleasure to have remote control once again.
The culprit in this situation was the RAP module ( Remote Anti-theft Personality module ). The little “black box” ( which is actually white ) controls the anti-theft system and the keyless entry system. The RAP module “talks” to the GEM ( General Electronics Module ) to request that the interior lights be turned ON/OFF with use of the keyless entry remote transmitter, and the GEM converses with the RAP to notify when the door is opened.
Ford, in its inestimable insight, located this module behind the left side rear quarter trim panel. Regrettably, they didn’t make the access hatch a little longer or simply place the RAP module more toward the rear. This plastic panel must be removed to take out the RAP module.
The RAP module, Ford part number F87Z15604AA, cost me $179.12 shipped to my door ( with sales tax ) from Torrie at Fast Parts Network ( http://www.fastpartsnetwork.com/ ). The new RAP module comes with a plastic card with the permanent 5 digit code for one’s records.
The first step in the install was to detach the negative battery cable.
This was followed by the removal of the driver’s side quarter trim panel. First, the liftgate scuff plate was loosened on the driver’s side by prying up the pins with a panel removal tool. Then the rear power lock switch assembly was then removed and the electrical connector disconnected. Next, my 115v duplex outlet ( http://www.explorerforum.com/forums/showthread.php?t=37851&highlight=power+outlet ) and 12v outlet were removed. This was followed by pulling the carpet back slightly and removing the 3 rear quarter trim panel screws. The 6 pin-type retainers were then removed with a panel tool. Subsequently, the bolt holding the seat belt guide was removed with a Torx T-50 bit followed by removing the seat belt anchor nut ( 18mm ). The seat belt was threaded through the quarter panel and then the quarter trim panel was removed to gain access to the RAP module.
The two electrical connectors on the RAP module were then disconnected. The RAP module was secured with two hex head screws ( 7/32” ) that were detached and the RAP module removed. The two metal mounting brackets were then removed from the RAP module and positioned on the new one.
To install the new RAP module, the above procedure was reversed.
Be sure to make note of the 5 digit code number on the sticker on the new RAP module ( I put it in a notebook with passwords and codes and stored it in my safe ). This was needed to program a new custom keypad entry code ( note: the factory code will also still work ).
To program a new access code:
1. Enter the permanent code ( from the RAP module sticker ) on the keyless entry keypad on the driver’s door.
2. Press the 1/2 button within 5 seconds of last digit of permanent code. (This alerts system to accept new code.)
3. Enter alternate 5-digit code. Do not exceed 5 seconds between entering digits or between pressing the 1/2 button and entering the first digit.
4. Verify that the new code works.
All of the remotes must be reprogrammed in order to function with the new RAP module.
To program the remotes:
1. Make sure that the anti-theft system is not armed or triggered.
2. Turn the ignition switch from OFF to RUN eight times within ten seconds, ending in RUN. If the RAP module has successfully entered program mode, it will lock and then unlock all doors.
3. Press any button on a keyless entry remote transmitter and the doors will lock and then unlock to confirm that each keyless entry remote transmitter has been programmed.
4. If the door locks do not respond for any keyless entry remote transmitter, wait several seconds and press the button again
5. Turn the ignition switch to the OFF position, or wait up to 20 seconds after step 2, to exit program mode. If a key less entry remote transmitter has been programmed (or reprogrammed), the RAP module will lock and unlock all doors one last time to confirm
6. Note: when the first remote is programmed, all existing remotes are erased.
7. Repeat for each transmitter.
The straightforward install took only 1 hour at a leisurely pace. The most time consuming and pain in the arse part was the removal/replacement of the rear quarter trim panel.
Oh what a pleasure to have remote control once again.