How to: - Replace Driveshaft CV joint | Ford Explorer Forums - Serious Explorations

  • Register Today It's free!

How to: Replace Driveshaft CV joint

Prefix for threads which are instructional.

jrme

Active Member
Joined
January 6, 2012
Messages
55
Reaction score
1
City, State
London Ontario
Year, Model & Trim Level
1999 Explorer 2wd sport
This is a fairly simple job requiring only hand tools and is not very difficult to do. the kit I used was the doorman #932-201 it came with everything you need
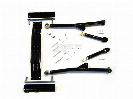
Tools:
Jack & stands
8mm wrench
8mm socket and ratchet head
T27 torx bit
Pry bar
Hammer
External c clamp pliers
Band clamp pliers (depending on your kit)

Step 1:
Jack up the vehicle and secure it with the stands.
Step 2:
Loosen all 6 of the bolts of the propel shaft cv joint using the 8mm wrench and remove using 8mm socket (I used an extension to go over the cross member).

Step 3:
Remove the 4 front u joint bolts using the T27 torx bit.

Step 5:
Remove the cv joint from the receiver (you will have to give a few taps with the hammer and pry bar) once its free the drive shaft should fall out.
Step 6:
Remove the rear cap.
Step 7:
Remove the c clamp.
Step 8:
Cut off band clamp and remove cv unit from shaft.

Step 9:
Push on the new boot and secure it with band clamp.

Step 10:
Line up the holes with the dust shield wile lining up the splnes on the shaft pack the front of the bearing with grease (supplied in the kit ).
Step 11:
Install c clamp.
Step 12:
Pack the unit full of grease (supplied in the kit).
Step 13:
Install rear cap and gasket taping it firmly in place(the bolts will pull it together later).

Step 14:
Install drive shaft making sure that the cv joint is seated properly into the carrier (you will have to use the bolts to pull it together).

And finally:
Tighten up front u bolts (making everything is properly aligned).

If you have any questions please feel free to message me.

If you have something to add please feel free any input is appreciated.


Join the Elite Explorers for $20 each year.
Elite Explorer members see no advertisements, no banner ads, no double underlined links,.
Add an avatar, upload photo attachments, and more!
.


left out two important steps...

1-before unbolting anything, you need to mark the shaft in relation to the front axle yoke and the transfer case flange, in order to preserve the balance of the drive train when you reinstall the shaft.

2-somewhere between 8 and 9 you need to thoroughly clean the shaft of all old grease and dirt, and verify the splines aren't worn out. If they are, STOP and trade the shaft for a re-manufactured or new replacement unit.

I found that I needed to reinstall the shaft to the transfer case flange using two of the old bolts first (they are longer) as the new ones wouldn't reach until it all was pulled together with the longer, old bolts. Then remove the old ones and replace with the new ones.

The Dorman kit only requires a pair of ordinary slip joint pliers to secure the boot retaining band.

Bill


.As far as I have been informed all driveshaft’s are balanced themselves and not to any particular driveline component.
.As far as cleaning and checking the input shaft good catch when I edited it I must have deleted a line lol.
.True the dorman kit comes with that type of clamp but the spicer and other brands do not,so depending on the kit depends how you secure the boot clamp.


Nice write up and suggestions on corrections! This is why I come to this forum a lot. Tons of good advice and friendly people to boot!

I was watching a youtube video on this exact procedure and the mechanic in it also said to mark the transfer case and shaft so you can replace it in the same orientation that it was removed. He never stated why. It kind of confused me since I know the rear drive shaft on a typical car is balanced by itself but 4 wheel drives are new to me so I just assumed it must be different. I don't think it would hurt anything to return it to the same orientation you removed it from, but now I wonder if it really matters. Or is something other than balance going on here.

Orion


Marking the drive shaft for peace of mind is a great idea, I didn’t mark mine and haven’t in any of my trucks and had no issues, bills tips on the driveshaft bolts are correct I did the same but did not use the new bolts I didn’t like the Allen heads, the dorman kit is great the clip is easy and straightforward to clamp down,


I just bought the Dorman kit. The little gasket for the rear cap is broken in one spot and coming apart in another spot. Unfortunately I got it from Amazon or I would take it back. Any ideas?

The instructions also say to put sealeant between the joint and the front cap?


I used the original gasket when I did mine. It looked sturdier that Dorman one. Also I used the rear cap from original CV.
No sealant on the front cap, it fitted snugly. You have to press it in straight - I used long bolts to pull it in straight at the end.
Even in the picture above you can see it being a little bit crocked/tilted.


The orientation of the shaft in relation to the yokes shouldn't matter, but there's times when it does, and because of that I take the extra 30 seconds and mark things with a Sharpie. Easier and quicker than looking for headache medication...

Bill


I used the original gasket when I did mine. It looked sturdier that Dorman one. Also I used the rear cap from original CV.
No sealant on the front cap, it fitted snugly. You have to press it in straight - I used long bolts to pull it in straight at the end.
Even in the picture above you can see it being a little bit crocked/tilted.

Thanks!!! That really helped me out! Knowing that, I went ahead and pulled the shaft. The OEM gasket was still in great shape, and the OEM cap fit much better than the one in the kt.


Driveline balance

.As far as I have been informed all driveshaft’s are balanced themselves and not to any particular driveline component.
.As far as cleaning and checking the input shaft good catch when I edited it I must have deleted a line lol.
.True the dorman kit comes with that type of clamp but the spicer and other brands do not,so depending on the kit depends how you secure the boot clamp.
I can check with some guys that I know from Ford if this is a thing of the past but I know that I've run across a few Ford Trucks that definitely needed to be put back the same way you took them out. Some other manufacturers made 2-piece driveshafts with no Master Spline and those were the ones we had the most work from. Thank you so much Chrysler Corporation! Made a few bucks correcting these vibrational problems simply by putting the thing back in "phase". I always mark the flanges or yokes of anything I pull apart if it has a "Cardan Style" U-joint. Would seem a C/V joint wouldn't have these problems but you never know. If in doubt, mark both halves for re-alignment.

I love this stuff! Have an old GM driveshaft film that shows it in detail. Am going to get this reproduced into DVD. As a drivetrain instructor of over 30 years, I have never seen a fim that better explains it!


When you replace the CV joint is like replacing the end flange or yoke.
Is really nothing left to "put back same way".


If the truck previously had driveline vibration issues, it may have been corrected with the shaft on the truck-when I worked at a dealership years ago we'd install worm clamps on the shaft and depending on the orientation of the screw section, could dial out the vibration and figure where weight needed to be added, and sometimes it wasn't necessarily the shaft out of balance but the pinion or output yoke. So it may not make a difference on the majority of vehicles, but then again it might on yours, so what's the harm in a quick grease pencil line before dropping the shaft?

Bill
Yeah, this is one of those things you won't believe until it happens to you. If you fix cars professionally, one day it will bite you. Easy enough to fix if you do it.


so what's the harm in a quick grease pencil line before dropping the shaft?
Bill

Where do you suggest to put that mark? I did that on mine and after replacing the CV and U-Joint, there is nothing left to "align".
The shaft itself is still balanced, so it does not matter how you rotate it in report to remaining flanges. It will rotate anyway continuously when driving...


Where do you suggest to put that mark? I did that on mine and after replacing the CV and U-Joint, there is nothing left to "align".
The shaft itself is still balanced, so it does not matter how you rotate it in report to remaining flanges. It will rotate anyway continuously when driving...

one mark on the shaft, one in line on the front yoke (the differential side) and one on the xfer case flange(xfer case side)...wait...that makes three...no wonder all the confusion

Bill


So what do you solve?
The shaft is not balanced with the front differential yoke itself. Same with transfer case. Those are not part of the shaft.
When they balance shafts they remove them from vehicle flanges and install them on balancing machine.


How do you know when it's time to replace the CV joint?


Mine sounded like something metallic broke under the truck - loud crunching, one at every shaft rotation.


Join the Elite Explorers for $20 each year.
Elite Explorer members see no advertisements, no banner ads, no double underlined links,.
Add an avatar, upload photo attachments, and more!
.


I picked up a new Dorman CV joint and it came like this. Can't for the life of me figure out how to get the thing back together without the ball bearings falling all over the place. Any ideas?

IMG_2760.JPG


Back
Top