RockRangerII the build up. | Page 27 | Ford Explorer Forums - Serious Explorations

  • Register Today It's free!

RockRangerII the build up.

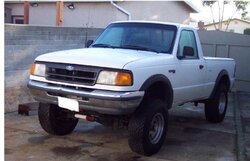
After loosing my last ranger a bit over a year ago I finally got onther one to replace it. The truck I am starting with is a 1993 ranger 4X4 xl standard cab short bed. It is pretty much a bare bones truck. No AC no cruise and a manualt t case. It also has a 4.0 and a 5 speed with 3.73 and an open rear diff. When I purchased the truck it came with a 2.5" rancho lift 31" bfg AT tires on aluminum rims.

I have had the truck around 3 months now and have put about 3000 miles on it sofar. Over that time I have noticed a few things about it. When they installed the lift instead of installing longer brake lines they installed limit straps that limit down travel to about 1" from ride height and also removed the sway bar. They also didnt lift the rear at all and it has a serous case of butt dragging.
 

Attachments

  • ranger.jpg
    ranger.jpg
    39.5 KB · Views: 3,910


Join the Elite Explorers for $20 each year.
Elite Explorer members see no advertisements, no banner ads, no double underlined links,.
Add an avatar, upload photo attachments, and more!
.


Also all the work is done in the back yard. The neighbor on that side has a bunch of tall plants along the fence so she can't see it and the only thing you can see from the street is the Cb antenna.


Join the Elite Explorers for $20 each year.
Elite Explorer members see no advertisements, no banner ads, no double underlined links,.
Add an avatar, upload photo attachments, and more!
.


I meant on the doubler install.... :p


Looks Good Matt :thumbsup:


Matt,
next run we go on i'd like to swap wheels/tires and see how bad they rub if at all on my coils. My wheel/tire combo isn't gonna cut it and besides you can give my swampers a try :D


My Powertank will work ;)


So I spent part of last week working on my truck. I needed a new slave cylinder so that ended up to a new clutch, new master cylender and a new tranny mount. There went $400 I wasnt planing on spending. Then I couldnt get the damn clutch to bleed to save my life. I finally got it half way to bleed but it is still way to soft. Still need o mess with it more.

Now onto the interesting stuff the doubler :D I posted a picture of it all together. The doubler adds 6 5/8" to the drivetrain length. You have to have a plate welded into the side of the case. I tok it to a local welding shop and $40 later it was done.

In the first picture you can see where the shifter piece on the rear 1354 wont clear the doubler plates. I had to make a shorter one.

The second pic shows the modded shifter piece with a rod welded to it that will eventually become the shifter. The 1354 and 1350 linkage are different so the factory shift linkage needs to modded or tossed. I am going to try a new linkage setup and see what happens.

The third pic shows the beginning of the two shifters. Still need to see if they will clear the floor and work.
 

Attachments

  • Picture1 001.jpg
    Picture1 001.jpg
    26.2 KB · Views: 544
  • Picture1 003.jpg
    Picture1 003.jpg
    56.6 KB · Views: 1,245
  • Picture1 004.jpg
    Picture1 004.jpg
    55.4 KB · Views: 540


So now onto building the doubler.

First pic. Bolt the rear doubler plate to the rear tcase. When D.D. sent me the doubler they sent me standard threaded countersunk bolts. However they should have been metric. I called D.D. and he said they were supose to be standard. After checking again they were metric. A quick trip Fasenal down the street and I had the right bolts. To bad I had to buy 25 when I needed 5.

Pic 2 and 3 Next install the new shifter rod into the other plate.

Pic 4 Then take the plate and install it onto the moddified t case casing. Install the shift fork and spring on at this time as well.
 

Attachments

  • Picture1 009.jpg
    Picture1 009.jpg
    39.9 KB · Views: 543
  • Picture1 008.jpg
    Picture1 008.jpg
    31.2 KB · Views: 542
  • Picture1 007.jpg
    Picture1 007.jpg
    37.5 KB · Views: 554
  • Picture1 005.jpg
    Picture1 005.jpg
    52.2 KB · Views: 539


Sweet! Thanks for the info matt! I can see where the plate was welded in. My slave never bled quiteright either. Piece o crap. I think I need to take it to a shop with a power bleeder, but my clutch is pretty much toast anyway, so whuwaste the money?

I like that doubler! Did you clock it at all?


Sorry, getting ahead of you.


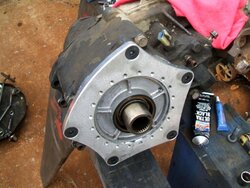
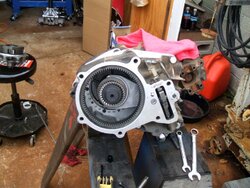
First pic. After that then install the 10 small bolts that hold the two plates together. A person with small hands comes in handy to help do this. Tracy pretty much assembled the whole thing as I was watching from the back ground. I tried to clock it but didnt have the clearance with out a body lift. I have ideas on hwo to resolve this later :D

Second pic. Once the 10 bolts are in put the new shaft in as well as the shift collar.

Third pic. Then install the front of the case back in. Once thats on you have the assembly complete.

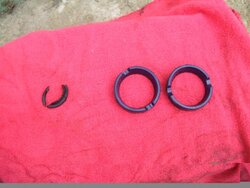
Forth pic. On a side note I had a real sloppy shifter in my tranny. so I pulled the cover to see what kind of shape the bushings were in. On the left was the old bushings I pulled out, on the right are the new ones I put in. Now I know why my shifter was so sloppy.
 

Attachments

  • Picture1 014.jpg
    Picture1 014.jpg
    50.2 KB · Views: 534
  • Picture1 016.jpg
    Picture1 016.jpg
    55.3 KB · Views: 529
  • Picture1 010.jpg
    Picture1 010.jpg
    58 KB · Views: 532
  • Picture1 011.jpg
    Picture1 011.jpg
    46.8 KB · Views: 540


That is about as worn out as a bushing can get. Tracy does real good work, I think she is a keeper! :confused: :eek: :rolleyes:


That's it matt...put that girl to work :p

Seriously though, you gotta lock this thing in...Don't let her get away. If not then you'll have to be the one getting your hands all greasy. :p


Stic-o said:
That's it matt...put that girl to work :p

Seriously though, you gotta lock this thing in...Don't let her get away. If not then you'll have to be the one getting your hands all greasy. :p

I wish I could convince my girl to do my dirty work.


What are you guys talking about. You mean most girls wont grab a grinder and start cutting plates for the modified tranny cross member. :D ;)
 

Attachments

  • Picture1 017.jpg
    Picture1 017.jpg
    49.1 KB · Views: 508


The only time my wife picked up a grinder was at Sears for a x-mas. :rolleyes: But I'm ok with that. ;)

But really get Tracy a ring like this :p

men's_11.jpg


RockRanger said:
What are you guys talking about. You mean most girls wont grab a grinder and start cutting plates for the modified tranny cross member. :D ;)
Ahhhhhhhhhh, my Wife doesn't even want me doing that around the house; "Do you have to make so much noise?" "How much longer are you going to be doing that?", etc... I tried to teach her about tools, so she could get some quality family time in the garage helping out, but she has no interest. :p


Join the Elite Explorers for $20 each year.
Elite Explorer members see no advertisements, no banner ads, no double underlined links,.
Add an avatar, upload photo attachments, and more!
.


So after being on the road for the last few months for work I got a chance to work on the truck a bit. I started by trying to get it to start after putting a new clutch in. Ended up being a corroded battery cables. Then I started working on the duel cases. I got the shifters figured out. The front case is shifted by the stock linkage. the rear case id being shifted by a rod that I made out of 3/8 rod. I cut and welded it to fit up through the floor and clear everything.

Things I still need to do to complete the duel cases:

Get a shift boot that will fit. Probably have Tracy sew one up for me.

Get a knob to fit the new shifter. Anyone know where to get one cheap. All I want is a basic one not a bling vtozone one whih is all I can find.

I need to extend the speddo cable. Anyone have any ideas on how to do this? I need it about 6" to a foot longer.

New Dr Pepper cup holder cause the one I had wont fit.

Now the pictures:

First one is the hole cut in the floor to allow the shifter to come into the cab.

Second one shows the shifter I made.

Third one shows the shifter in the cab.

Fourth one is the speedo cable that needs to be extended. Anyone have any ideas on how to do this?
 

Attachments

  • tracy fall august 13 002.jpg
    tracy fall august 13 002.jpg
    47.5 KB · Views: 435
  • tracy fall august 13 003.jpg
    tracy fall august 13 003.jpg
    14.1 KB · Views: 426
  • tracy fall august 13 005.jpg
    tracy fall august 13 005.jpg
    33.5 KB · Views: 431
  • truck 002.jpg
    truck 002.jpg
    42.3 KB · Views: 431


Back
Top