-
Performance Upgrades - Maintenance - Modifications - Problem Solving - Off-Road - Street Trucks.
Covering the Explorer, ST, Sport, Lincoln Aviator, Sport Trac,
Mercury Mountaineer, Mazda Navajo, Ford Ranger, Mazda Pickups, and the Aerostar.
Featuring H.I. - Human Intelligence.
Register Today It's free!
- Forums
- Generation Specific Forums
- 1995 - 2001 Explorer Ranger Merc. 2nd Generation
- Modified 1995-2001 Explorers
You are using an out of date browser. It may not display this or other websites correctly.
You should upgrade or use an alternative browser.
You should upgrade or use an alternative browser.
Sandbox2.000 Suspension Build
- Thread starter 97Sandbox
- Start date
Elite Explorer members see no advertisements, no banner ads, no double underlined links,.
Add an avatar, upload photo attachments, and more!.
97Sandbox
Elite Explorer
- Joined
- February 7, 2019
- Messages
- 1,090
- Reaction score
- 986
- City, State
- Seward, NE
- Year, Model & Trim Level
- 2000 Explorer Sport
It may be coming out tonight if I find some time, otherwise tomorrow. I'm also debating if I can do a better job trimming the bump stop bracket with a cutting disk on my angle grinder -- we'll see.Good step, now where's the sawzall.
- Joined
- June 17, 2004
- Messages
- 24,263
- Reaction score
- 4,729
- City, State
- Knoxville, TN
- Year, Model & Trim Level
- 98 Limited AWD 302
Yeah, that bump stop is a little low when having the ride height down much. My Mountaineer worked great with the shorter EE bump stops, but my 98 Limited's both bottom out too much, and they are nearly stock height. Having that frame mount a little higher would be very good.
97Sandbox
Elite Explorer
- Joined
- February 7, 2019
- Messages
- 1,090
- Reaction score
- 986
- City, State
- Seward, NE
- Year, Model & Trim Level
- 2000 Explorer Sport
Good point about the height! I'm actually trimming the bracket back (not up) to clear the coil spring. I have some Energy Suspension bump stops that can be trimmed down to various heights. I'm hoping I can make do with the bracket at the height it is now by just making a short bump stop. We'll see though!Yeah, that bump stop is a little low when having the ride height down much. My Mountaineer worked great with the shorter EE bump stops, but my 98 Limited's both bottom out too much, and they are nearly stock height. Having that frame mount a little higher would be very good.
- Joined
- June 17, 2004
- Messages
- 24,263
- Reaction score
- 4,729
- City, State
- Knoxville, TN
- Year, Model & Trim Level
- 98 Limited AWD 302
I haven't taken a stock bump stop apart, but I think they are almost all rubber, just the top base of it is steel. My Limited's have the optional version that is partly hollow, they compress slightly further before bottoming out. They were obsolete long ago though, so that doesn't really help.
97Sandbox
Elite Explorer
- Joined
- February 7, 2019
- Messages
- 1,090
- Reaction score
- 986
- City, State
- Seward, NE
- Year, Model & Trim Level
- 2000 Explorer Sport
No progress on the coilover conversion itself last night, but I did some work on the LCA I pulled off. I'm replacing the rubber bushings with poly ones from Energy Suspension. The sleeves pressed out okay, but the rubber bushings are hanging on so far. Due to the shape of the arm, I'm having to use my ball joint press instead of my shop press and it's just going to take finding the right size socket/stack of washers to let me push out the bushings without just folding them in in themselves. Hopefully tonight I get them out then I can clean everything up and start drilling holes for the lower coilover bracket.
Cobraguy
Explorer Addict
- Joined
- February 22, 2008
- Messages
- 2,526
- Reaction score
- 29
- City, State
- Phoenix...Greatest City on Earth
- Year, Model & Trim Level
- 1995 EB & 1999 EB 5.0
I've actually had to torch those things out before. They just get stuck so bad a press won't get it done...even with the correct Rotunda tools. Stinks up the whole shop.
97Sandbox
Elite Explorer
- Joined
- February 7, 2019
- Messages
- 1,090
- Reaction score
- 986
- City, State
- Seward, NE
- Year, Model & Trim Level
- 2000 Explorer Sport
Yeah, I had to use the torch to get the OEM shackle bushings out of the frame in my '97 when I installed poly bushings -- it's nasty business worth avoiding if possible!I've actually had to torch those things out before. They just get stuck so bad a press won't get it done...even with the correct Rotunda tools. Stinks up the whole shop.
- Joined
- June 17, 2004
- Messages
- 24,263
- Reaction score
- 4,729
- City, State
- Knoxville, TN
- Year, Model & Trim Level
- 98 Limited AWD 302
Ditto, I've chosen to buy new CA's since pressing them out of my old 73 Ranchero LCA's in the early 90's. That's a dangerous process sometimes.
97Sandbox
Elite Explorer
- Joined
- February 7, 2019
- Messages
- 1,090
- Reaction score
- 986
- City, State
- Seward, NE
- Year, Model & Trim Level
- 2000 Explorer Sport
I used a hacksaw to cut a slot in each bushing which allowed me to peel them away from the metal a bit, but hacksawing rubber is not easy. I'm considering putting a socket in the ID of the bushing to stop it from collapsing on itself and see if I have better luck pressing them that way. I'd really prefer to keep these original LCAs because they're in really good shape -- the original coating is still in-tact under the dirty outside layer.Ditto, I've chosen to buy new CA's since pressing them out of my old 73 Ranchero LCA's in the early 90's. That's a dangerous process sometimes.
97Sandbox
Elite Explorer
- Joined
- February 7, 2019
- Messages
- 1,090
- Reaction score
- 986
- City, State
- Seward, NE
- Year, Model & Trim Level
- 2000 Explorer Sport
Bushings are out! Used a pick to work some lube in around the bushings then pressed out with the ball joint press. One left some rubber behind, so I'll scrape what I can and torch the rest.
Cleanup and touch up painting still to come, then reassembly with the coilover kit woohoo!
Cleanup and touch up painting still to come, then reassembly with the coilover kit woohoo!
97Sandbox
Elite Explorer
- Joined
- February 7, 2019
- Messages
- 1,090
- Reaction score
- 986
- City, State
- Seward, NE
- Year, Model & Trim Level
- 2000 Explorer Sport
Spent most of the day on house projects, but managed to make some progress on the coilover conversion tonight.
Poly bushings pressed into LCA, mounts mounted, and bump stop bracket cut back. Here's a quick test fit:

I would've finished this side tonight, but it turns out I'll need a spring compressor to put my coilovers together and I don't have one. Oh well, tomorrow's another day!
Poly bushings pressed into LCA, mounts mounted, and bump stop bracket cut back. Here's a quick test fit:
I would've finished this side tonight, but it turns out I'll need a spring compressor to put my coilovers together and I don't have one. Oh well, tomorrow's another day!
- Joined
- August 3, 2000
- Messages
- 31,623
- Reaction score
- 8,263
- City, State
- NORTH IDAHO, 7B
- Year, Model & Trim Level
- B2 "Slightly" Modified
- Callsign
- FOURTEN
harbor freight has a new design of the "simple" threaded rod type spring compressors, $35

 www.harborfreight.com
they have worked well on coil overs for me. I just swapped springs in my wife's swayaways last month, her springs were too soft
www.harborfreight.com
they have worked well on coil overs for me. I just swapped springs in my wife's swayaways last month, her springs were too soft
The key is to get the tool set on the absolute furthest coil you can from each other, put the tool in there and then rotate as far down and hte other side as far up as possible.
I do this so often though that I ended up also buying a much much larger strut spring compressor from Amazon, $250 gets 5 stars. I still need to put it together, I have another friend with a Tacoma we are doing new struts on his truck next month.
I am super impressed you were able to press out the LCA bushings
It has always been the torch for me, NASTY! I would rather use the pick/lube and press method myself!! Thanks for that!
MacPherson Strut Spring Compressor Set
Amazing deals on this Macpherson Strut Spring Compressor Set at Harbor Freight. Quality tools & low prices.
www.harborfreight.com
The key is to get the tool set on the absolute furthest coil you can from each other, put the tool in there and then rotate as far down and hte other side as far up as possible.
I do this so often though that I ended up also buying a much much larger strut spring compressor from Amazon, $250 gets 5 stars. I still need to put it together, I have another friend with a Tacoma we are doing new struts on his truck next month.
I am super impressed you were able to press out the LCA bushings
It has always been the torch for me, NASTY! I would rather use the pick/lube and press method myself!! Thanks for that!
97Sandbox
Elite Explorer
- Joined
- February 7, 2019
- Messages
- 1,090
- Reaction score
- 986
- City, State
- Seward, NE
- Year, Model & Trim Level
- 2000 Explorer Sport
I rented a spring compressor from AutoZone to see if I could avoid buying the HFT one for once (I shop there too much lol). I could only get 3 coils per side without hitting the shock and that was not enough to compress the inch or so I needed to. Ended up taking off one end of the shock, dropping on the spring and re threading the eye on. Scratched up the coil and chewed up the locknut pretty good getting everything back together...oh well, this is no show car anyhow.

Slowly coming back together.
Slowly coming back together.
Yeah there was a lot of trial and error before I got the right mix of washers and sleeves on the BJ press and worked enough lube around the bushings. I'll take some pics of the process when I do the passenger side.I am super impressed you were able to press out the LCA bushings
It has always been the torch for me, NASTY! I would rather use the pick/lube and press method myself!! Thanks for that!
- Joined
- June 16, 2003
- Messages
- 31,574
- Reaction score
- 3,244
- City, State
- Humboldt, KS
- Year, Model & Trim Level
- 2000 Mounty
This will sound funny, but the cheapest repair for the spring scratches,
Take the other spring to Walmart, get a bottle of close as you can nail polish.
That will slow rusting.
Take the other spring to Walmart, get a bottle of close as you can nail polish.
That will slow rusting.
97Sandbox
Elite Explorer
- Joined
- February 7, 2019
- Messages
- 1,090
- Reaction score
- 986
- City, State
- Seward, NE
- Year, Model & Trim Level
- 2000 Explorer Sport
Haha I used to get nail polish to touch up my hotwheels as a kid, totally forgot about that. Good quality enamel and comes in more colors than you can imagineThis will sound funny, but the cheapest repair for the spring scratches,
Take the other spring to Walmart, get a bottle of close as you can nail polish.
That will slow rusting.
97Sandbox
Elite Explorer
- Joined
- February 7, 2019
- Messages
- 1,090
- Reaction score
- 986
- City, State
- Seward, NE
- Year, Model & Trim Level
- 2000 Explorer Sport
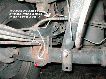
One thing I wanted to mention for anyone running a larger front swaybar and lowering their Ex; I bought shorter sway bar links in effort to keep the bar closer to the factory position with the truck at ride height, but they won't actually work. You can see in the last picture, the 1.5" sway bar is fairly close to the tie rod with the stock-length link. If you go much shorter, they get too close/run into each other. I don't think running the stock length link in the front will be a problem though.
Side note, I'm already running the shorter (F-250) rear links because my 1" swaybar was able to just barely touch my shocks and the shorter links helped lift the bar out of the way a bit. Once I get blocks in the rear and lift the axle (and thus the swaybar) I don't think there will be any bar close to the shocks anymore.
Side note, I'm already running the shorter (F-250) rear links because my 1" swaybar was able to just barely touch my shocks and the shorter links helped lift the bar out of the way a bit. Once I get blocks in the rear and lift the axle (and thus the swaybar) I don't think there will be any bar close to the shocks anymore.
Elite Explorer members see no advertisements, no banner ads, no double underlined links,.
Add an avatar, upload photo attachments, and more!.
97Sandbox
Elite Explorer
- Joined
- February 7, 2019
- Messages
- 1,090
- Reaction score
- 986
- City, State
- Seward, NE
- Year, Model & Trim Level
- 2000 Explorer Sport
Set out for a 2" drop, ended up with a 1" lift...oops 

Just one of those things where all you can do is chuckle and move on -- if I wanted an easy truck to modify, I would've gotten a Chevy.
I see the lowered folks running QA1 coilovers are using 10" springs, I guess that's what I need to do because my 12" springs are just too long for the height I'm going for (collar already at the end of its range). At least springs aren't too pricy compared to the shocks!
Featured images


Featured images
Similar Threads
- Replies
- 1
- Views
- 1,253
- Replies
- 7
- Views
- 1,658
- Replies
- 0
- Views
- 1,291