Scott B.
Explorer Addict
- Joined
- February 15, 1999
- Messages
- 2,822
- Reaction score
- 28
- City, State
- GA
- Year, Model & Trim Level
- '93 Ranger XLT
I decided to add an air tank to my on-board air system. Initially, I thought I didn't need a tank, since I don't run air tools on the trail. After much discussion (with you know who you are!) I changed my mind.
At this point, I am still not planning on using air tools, but the tank will make airing up the tires much faster.
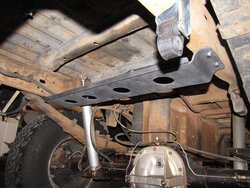
The air compressor I am using is a Viair 450P - yes, it started life as a portable. Originally, I had an ARB in this truck, and the 450P was for the other truck. Seeing as the 450P is a higher volume unit, (and this is the truck where I will need air) I decided to swap. The compressor is mounted in the bed, under the sleeping platform.
If the design of this mount looks familiar, consider it Version 2 - with Version 1 being Brian1's. (Thanks, Brian!)
The differences to mine are 3/16" steel and ribs along each side - both limit the middle of the plate from flexing.
On to the pictures.
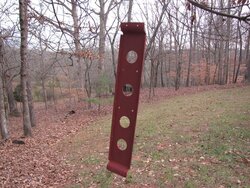
I started with a cardboard template, then cut and drilled a piece of flat steel.
The original idea called for the ribs (or wings) to be bent. It turns out, the fab shop couldn't bend a 1/2" piece. The solution was to cut the rib off and weld it back on at an angle.
At this point, I am still not planning on using air tools, but the tank will make airing up the tires much faster.
The air compressor I am using is a Viair 450P - yes, it started life as a portable. Originally, I had an ARB in this truck, and the 450P was for the other truck. Seeing as the 450P is a higher volume unit, (and this is the truck where I will need air) I decided to swap. The compressor is mounted in the bed, under the sleeping platform.
If the design of this mount looks familiar, consider it Version 2 - with Version 1 being Brian1's. (Thanks, Brian!)
The differences to mine are 3/16" steel and ribs along each side - both limit the middle of the plate from flexing.
On to the pictures.
I started with a cardboard template, then cut and drilled a piece of flat steel.
The original idea called for the ribs (or wings) to be bent. It turns out, the fab shop couldn't bend a 1/2" piece. The solution was to cut the rib off and weld it back on at an angle.


 :
:


