Nick26
Explorer Addict
- Joined
- June 30, 2003
- Messages
- 1,131
- Reaction score
- 12
- City, State
- Cumberland, RI
- Year, Model & Trim Level
- 98' 5.0 XLT
Not sure who remembers this thread: http://www.explorerforum.com/forums/showthread.php?t=105207
But I did it and have put nearly 5000 trouble free miles on it so far...
Some notes for people who might want to do this or any SOA for that matter:
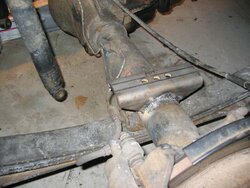
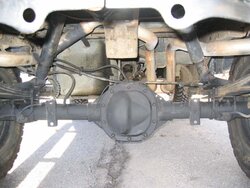
• The perches I got were from M.O.R.E. offroad but the holes drilled in them are only 1/2" and the peg on the bottom of my leaf spring needed at least a 5/8" hole. So I had to drill those out.
• Also to move the axle about an inch closer and aim the pinion up slightly, I used the furthest back hole. This ending up being a key move because at first I had tons of vibes from my driveshaft slip joint almost seperating (which it did during the install when drooped) and the angle. I tried using the center hole first for a day and immediately changed it the next day. Now its smoother than it was even before the install (my stock tires which were on before were badly balanced)
• The brake lines reached perfectly fine (with a good amount of slack even) after carefully bending the bracket on the frame straight down.
• I rerouted the parking brake cables over the springs and flipped the bracket on the driverside frame. It still works perfectly and reaches fine.
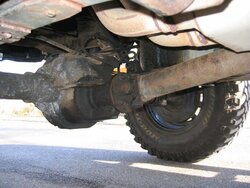
• I trashed the thrid shock/dampener weight that I had and there is no noticiable difference.
• Originally I mounted the shocks on the spring plates flipped and switched sides, which would have worked except for my exhaust. I have dual exhaust pipes that go out both sides and the shocks were really rubbing and pushing on them. So instead I used the bolt and made a stud on the sway bar mount and bolted them to that. This has worked great.
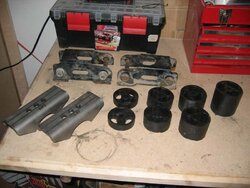
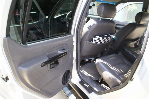
The body lift part was pretty straight forward. I just jacked the truck up from the rear body and replaced each block at a time. The only thing that isn't perfect about this is now my 3in adapter for my 5spd shifter is hitting the plastic shift boot in first. Also I had to slightly modify my tcase shifter which was custom anyway.
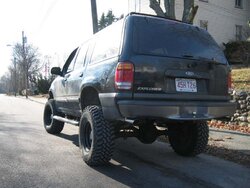
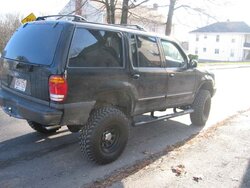
Overall with a 2 inch TT and a 3 inch body lift up front and the 6" SOA in the rear, the truck sits fairly even with a nice little rake. Then theres an idea I had for getting another inch up front: putting 1" drop spacers in the mounts for the front axle, so I can TT another inch without stressing the CV's. Seems like it could work, but the front crossmember could be in the way of diff cover, nothing a BFH can't fix... Also, i realize the geometry would be a little off from this making the cv shaft no longer parallel ot the A arms, thats why I'm still thinking about it.
anyway now for the pics:
if your interested here is some more pics I took during the process email me for a folder of them.
Since a lot of people have private messaged me and asked me for the dimensions of the blocks and i forgot the measurements when I installed them... i redid the math to post here. First off these are measurements for a 2nd gen 4 door, if someone wants to measure a sport and let me know I'll post that here too.
Body mount #1: 3"
Body mount #2 (46" from the first mount ~28%): 2 3/16"
Body mount #3 (77" from the first mount ~47%: 1 9/16"
Body mount #4 (120" from the first mount ~78%): 3/4"
Body mount #5 (163" from the first mount): 0"
So if you are careful you can use the left over piece cut off body mount 2 for body mount 4 and it should only take 1 3" block to make the 2 sides for mount 3. So in all you should only need 5 blocks to do this. Disclaimer: These are rough measurements i did in 5 mins with a tape measure and pendulum so it wouldn't hurt to double check my math.
But I did it and have put nearly 5000 trouble free miles on it so far...
Some notes for people who might want to do this or any SOA for that matter:
• The perches I got were from M.O.R.E. offroad but the holes drilled in them are only 1/2" and the peg on the bottom of my leaf spring needed at least a 5/8" hole. So I had to drill those out.
• Also to move the axle about an inch closer and aim the pinion up slightly, I used the furthest back hole. This ending up being a key move because at first I had tons of vibes from my driveshaft slip joint almost seperating (which it did during the install when drooped) and the angle. I tried using the center hole first for a day and immediately changed it the next day. Now its smoother than it was even before the install (my stock tires which were on before were badly balanced)
• The brake lines reached perfectly fine (with a good amount of slack even) after carefully bending the bracket on the frame straight down.
• I rerouted the parking brake cables over the springs and flipped the bracket on the driverside frame. It still works perfectly and reaches fine.
• I trashed the thrid shock/dampener weight that I had and there is no noticiable difference.
• Originally I mounted the shocks on the spring plates flipped and switched sides, which would have worked except for my exhaust. I have dual exhaust pipes that go out both sides and the shocks were really rubbing and pushing on them. So instead I used the bolt and made a stud on the sway bar mount and bolted them to that. This has worked great.
The body lift part was pretty straight forward. I just jacked the truck up from the rear body and replaced each block at a time. The only thing that isn't perfect about this is now my 3in adapter for my 5spd shifter is hitting the plastic shift boot in first. Also I had to slightly modify my tcase shifter which was custom anyway.
Overall with a 2 inch TT and a 3 inch body lift up front and the 6" SOA in the rear, the truck sits fairly even with a nice little rake. Then theres an idea I had for getting another inch up front: putting 1" drop spacers in the mounts for the front axle, so I can TT another inch without stressing the CV's. Seems like it could work, but the front crossmember could be in the way of diff cover, nothing a BFH can't fix...
Also, i realize the geometry would be a little off from this making the cv shaft no longer parallel ot the A arms, thats why I'm still thinking about it.anyway now for the pics:
if your interested here is some more pics I took during the process email me for a folder of them.
Since a lot of people have private messaged me and asked me for the dimensions of the blocks and i forgot the measurements when I installed them... i redid the math to post here. First off these are measurements for a 2nd gen 4 door, if someone wants to measure a sport and let me know I'll post that here too.
Body mount #1: 3"
Body mount #2 (46" from the first mount ~28%): 2 3/16"
Body mount #3 (77" from the first mount ~47%: 1 9/16"
Body mount #4 (120" from the first mount ~78%): 3/4"
Body mount #5 (163" from the first mount): 0"
So if you are careful you can use the left over piece cut off body mount 2 for body mount 4 and it should only take 1 3" block to make the 2 sides for mount 3. So in all you should only need 5 blocks to do this. Disclaimer: These are rough measurements i did in 5 mins with a tape measure and pendulum so it wouldn't hurt to double check my math.