-
Performance Upgrades - Maintenance - Modifications - Problem Solving - Off-Road - Street Trucks.
Covering the Explorer, ST, Sport, Lincoln Aviator, Sport Trac,
Mercury Mountaineer, Mazda Navajo, Ford Ranger, Mazda Pickups, and the Aerostar.
Featuring H.I. - Human Intelligence.
Register Today It's free!
You are using an out of date browser. It may not display this or other websites correctly.
You should upgrade or use an alternative browser.
You should upgrade or use an alternative browser.
SOHC: whats this part?
- Thread starter IZwack
- Start date

Elite Explorer members see no advertisements, no banner ads, no double underlined links,.
Add an avatar, upload photo attachments, and more!.
Russ in CT
Well-Known Member
- Joined
- November 11, 2002
- Messages
- 176
- Reaction score
- 0
- City, State
- Milford, CT
- Year, Model & Trim Level
- '99 XLT
I measured my old parts, and it seems your piece is not the jackshaft tensioner after all, but rather the balance chain tensioner.
The jackshaft tensioner metal strips are about 9/16" wide, about 3 3/8" long (if flattened).
The balance tensioner metal strips are just a hair under 1/2" (maybe 31/32"), and about 2 3/8" long (if flattened).
So your piece appears to balance chain tensioner (measure yours once more to be sure).
That tensioner has just two metal strips, so yours is down to one. You can replace just the tensioner without pulling the front cover, but if you want to replace the chain too (and gears of course), you'll need to remove the jackshaft chain (which means you need to timing aligment tools), so if you do the whole balance kit you might as well do the jackshaft kit since the parts are cheap enough.
To do just the balance tensioner (you won't need any timing TDC alignment tools, tensioner is < $20), you remove the front axle, remove engine mounting bolts, remove starter, remove lower pan & oil pickup, remove ladder frame bolts (some of these are tricky, especially at back of pan), jack up engine, optionally remove the drivers side Cat (won't have to jack engine as high), remove ladder frame.
gaskets are reusable. You might want to do the oil pump too since its right there. You need a 10mm Star socket to remove the two tensioner bolts.
Tools I know you need (may be more, just from memory):
- 13 mm socket
- 18 mm socket
- 10 mm socket
- 10 mm Star socket
- Torx bit - size? (rear ladder frame bolts, oil pickup)
- assorted extensions
Here is a link with details on those ladder frame bolts: (scroll down to 4.0 SOHC E engine)
http://www.autozone.com/az/cds/en_us/0900823d/80/0b/8f/f8/0900823d800b8ff8/repairInfoPages.htm
IZwack
Moderator Emeritus
- Joined
- February 5, 2003
- Messages
- 21,675
- Reaction score
- 49
- City, State
- Germantown, MD
- Year, Model & Trim Level
- 1998 Ford Explorer
Wow thanks a lot Russ in CT!!
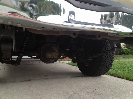
The stock axle is no longer there and the cats have all been removed already -- so this puts me a little bit ahead. DOes the transmission need to be moved back?

(pardon the red squares)
BTW you dont happen to have the part number do you?
The stock axle is no longer there and the cats have all been removed already -- so this puts me a little bit ahead. DOes the transmission need to be moved back?
(pardon the red squares)
BTW you dont happen to have the part number do you?
Russ in CT
Well-Known Member
- Joined
- November 11, 2002
- Messages
- 176
- Reaction score
- 0
- City, State
- Milford, CT
- Year, Model & Trim Level
- '99 XLT
Happen to be home, have my invoice from dealer right here.
Balance Tensioner P/N: (for '99 4.0 SOHC, imagine its the same for '98) 1L2Z 6L266 AA
List price $18.03
From the looks of your photo, you can get the ladder frame off without taking anything off but the starter. Won't even have to jack up motor. Even your tranny cooler lines aren't in the way.
No need to move tranny.
Look at that AZ link though for the comlete list of ladder frame bolts, a couple of them in the back are not easy to find (two large bolts that go from tranny into ladder frame horizontal to ground, two small vertical ones at the very back that are torx head, one long, one short)
All you'll need to do is:
- remove starter
- drain oil
- drop pan
- remove oil pickup (torx)
- remove 8 large ladder frame bolts (6 inside pan, two outside)
- remove ~20-something small ladder frame bolts (last two at the back are the torx)
- remove two large horizontal bolts (from tranny into LF)
- wipe off all the oil that dripped on you
- wack the LF with rubber mallet and it'll drop right out
- use 10 mm Star socket to remove two balance tensioner bolts (careful, these are easy to strip the head, use lots 'o pressure up on the socket to keep it seated)
- leave 'grenade' pin in new tensioner in place until its installed, then pull it out once its in place
- put it all back together (note, LF is a support structure of the engine block, need to torque it down to spec, I'll look up torque specs for ya later)
Stuff you'll need:
- lots of rags for the oil bath you're going to take
- tools mentioned above
- new balance tensioner
- new gasket for oil pickup (you need this even if you get a new oil pump with its two gaskets)
- new oil pump? Much cheaper at auto zone than dealer - comes with the two gaskets you'll need (when you drop the pump, the drive shaft (above) will drop out with it, take note of which end of shaft is up) Fill new intake pump with oil, turn drive shaft by hand, add more oil, repeat until oil comes out other end
- silicone sealant (used for main journal humps at front and rear of LF, replace grey factory stuff that will crumble into pieces with a small bead on LF during install - silicone only in hump area, leave flat surfaces dry)
IZwack
Moderator Emeritus
- Joined
- February 5, 2003
- Messages
- 21,675
- Reaction score
- 49
- City, State
- Germantown, MD
- Year, Model & Trim Level
- 1998 Ford Explorer
You were dead on Russ in CT -- it was indeed the balance tensioner, of which there wasn't much left of.
I took a lot of pics and Ill do a writeup on the process in a few days (took the "ladder frame" and oil pan to the machine shop for some cleaning and hot tanking). But here is what is left of the tensioner:
The other metal strip was found in pieces -- lodged inside the oil pickup (before the metal screen):

Broken tensioner thingy found at the bottom of the "ladder frame":

And this is where everything came from:

I took a lot of pics and Ill do a writeup on the process in a few days (took the "ladder frame" and oil pan to the machine shop for some cleaning and hot tanking). But here is what is left of the tensioner:
The other metal strip was found in pieces -- lodged inside the oil pickup (before the metal screen):
Broken tensioner thingy found at the bottom of the "ladder frame":
And this is where everything came from:
Willard
Explorer Addict
- Joined
- March 16, 2007
- Messages
- 3,171
- Reaction score
- 8
- City, State
- Bloomington, Indiana
- Year, Model & Trim Level
- 04 Ranger Edge
- Joined
- June 17, 2004
- Messages
- 24,263
- Reaction score
- 4,729
- City, State
- Knoxville, TN
- Year, Model & Trim Level
- 98 Limited AWD 302
Excellent, that's good news for you for the short term. BTW, the Mark VIII fan is what I'm trying to get a look at. The 302's only have about 3.75" of total space between the radiator and the water pump shaft.
While you are under there, check the two timing marks on the balancer, be sure that they line up. That will tell you if that chain had jumped any teeth.
While you are under there, check the two timing marks on the balancer, be sure that they line up. That will tell you if that chain had jumped any teeth.
IZwack
Moderator Emeritus
- Joined
- February 5, 2003
- Messages
- 21,675
- Reaction score
- 49
- City, State
- Germantown, MD
- Year, Model & Trim Level
- 1998 Ford Explorer
Thanks -- I'll be sure to do that once I get the replacement tensioner. But just to make sure I get this straight, one mark is on the balancer's sprocket and where is the other?While you are under there, check the two timing marks on the balancer, be sure that they line up. That will tell you if that chain had jumped any teeth.
- Joined
- June 17, 2004
- Messages
- 24,263
- Reaction score
- 4,729
- City, State
- Knoxville, TN
- Year, Model & Trim Level
- 98 Limited AWD 302
Excellent, I think the manual I was reading showed just dots. That looks correct on your engine. Well done, carefully button that back up and see what you have.
IZwack
Moderator Emeritus
- Joined
- February 5, 2003
- Messages
- 21,675
- Reaction score
- 49
- City, State
- Germantown, MD
- Year, Model & Trim Level
- 1998 Ford Explorer
Thanks for your help CDW6212R and Russ in CT!
I'd love to see what I have but it'll be at least a few more months until the engine gets cranked again -- this tensioner is just a small distraction from my Dana 60 project.
I'd love to see what I have but it'll be at least a few more months until the engine gets cranked again -- this tensioner is just a small distraction from my Dana 60 project.
Russ in CT
Well-Known Member
- Joined
- November 11, 2002
- Messages
- 176
- Reaction score
- 0
- City, State
- Milford, CT
- Year, Model & Trim Level
- '99 XLT
Ya know, that looks like too much metal to all be just from the one other strip from the balance tensioner. balance tensioner only has two strips, the one you found at bottom of pan, and one other just like it. That chewed up stuff looks like too much to be just that other strip (but difficult to tell scale in that photo).
Can you make sure that all those pieces are the same width? Yea, gonna be tough since its all chewed up, but if ANY of them are any wider than just barely 1/2" (31/32") of the balance tensioner (Jackshaft tensioner metal strips are about 9/16" wide), OR if there is more metal in total than the intact other piece (maybe you could find a scale to compare chewed up bits weight with intact piece weight, see if they are the same?), than you also have metal strips from the jackshaft tensioner.
That means you'd have to pull the front cover, get those timing tools, and do the jackshaft kit. Better safe than sorry. If you wanted to really cheap out you could prolly do just the tensioner, wouldn't need the timing tools then (might as well do the plastic guide on the other side of chain as well), but it'd be a shame to get all that way in there and not do it right.
Russ in CT
Well-Known Member
- Joined
- November 11, 2002
- Messages
- 176
- Reaction score
- 0
- City, State
- Milford, CT
- Year, Model & Trim Level
- '99 XLT
...also, with that much metal clogging up the screen, better check out your rod bearings while you have the LF off. Just pull the first and last connecting rod caps, and see what the bearings look like. Maybe get some green plasitigage and see what your clearances are (rod bearings tend to be the first to go when oil restriction occurs, if there was damage, you'd see it in these bearings).
It'll only take you a short time to check these bearings out. I still owe you the torque specs for the LF bolts, I'll get you the rod bolt specs too for reassembly.
It'll only take you a short time to check these bearings out. I still owe you the torque specs for the LF bolts, I'll get you the rod bolt specs too for reassembly.
IZwack
Moderator Emeritus
- Joined
- February 5, 2003
- Messages
- 21,675
- Reaction score
- 49
- City, State
- Germantown, MD
- Year, Model & Trim Level
- 1998 Ford Explorer
Will do.
I did measure them and yep they are the same width as the single curled one I found in the pan.
EDIT -- for the record and anyone following this thread in the future, there is a washer sitting under the two front-most center bolts of the ladder frame. I did not know this until I went and picked up the ladder frame from the machine shop. They were stuck onto the ladder frame and did not fall off until it was hot tanked.
IZwack
Moderator Emeritus
- Joined
- February 5, 2003
- Messages
- 21,675
- Reaction score
- 49
- City, State
- Germantown, MD
- Year, Model & Trim Level
- 1998 Ford Explorer
The ladder frame will probably not get powder coated and just left bare. What will get coated are the four aluminum air-shock tubes because they attract dirt very easily and could use a tough coating from the small rocks that fly up.
Featured images


Featured images