Stephen Cannon
Well-Known Member
- Joined
- August 25, 2018
- Messages
- 242
- Reaction score
- 25
- City, State
- DFW METROPLEX
- Year, Model & Trim Level
- 2018 Explorer Sport
This is a fairly simple project so hopefully everyone can understand without photos.
Project: Replace the OEM incandescent rear back up and turn signal bulbs, 2018 Explorer Sport.
Tools needed
8mm socket, either 8mm nut driver or socket with about a 3 inch extension (3')
Bridge Connectors (AKA T Taps this takes the wires side by side and crimps a piece of metal between them and bridges the connection to avoid splicing. (4)
Resistor (2)
Small narrow flat head screw driver.
Sylvania 7740 LED series bulbs 7440 LED (Back up/Reverse lights) (2)
7440A (Amber, Turn signal/4 way Hazard/flasher) (2)
Should come two to a pack so that makes it easy. I was able to find the 7440 locally but not so much on the 7440A I went with Amazon for those. REMEMBER LED Version other than the package saying LED there is no marking difference so pay attention.
I will describe how the process SHOULD go and then where I had some challenges.
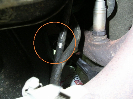
1. Remove the two 8mm bolts from the housing, There are two round about quarter size protective caps, take a small narrow medium length flathead screwdriver. The locking tabs are at 3 and 9 O Clock. I recommend 9 but if you decide with 3 then wrap the screwdriver in a micro fiber towel since you might have to pry against the body . With the one tab removed the other should be easy, BE CAREFUL they will roll away...ask me how I know.
2. Remove the two 8mm retaining bolts slowly. Grab the assembly above end below the retaining bolts. Pull VERY slowly back and you can rest on the inside lift gate frame.
3. Back up Light: This is the easy one, this is simply remove and replace. Set parking brake turn ignition ON (accessory mode.....DO NOT START: Check operation if bulb doesn't work try removing and rotating 180 degrees in the socket.
4. Turn Signals, this is where it gets a little more challenging but not overly difficult.
Remove OEM bulb assembly by rotating 1/4 turn Counter Clockwise. MAKE NOTE OF POSITION: There is not a lot of extra slack in the wiring harness and the OEM wires are in my opinion very thin I believe only 18-22 gauge wire. Remove and replace bulb assembly.
This is the technical portion. The turn signals will require a resistor to avoid the "Hyper Flash" of the turn signals. The resistor is fairly simple. Take one side of the resistor and bridge tap into the Turn Signal Positive. Repeat same step for Turn Signal Negative (Ground) wire.
If you want to check operation before resistor that's fine, remember the turn signal will Hyper Flash since there is no resistor.. Don't leave long term but should be O.K to test operation of turn signal. Just like back up lamp if the bulb doesn't work remove and rotate 180 degrees.
RESISTOR CAN GET HOT DO NOT mount to plastic or paint. When re installing the lens assembly there is a slight void between the bumper cap and the frame. The resistor should fit there nicely and give some room for air to circulate around and keep cool.
When installing the lens assembly back to the body make a note of the upper corner. There is a alignment clip there similar to the door clips and slide the lens into the alignment clip. After that the retaining bolt holes should line up. Reinstall bolts and covers.
Should be about 20-30 minutes for both sides.
NOTE In my case I ran out of daylight after the drivers side. Even though I didn't have a resistor on the passengers side I was fine because I left the OEM incandescent amber bulb in. I went to work that night with LED for drivers side and OEM for passengers side. That is why there was no HyperFlash. I finished the process the following morning for the passengers side. Truth be told I cut off a lot more excess extension wire than I was originally thinking but that's fine, tuck extra behind the void near the resistor. Try to avoid contact with resistor housing. The added benefit would be more slack to install connector but I installed my bulb and connector in the housing first then worked with the wiring.
Where I went wrong:
The below step is only applicable if your not good with T taps or bridge connectors. If you are then your DONE.
Bridge T Taps. I am not very good with them yes I followed instructions. I have little manual dexterity in the hands, I have it in the head but lose it in the hands. Long Story short I wound up cutting the OEM connectors way upstream of the bulb connector and spliced in four sections of wire (yes I went with 16-14 speaker wire on this one.!) Take The piece of wiring harness that comes from the body to the first cut point.
Take the OEM Positive wire (Purple/Black) the stripped end of the extension wire (16-14) and one end of the resistor Splice ALL three sections to them selves. After that splice into the connector of your choice. Take the other piece of extension wire and splice into the positive wire coming from the bulb connector side. Repeat step for Negative (Ground) wire.....(Black) Tuck back extra wire and re install lens assembly.
Project: Replace the OEM incandescent rear back up and turn signal bulbs, 2018 Explorer Sport.
Tools needed
8mm socket, either 8mm nut driver or socket with about a 3 inch extension (3')
Bridge Connectors (AKA T Taps this takes the wires side by side and crimps a piece of metal between them and bridges the connection to avoid splicing. (4)
Resistor (2)
Small narrow flat head screw driver.
Sylvania 7740 LED series bulbs 7440 LED (Back up/Reverse lights) (2)
7440A (Amber, Turn signal/4 way Hazard/flasher) (2)
Should come two to a pack so that makes it easy. I was able to find the 7440 locally but not so much on the 7440A I went with Amazon for those. REMEMBER LED Version other than the package saying LED there is no marking difference so pay attention.
I will describe how the process SHOULD go and then where I had some challenges.
1. Remove the two 8mm bolts from the housing, There are two round about quarter size protective caps, take a small narrow medium length flathead screwdriver. The locking tabs are at 3 and 9 O Clock. I recommend 9 but if you decide with 3 then wrap the screwdriver in a micro fiber towel since you might have to pry against the body . With the one tab removed the other should be easy, BE CAREFUL they will roll away...ask me how I know.
2. Remove the two 8mm retaining bolts slowly. Grab the assembly above end below the retaining bolts. Pull VERY slowly back and you can rest on the inside lift gate frame.
3. Back up Light: This is the easy one, this is simply remove and replace. Set parking brake turn ignition ON (accessory mode.....DO NOT START: Check operation if bulb doesn't work try removing and rotating 180 degrees in the socket.
4. Turn Signals, this is where it gets a little more challenging but not overly difficult.
Remove OEM bulb assembly by rotating 1/4 turn Counter Clockwise. MAKE NOTE OF POSITION: There is not a lot of extra slack in the wiring harness and the OEM wires are in my opinion very thin I believe only 18-22 gauge wire. Remove and replace bulb assembly.
This is the technical portion. The turn signals will require a resistor to avoid the "Hyper Flash" of the turn signals. The resistor is fairly simple. Take one side of the resistor and bridge tap into the Turn Signal Positive. Repeat same step for Turn Signal Negative (Ground) wire.
If you want to check operation before resistor that's fine, remember the turn signal will Hyper Flash since there is no resistor.. Don't leave long term but should be O.K to test operation of turn signal. Just like back up lamp if the bulb doesn't work remove and rotate 180 degrees.
RESISTOR CAN GET HOT DO NOT mount to plastic or paint. When re installing the lens assembly there is a slight void between the bumper cap and the frame. The resistor should fit there nicely and give some room for air to circulate around and keep cool.
When installing the lens assembly back to the body make a note of the upper corner. There is a alignment clip there similar to the door clips and slide the lens into the alignment clip. After that the retaining bolt holes should line up. Reinstall bolts and covers.
Should be about 20-30 minutes for both sides.
NOTE In my case I ran out of daylight after the drivers side. Even though I didn't have a resistor on the passengers side I was fine because I left the OEM incandescent amber bulb in. I went to work that night with LED for drivers side and OEM for passengers side. That is why there was no HyperFlash. I finished the process the following morning for the passengers side. Truth be told I cut off a lot more excess extension wire than I was originally thinking but that's fine, tuck extra behind the void near the resistor. Try to avoid contact with resistor housing. The added benefit would be more slack to install connector but I installed my bulb and connector in the housing first then worked with the wiring.
Where I went wrong:
The below step is only applicable if your not good with T taps or bridge connectors. If you are then your DONE.
Bridge T Taps. I am not very good with them yes I followed instructions. I have little manual dexterity in the hands, I have it in the head but lose it in the hands. Long Story short I wound up cutting the OEM connectors way upstream of the bulb connector and spliced in four sections of wire (yes I went with 16-14 speaker wire on this one.!) Take The piece of wiring harness that comes from the body to the first cut point.
Take the OEM Positive wire (Purple/Black) the stripped end of the extension wire (16-14) and one end of the resistor Splice ALL three sections to them selves. After that splice into the connector of your choice. Take the other piece of extension wire and splice into the positive wire coming from the bulb connector side. Repeat step for Negative (Ground) wire.....(Black) Tuck back extra wire and re install lens assembly.