GopherBaroque
Elite Explorer
- Joined
- February 6, 2010
- Messages
- 38
- Reaction score
- 5
- City, State
- Lake Stevens, Washington
- Year, Model & Trim Level
- '95 2D 4WD
- Callsign
- KC7HP
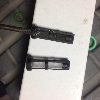
I just pulled the 90amp 3G alternator from my 95 Explorer Sport V6 this evening. People who have not yet done it themselves may be interested in the tools I used so they can round everything up ahead.

Notes:
Serpentine tool may be a bit of a luxury but fit easily through the limited clearance between fan and tensioner pulley. I worked from the bottom to get enough swing to release the belt.
The thin probe is a 1/8" diameter rod I ground like a straight screwdriver. I used it to gently pry the locking tabs on the two electrical connectors to release them. I use the wide needle nose pliers to grip the connector housing and gently rock/pull it out.
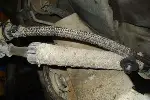
The channel lock was used to release the upper radiator hose clamp. It was a bit of a detour to drain a gallon or two from the radiator but moving that upper hose out of the way gave lots of clearance for messing with the wires on the rear of the alternator. It was just too fussy for me trying to push the hose out of the way.
The 8mm wrench is for disconnecting the battery terminal and the 10mm wrench is for the fat B+ wire on the rear of the alternator.
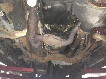
The little foot on the end of the pry-bar was used to unsuccessfully pull the plastic button holding a hose to the side of the alternator. I'll replace the broken button with something (threaded) I can remove easily the next time.
The breaker bar/ratchet/adapter/extension/13mm socket are used to remove the three main mounting bolts as the last step to removal.
The Surefire flashlight, a favorite of mine, is used to get a good view in the nooks and crannies what I am trying to access.
Notes:
Serpentine tool may be a bit of a luxury but fit easily through the limited clearance between fan and tensioner pulley. I worked from the bottom to get enough swing to release the belt.
The thin probe is a 1/8" diameter rod I ground like a straight screwdriver. I used it to gently pry the locking tabs on the two electrical connectors to release them. I use the wide needle nose pliers to grip the connector housing and gently rock/pull it out.
The channel lock was used to release the upper radiator hose clamp. It was a bit of a detour to drain a gallon or two from the radiator but moving that upper hose out of the way gave lots of clearance for messing with the wires on the rear of the alternator. It was just too fussy for me trying to push the hose out of the way.
The 8mm wrench is for disconnecting the battery terminal and the 10mm wrench is for the fat B+ wire on the rear of the alternator.
The little foot on the end of the pry-bar was used to unsuccessfully pull the plastic button holding a hose to the side of the alternator. I'll replace the broken button with something (threaded) I can remove easily the next time.
The breaker bar/ratchet/adapter/extension/13mm socket are used to remove the three main mounting bolts as the last step to removal.
The Surefire flashlight, a favorite of mine, is used to get a good view in the nooks and crannies what I am trying to access.