- Joined
- February 2, 2006
- Messages
- 7,476
- Reaction score
- 53
- City, State
- North East Arkansas
- Year, Model & Trim Level
- 2012 F150 4x4
Torque Monster Headers Install Write-up and Review
Note: Lots of pics give it time to load
I initially was looking for more MPG from my Mountaineer. That search led me to this web site, which I cannot seem to tear myself away from. I found v8boatbuilder’s write up on TMH headers. The install work intrigued me, I like a good challenge. I talked to Bob via email first then I called to pay over the phone. He really knows his stuff, I was impressed with how much he knew about explorers.
I began preparing for the install work by soaking all the bolts that I could reach with everything intact. I used liquid wrench and a clear plastic tube to run the penetrating oil on the bolts.

I started the install the day before my headers arrived. I tracked my package with UPS tracking, so I knew when they would arrive.
Day 1
I started by jacking up my Mountaineer and supporting it on jack stands. I put wheel chocks behind the rear wheels since the AWD parks through the front axle.

I removed the inner fender well on the driver’s side. I took out the spark plugs and moved the wires out of the way. There are some wires that attach to the fender well that have to be removed.

The bolts look wet because of the penetrating oil. I used an impact wrench (cheap one)........

and all of the bolts came right out. I had to remove a heat shield from the back of an accessory on the front of the motor.

The bolts came out very easily, my truck was in Florida before I got it, so it has been in the south. Not having been in the north seems to help a lot.

In order to remove the collector bolts, I decided to drop the drive shaft from the front axle. This allowed me to get a straight shot on the bolts.

I marked the u joint to help keep the shaft lined up. The bolts came out easily.

I removed the dip stick and the manifold came out.

I removed the gasket with a flat screwdriver and polished the block with an air die and buffer pad.


That was it for the driver side. That took less than an hour to do that.
The passenger side fender well came out easily, but my vacuum canister for the HVAC, the lines were brittle and broke right away.

I removed the spark plugs and moved the wires out of the way. Once again, the liquid wrench worked wonders.


I diagramed the spark plug wiring.

I removed the cold air intake and heat shield, both home made.


I took off the heat shield on the manifold.

The manifolds bolts came right out.

Then the fun began. The collector bolts are right at the back of the block. The outside one is easily accessible. The inboard bolt is not quite so easy. At this point everything has taken less than two hours. After I tried for an hour to get a socket on the bolt securely and failing, I had rounded the shoulders off of the head of the bolt. I had to take a small hacksaw and cut the bolt in two.


I got to the bolt by spinning the manifold around with a pipe wrench. Then the manifold came out. If I had of taken some more time I may could have gotten it out without cutting it. Lesson learned- don’t get in a hurry and try not to get frustrated. I broke the polishing pad on my air die so I couldn’t clean up the block.
I next removed the EGR tube. It uses an 1 1/16 wrench for the nuts. The most difficult part is the nut that goes into the EGR. I took off the oil filler neck and that gave me room to swing the wrench to take the nut out. The adapter that goes into the manifold uses a 1” wrench.

Day 2
Day two began with a trip to the parts store to get an easy out to make my air die work again. I got it fixed and polished the block.


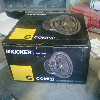
The box arrived UPS.

It was well packaged


The quality is top notch. Of course here is the comparison pics-


I started with the driver’s side. It went in easily, but the exhaust was in the way. I tied the jack to the pipe to pull it down out of the way.

The header bolted right in. I used a 1/4” drive ratchet with ext. and a universal and 3/8” socket. Locktite was applied to all bolts.


I then went to the passenger side, loosened the motor mount bolts, jacked up the motor. I used some old jack wheels to lift the motor.

The header took some wiggling to slide in place, but when it went, it went right in. I used a pipe to push the exhaust back and bolted the header in. I removed a layer of insulation from the heater core box to give me some room. It is held on by one screw and two keepers. I made a major error and forgot to tighten the motor mount bolts. I was able to tighten the outer one but not the inner. The bolts on this side were a little more difficult to tighten with a socket. I used a small wrench to tighten each bolt.

I put in the outside collector bolt easily enough.

The inside bolt was a huge PITA again. I ended up running it through from the wrong side, taking it out, then putting it through the right side. That seemed to help the bolt thread through easier. I talked to Bob later and he told me that the bolts taper and so as they get tighter as they go in. It still took lots of time and patience to get that bolt tight. I then put in the drivers side collector bolts, which were also very tight. They are both accessible from the bottom of the truck.
I bought some exhaust system repair tape to protect my A/C line. Due to the close proximity of the header, I didn't want any heat soak. It was only a couple of bucks, so it was cheap insurance.

It is basically glorified aluminum foil. I left the adhesive cover on the back so it didn’t stick to the tube in case I ever needed to work on it.

I collapsed it down some more after I took the picture to make it fit nicely.


Now its time to bend the EGR tube.

I had a hard time getting the correct bend. I ended up starting the tube in the EGR valve, then the adaptor fitting in the tube. I used a wrench to force the tube in place. It did not work all that well, I nearly collapsed the tube at the bend under the valve. But, it works. I then tightened the adaptor into the header with the nut on the tube still loose. Once the adaptor was tight, I tightened the tube on the adaptor.

Notice the oil fill tube is removed to aid in access.
I then went to installing the new plug wires and spark plugs. I bought “socks” to protect my wires from the heat.

I took some time to route my wires carefully, using wire separators.

Driver’s side pic-

I installed my air intake and other parts removed. I started the truck, had an exhaust leak. Driver’s side collector bolts not tight enough. With the bolts warmer, I turned them in some more. Started the motor again, still leaking. I turned in the bolts a few more turns and the leak stopped. I ran the motor for a few more minutes to warm everything up. I re attached the driveshaft. I then checked the header bolts, everything was tight as could be. While it was still in the air, I took pictures of the exhaust.

I put both fender wells back in, and fixed my broken vacuum lines with some rubber hose. I put the wheels back on, and double checked everything. I took the jack stands out and let the truck down. I forgot to remove the wheel chocks and I couldn’t back up. I then removed them and backed right out. It was about 11:00 pm and I was ready to go home. I went home and filled the garage full of new header smell.
The biggest question, what is the difference over stock?
At first, not much. The first 10 miles I drove were not hardly any different than stock. I drove it the next day to work and pulled the battery cable to let the computer reset. I checked everything to make sure nothing was touching or rubbing. I put the cable back on and let the computer learn again. I set my programmer from performance to towing performance. I drove it about 30 miles and then hooked on to a 3,000 lb pop up camper and drove it back. The difference is night and day. I pulled the relatively heavy camper like a champ. Lots of power and torque that I could feel. The next day I put the programmer back to performance. The computer has figured out the new parts and it runs great. Acceleration is easier and faster. If you really get on it, it opens up and screams. Under normal driving, acceleration comes a lower RPMs effortlessly. This is only my third day since install at the time of writing this, so I will give reports over time.
Gas mileage increase?
I will post MPG, before and after, when I run a tank through under normal driving conditions. I have been logging mileage at almost every tank so that I have a good history to compare it to.
Sound?
With my custom exhaust and intake, it is great. I wouldn't say it is louder, just deeper. It has a very nice rumble, very distinct. I do have more resonance on the highway whereas I had virtually none before. I am thinking about changing to a 50 series flowmaster or something quieter. My digital camera shoots video with audio, so I will try to figure out how to get that posted after I record it.
Install Time?
Since I split the work over two days, it was much more tolerable. If you can at all, split it over two days. The warehouse I manage has a truck that I can borrow on occasion, so I was able to drive it. The first day took about four hours, and the second about 8. I had all the tools I needed there, so there was no running for parts or tools. If I had of had help, I could have gotten the inside collector bolt out without rounding it off or cutting it in two. That would have saved a couple of hours. I could do it again in eight hours fairly easily. I hope this write up helps someone install their headers.
All that being said, I have some tips for install-
Re route the hood pop cable. I found my cable had moved and touched the header. I smelled a rubber burning smell and the cable outer sheath had melted. I worked for a while and got the hood opened, rigged the cable up to work until I found a replacement. BTW, a cable from a 97 will work on an 01 even though a salvage yard may tell you otherwise. The only difference is mine had a place to put a keeper that the 97 did not have.
Buy a set of plug wire heat protectors. They make it much easier to route the plug wires and give piece of mind. Auto Zone has them for $34- I hate that place, but they were the only ones with them in stock.
Get someone to help you. I did nearly all of the work alone, which greatly added to the time. A good helper is worth a lot.
Soak your bolts ahead of time. It makes a world of difference, especially if your truck has been in the north.
Buy a tap and die to fit the collector bolts. Run the tap through the headers and the die over the bolts. Then use locktite. This will make install much easier.
Updates to follow---------
Note: Lots of pics give it time to load
I initially was looking for more MPG from my Mountaineer. That search led me to this web site, which I cannot seem to tear myself away from. I found v8boatbuilder’s write up on TMH headers. The install work intrigued me, I like a good challenge. I talked to Bob via email first then I called to pay over the phone. He really knows his stuff, I was impressed with how much he knew about explorers.
I began preparing for the install work by soaking all the bolts that I could reach with everything intact. I used liquid wrench and a clear plastic tube to run the penetrating oil on the bolts.
I started the install the day before my headers arrived. I tracked my package with UPS tracking, so I knew when they would arrive.
Day 1
I started by jacking up my Mountaineer and supporting it on jack stands. I put wheel chocks behind the rear wheels since the AWD parks through the front axle.
I removed the inner fender well on the driver’s side. I took out the spark plugs and moved the wires out of the way. There are some wires that attach to the fender well that have to be removed.
The bolts look wet because of the penetrating oil. I used an impact wrench (cheap one)........
and all of the bolts came right out. I had to remove a heat shield from the back of an accessory on the front of the motor.
The bolts came out very easily, my truck was in Florida before I got it, so it has been in the south. Not having been in the north seems to help a lot.
In order to remove the collector bolts, I decided to drop the drive shaft from the front axle. This allowed me to get a straight shot on the bolts.
I marked the u joint to help keep the shaft lined up. The bolts came out easily.
I removed the dip stick and the manifold came out.
I removed the gasket with a flat screwdriver and polished the block with an air die and buffer pad.
That was it for the driver side. That took less than an hour to do that.
The passenger side fender well came out easily, but my vacuum canister for the HVAC, the lines were brittle and broke right away.
I removed the spark plugs and moved the wires out of the way. Once again, the liquid wrench worked wonders.
I diagramed the spark plug wiring.
I removed the cold air intake and heat shield, both home made.
I took off the heat shield on the manifold.
The manifolds bolts came right out.
Then the fun began. The collector bolts are right at the back of the block. The outside one is easily accessible. The inboard bolt is not quite so easy. At this point everything has taken less than two hours. After I tried for an hour to get a socket on the bolt securely and failing, I had rounded the shoulders off of the head of the bolt. I had to take a small hacksaw and cut the bolt in two.
I got to the bolt by spinning the manifold around with a pipe wrench. Then the manifold came out. If I had of taken some more time I may could have gotten it out without cutting it. Lesson learned- don’t get in a hurry and try not to get frustrated. I broke the polishing pad on my air die so I couldn’t clean up the block.
I next removed the EGR tube. It uses an 1 1/16 wrench for the nuts. The most difficult part is the nut that goes into the EGR. I took off the oil filler neck and that gave me room to swing the wrench to take the nut out. The adapter that goes into the manifold uses a 1” wrench.
Day 2
Day two began with a trip to the parts store to get an easy out to make my air die work again. I got it fixed and polished the block.
The box arrived UPS.
It was well packaged
The quality is top notch. Of course here is the comparison pics-
I started with the driver’s side. It went in easily, but the exhaust was in the way. I tied the jack to the pipe to pull it down out of the way.
The header bolted right in. I used a 1/4” drive ratchet with ext. and a universal and 3/8” socket. Locktite was applied to all bolts.
I then went to the passenger side, loosened the motor mount bolts, jacked up the motor. I used some old jack wheels to lift the motor.
The header took some wiggling to slide in place, but when it went, it went right in. I used a pipe to push the exhaust back and bolted the header in. I removed a layer of insulation from the heater core box to give me some room. It is held on by one screw and two keepers. I made a major error and forgot to tighten the motor mount bolts. I was able to tighten the outer one but not the inner. The bolts on this side were a little more difficult to tighten with a socket. I used a small wrench to tighten each bolt.
I put in the outside collector bolt easily enough.
The inside bolt was a huge PITA again. I ended up running it through from the wrong side, taking it out, then putting it through the right side. That seemed to help the bolt thread through easier. I talked to Bob later and he told me that the bolts taper and so as they get tighter as they go in. It still took lots of time and patience to get that bolt tight. I then put in the drivers side collector bolts, which were also very tight. They are both accessible from the bottom of the truck.
I bought some exhaust system repair tape to protect my A/C line. Due to the close proximity of the header, I didn't want any heat soak. It was only a couple of bucks, so it was cheap insurance.
It is basically glorified aluminum foil. I left the adhesive cover on the back so it didn’t stick to the tube in case I ever needed to work on it.
I collapsed it down some more after I took the picture to make it fit nicely.
Now its time to bend the EGR tube.
I had a hard time getting the correct bend. I ended up starting the tube in the EGR valve, then the adaptor fitting in the tube. I used a wrench to force the tube in place. It did not work all that well, I nearly collapsed the tube at the bend under the valve. But, it works. I then tightened the adaptor into the header with the nut on the tube still loose. Once the adaptor was tight, I tightened the tube on the adaptor.
Notice the oil fill tube is removed to aid in access.
I then went to installing the new plug wires and spark plugs. I bought “socks” to protect my wires from the heat.
I took some time to route my wires carefully, using wire separators.
Driver’s side pic-
I installed my air intake and other parts removed. I started the truck, had an exhaust leak. Driver’s side collector bolts not tight enough. With the bolts warmer, I turned them in some more. Started the motor again, still leaking. I turned in the bolts a few more turns and the leak stopped. I ran the motor for a few more minutes to warm everything up. I re attached the driveshaft. I then checked the header bolts, everything was tight as could be. While it was still in the air, I took pictures of the exhaust.
I put both fender wells back in, and fixed my broken vacuum lines with some rubber hose. I put the wheels back on, and double checked everything. I took the jack stands out and let the truck down. I forgot to remove the wheel chocks and I couldn’t back up. I then removed them and backed right out. It was about 11:00 pm and I was ready to go home. I went home and filled the garage full of new header smell.
The biggest question, what is the difference over stock?
At first, not much. The first 10 miles I drove were not hardly any different than stock. I drove it the next day to work and pulled the battery cable to let the computer reset. I checked everything to make sure nothing was touching or rubbing. I put the cable back on and let the computer learn again. I set my programmer from performance to towing performance. I drove it about 30 miles and then hooked on to a 3,000 lb pop up camper and drove it back. The difference is night and day. I pulled the relatively heavy camper like a champ. Lots of power and torque that I could feel. The next day I put the programmer back to performance. The computer has figured out the new parts and it runs great. Acceleration is easier and faster. If you really get on it, it opens up and screams. Under normal driving, acceleration comes a lower RPMs effortlessly. This is only my third day since install at the time of writing this, so I will give reports over time.
Gas mileage increase?
I will post MPG, before and after, when I run a tank through under normal driving conditions. I have been logging mileage at almost every tank so that I have a good history to compare it to.
Sound?
With my custom exhaust and intake, it is great. I wouldn't say it is louder, just deeper. It has a very nice rumble, very distinct. I do have more resonance on the highway whereas I had virtually none before. I am thinking about changing to a 50 series flowmaster or something quieter. My digital camera shoots video with audio, so I will try to figure out how to get that posted after I record it.
Install Time?
Since I split the work over two days, it was much more tolerable. If you can at all, split it over two days. The warehouse I manage has a truck that I can borrow on occasion, so I was able to drive it. The first day took about four hours, and the second about 8. I had all the tools I needed there, so there was no running for parts or tools. If I had of had help, I could have gotten the inside collector bolt out without rounding it off or cutting it in two. That would have saved a couple of hours. I could do it again in eight hours fairly easily. I hope this write up helps someone install their headers.
All that being said, I have some tips for install-
Re route the hood pop cable. I found my cable had moved and touched the header. I smelled a rubber burning smell and the cable outer sheath had melted. I worked for a while and got the hood opened, rigged the cable up to work until I found a replacement. BTW, a cable from a 97 will work on an 01 even though a salvage yard may tell you otherwise. The only difference is mine had a place to put a keeper that the 97 did not have.
Buy a set of plug wire heat protectors. They make it much easier to route the plug wires and give piece of mind. Auto Zone has them for $34- I hate that place, but they were the only ones with them in stock.
Get someone to help you. I did nearly all of the work alone, which greatly added to the time. A good helper is worth a lot.
Soak your bolts ahead of time. It makes a world of difference, especially if your truck has been in the north.
Buy a tap and die to fit the collector bolts. Run the tap through the headers and the die over the bolts. Then use locktite. This will make install much easier.
Updates to follow---------

")