How to: - U-joint removal and replace-how to with pics | Ford Explorer Forums - Serious Explorations

  • Register Today It's free!

How to: U-joint removal and replace-how to with pics

Prefix for threads which are instructional.

Turdle

DIY stunt double
Staff member
Moderator
Elite Explorer
Joined
June 16, 2003
Messages
31,581
Reaction score
3,263
City, State
Humboldt, KS
Year, Model & Trim Level
2000 Mounty
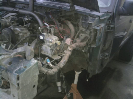
Here is my first how to thread--hope it helps someone.

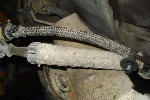
Now, let's replace some u joints!

Tools needed--

12mm 12 point wrench
Pliers--I used some needle nose
a flat screwdriver
a 7/8" deep well impact socket
(optional, a length of 3/4" pipe)
A mini sledge, or BFH
blocks of wood --2x6 is good
penetrating lubricant
Safety glasses of course (thanks Dan for the reminder)

Mine must have been on my head
tools.jpg


Join the Elite Explorers for $20 each year.
Elite Explorer members see no advertisements, no banner ads, no double underlined links,.
Add an avatar, upload photo attachments, and more!
.


Materials needed

u joints, and beverage.

330 for my yoke end
331 for my diffy end
I have a conversion driveshaft-it is from a 5.4l expedition.
Your u joints will probably be different part numbers--
These are the accurate rear u-joints for a 4406 transfer case swap--
front joint.jpg
Rear ujoint.jpg
Beer.jpg


Step 1

Raise and support rear of truck on stands.
chock front wheels, and shift gear selector into N

Using a 12mm wrench--remove the 4 driveshaft bolts.
Pull driveshaft toward rear of truck, and out.
be ready for a trickle of fluid from transmission-transfer case

Now is where the fun starts


Step 3
support the joint on a block of wood, as well as the other end of shaft to keep it even and managable

Using a socket sized close to the cap holes-
or a pipe

Take out all the aggression you can with your minisledge
support blocks.jpg
pipe.jpg


OK, that's about it--except you have to do it all over again for the other 2 caps.

And, guess what, there is another u joint waiting for you on the other end--

Re install in the reverse--be very carefull not to loose the pin bearings--


Thanks been wanting to do this. :thumbsup: :thumbsup:


Could a big C-clamp be used to press caps out/in?


Ok thanks BrooklynBay :salute:


Thanks been wanting to do this. :thumbsup: :thumbsup:


Could a big C-clamp be used to press caps out/in?

A heavy press style one can, however none of mine were strong enough
clamps.jpg


WOW.....lol

OK then no normal C-clamp then (what I have) :salute:


Wow, that's some clamp collection! Why did you buy so many of them?

You can never have enough:thumbsup:

I once made some cutting boards out of maple and walnut strips.
I used all the clamps you see hanging, plus some.Can you see the bar clamps?
Each cutting board is made of 1 strips of wood, I glued 9 foot strips together, and cut it into 2 foot sections.

That's why I have so many clamps--:D


I just want to add to make sure to wear safety glasses for removing the snap rings from the u-joint.

A few years ago one of the guys at work was using the needle nose pliers like Jon when they slipped and poked him in the eye causing him to loose it. :(


Join the Elite Explorers for $20 each year.
Elite Explorer members see no advertisements, no banner ads, no double underlined links,.
Add an avatar, upload photo attachments, and more!
.


That's why I have so many clamps

And to think I just thought you were extra kinky :D


Back
Top