tac40
Elite Explorer
- Joined
- July 15, 2013
- Messages
- 45
- Reaction score
- 0
- Year, Model & Trim Level
- '97 Ford Explorer Sport
Hi all. I'm new to the forums and am having trouble with a 5R55E that I recently rebuilt. Am hoping that someone here can share their insight on a few items in question. I've tried to provide as much detail as possible below.
Recently purchased a '97 Explorer with a "blown" trans; (4.0 SOHC/5R55E with ~161K miles). Great condition (and price, due to the trans). When I bought it, it only had 1st & reverse and it slipped in all forward gears, but I only had to drive it 4 blocks to get it home so not a big deal.
Had no prior experience with the 5R55E, but after a successful prior career building trannies, (and still having all the tools) I figured I'd give it a shot. Spent a few days researching the typical issues with this model along with recommended parts, mods, etc. That's actually how I found this forum.")
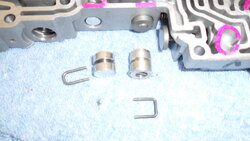
The fluid was the typical "stinky brown mud" found in overheated units and I could tell that someone had recently had the pan off. I pulled it apart and since I hadn't worked on one of these before, I photographed everything along the way.
The most obvious problem was that the forward clutch pack was toast and the directs were badly worn as well. One of the two brass sealing rings on the forward clutch hub had worn thin, and pressure to that drum was dumping at the hub. This seems to be a known issue with this model. Looks like Ford switched from brass to plastic sealing rings in 2004 for the fwd hub, so I used plastic during the rebuild. The other clutch-packs weren't *great*, but not as bad as the forward. Also had to replace the output-shaft-ring-gear-and-hub-assembly. The needle bearing, had come apart and the hub was scored.
For parts, I used a TransTec kit, and replaced all frictions. Also replaced the steels in the forward and direct clutches. I replaced the front & intermediate servo pistons and made sure that the heat-shield was properly reinstalled on the passengers side. Up front, I replaced the pump bushing and went with a rebuilt torque converter. I used a TransGo shift-kit and replaced the TPC solenoid just because it was recommended to do so. I couldn't locate a separator plate with bonded gaskets, so I reused the existing plate, made the TransGo mods and went with new gaskets from the TransTec kit. I mock-assembled it first, and checked all critical clearances and made the necessary adjustments where needed as well as air-checked the application of every clutch-pack and band servo. I tried to be as careful as possible and photographed and recorded everything during the reassembly. I measured/tested the resistance of all the solenoids and all seemed fine. I also used an inch-pound torque wrench for the valve body and 1st/reverse servo cover and was very careful about the tightening sequence of the VB.
I flushed the cooler lines as well as possible and reinstalled the beast. Added 5 quarts of Mercon-V, started it with the rear wheels off the ground and let it idle in reverse while I added just a little more than 4.5 more quarts.
It didn't make any noise, but also didn't have reverse. Also, the OD light was flashing. In drive, there were no delays, but I could only detect two upshifts. I rechecked electrical connections at the trans and also disconnected the shift linkage and tried moving the shift-lever manually to check for reverse and also cycle through forward gears. No change. On the ground, I realized there was no first gear either. Since first and reverse use the same servo and band, I wasn't really surprised. I was really careful with the positioning of the rear band and never heard any loud bang noise, so I'm not thinking broken band, but could it have slipped reassembly? .. maybe...
So it's starting out in second, shifting to third, then fourth, and no overdrive. I'm suspecting valve body. I went to put a pressure gauge on it last night but lost the needed fitting so I'm going to get a replacement this morning and check pressures before pulling the valve body and checking 1st/reverse servo and band position. I'll post pics and any discoveries and will undoubtedly have questions. Would sincerely appreciate any comments, advice, guidance, etc. Thanks in advance.
Regards,
--mike
Recently purchased a '97 Explorer with a "blown" trans; (4.0 SOHC/5R55E with ~161K miles). Great condition (and price, due to the trans). When I bought it, it only had 1st & reverse and it slipped in all forward gears, but I only had to drive it 4 blocks to get it home so not a big deal.
Had no prior experience with the 5R55E, but after a successful prior career building trannies, (and still having all the tools) I figured I'd give it a shot. Spent a few days researching the typical issues with this model along with recommended parts, mods, etc. That's actually how I found this forum.
The fluid was the typical "stinky brown mud" found in overheated units and I could tell that someone had recently had the pan off. I pulled it apart and since I hadn't worked on one of these before, I photographed everything along the way.
The most obvious problem was that the forward clutch pack was toast and the directs were badly worn as well. One of the two brass sealing rings on the forward clutch hub had worn thin, and pressure to that drum was dumping at the hub. This seems to be a known issue with this model. Looks like Ford switched from brass to plastic sealing rings in 2004 for the fwd hub, so I used plastic during the rebuild. The other clutch-packs weren't *great*, but not as bad as the forward. Also had to replace the output-shaft-ring-gear-and-hub-assembly. The needle bearing, had come apart and the hub was scored.
For parts, I used a TransTec kit, and replaced all frictions. Also replaced the steels in the forward and direct clutches. I replaced the front & intermediate servo pistons and made sure that the heat-shield was properly reinstalled on the passengers side. Up front, I replaced the pump bushing and went with a rebuilt torque converter. I used a TransGo shift-kit and replaced the TPC solenoid just because it was recommended to do so. I couldn't locate a separator plate with bonded gaskets, so I reused the existing plate, made the TransGo mods and went with new gaskets from the TransTec kit. I mock-assembled it first, and checked all critical clearances and made the necessary adjustments where needed as well as air-checked the application of every clutch-pack and band servo. I tried to be as careful as possible and photographed and recorded everything during the reassembly. I measured/tested the resistance of all the solenoids and all seemed fine. I also used an inch-pound torque wrench for the valve body and 1st/reverse servo cover and was very careful about the tightening sequence of the VB.
I flushed the cooler lines as well as possible and reinstalled the beast. Added 5 quarts of Mercon-V, started it with the rear wheels off the ground and let it idle in reverse while I added just a little more than 4.5 more quarts.
It didn't make any noise, but also didn't have reverse. Also, the OD light was flashing. In drive, there were no delays, but I could only detect two upshifts. I rechecked electrical connections at the trans and also disconnected the shift linkage and tried moving the shift-lever manually to check for reverse and also cycle through forward gears. No change. On the ground, I realized there was no first gear either. Since first and reverse use the same servo and band, I wasn't really surprised. I was really careful with the positioning of the rear band and never heard any loud bang noise, so I'm not thinking broken band, but could it have slipped reassembly? .. maybe...
So it's starting out in second, shifting to third, then fourth, and no overdrive. I'm suspecting valve body. I went to put a pressure gauge on it last night but lost the needed fitting so I'm going to get a replacement this morning and check pressures before pulling the valve body and checking 1st/reverse servo and band position. I'll post pics and any discoveries and will undoubtedly have questions. Would sincerely appreciate any comments, advice, guidance, etc. Thanks in advance.
Regards,
--mike