The mutilation of my '91 thus far. :-D | Page 3 | Ford Explorer Forums - Serious Explorations

  • Register Today It's free!

The mutilation of my '91 thus far. :-D

Howdy everybody. It's been a while since I've posted here but thought I'd stop by to show what I've been doing.

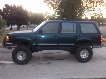
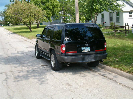
Last year I rear ended a chevy and pretty much totaled my truck. here's the thread with pictures

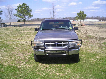
Now, I love this ford. And hence, was not nearly ready to part with it... So, the transformation begins.

Fist thing was to get rid of all that pesky body stuffs in front of the fire wall. I have pictures of this on a different hard drive and will post them if anyone is interested.

Luckily the frame was still straight and I only fragged the ac condenser and radiator. In my mind, it just meant I get to have on-board air and slap on a bigger radiator.

2hhogwo.jpg


After that I needed to reevaluate the intake and battery location.

2dtswf9.jpg


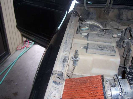
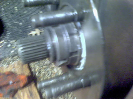
The intake is just a blue rubber couple to link the MAF to the TB. Then I cannibalized the stock air box to mount the cone filter to the MAF with the assistance of a PVC drainage pipe reducer.

1smyo2.jpg


2rnveyu.jpg


For the battery I used two lengths of square tubing and notched both ends to accept a piece of flat bar with a hole and a nut welded inside. I welded these pieces into the notches and used pre-existing holes in the frame for the bolts.

2luv11c.jpg


More cannibalism was in store as I reused the stock battery tray sans a little material I cut away to clear the harmonic balancer and to lay flat against the frame.

rc0ufl.jpg


1zcmz9y.jpg


Also, I had to relocate the clutch reservoir as it was in the way of the frame for the new fenders. A simple bracket was fabed up for this.

o8fih4.jpg


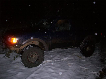
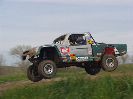
So here is where I'm at thus far. [WARNING, NAKED EXPLORER PICTURES]

5khvkp.jpg


Ultimately it will look a bit like a big rig with a doghouse covering the engine and a couple trailer style fenders (I want to go fenderless, but I guess there's a weight limit which is how hot rods get away with it).

f24v46.jpg


The whole doghouse frame is designed to be easily removed to make it easier to work on the engine.

3vupi.jpg


I still have to bend up some flat bar as a sort of indexing crossmember to keep the frame mounting bits from rotating independently.

2ms1p2h.jpg


Tomorrow I hope to mount up all the electricals and weld up the rest of the doghouse frame. It should be finished and skinned up in sheet this weekend.

~Rev


Join the Elite Explorers for $20 each year.
Elite Explorer members see no advertisements, no banner ads, no double underlined links,.
Add an avatar, upload photo attachments, and more!
.


Very Creative.....

I like it!!!! You for sure will have one of a kind. Which makes it unique. Using old school technique (hanging & banging) some what of a loss art. Which makes you a "craftsman" in my book. Hope you feel better to soon, good luck on finishing the project....waiting to see.
On a side note: My Grandfather was a Blacksmith, maybe thats the connection. If you need it make it.


Join the Elite Explorers for $20 each year.
Elite Explorer members see no advertisements, no banner ads, no double underlined links,.
Add an avatar, upload photo attachments, and more!
.


Thanks for all the words of encouragement and well wishes. Be kind to your back, sciatica is no fun for anyone.

I'm hoping to finish up the right fender and install the hood pins today. I'll be out of town from tomorrow to Saturday so hopefully I'll be able to get all the metal work done on Sunday (other than the left fender, need to get some more sheet metal).

~Rev


I like how this thing is turning out.
Are you going to move the headlights up a little higher? I think it would look better.
What size tires are you going to run on it?
I think some 33's would look good on it and you probably won't have a problem clearing them with no lift with your custom frontend.


This project is fantastic...it gives me hope that I can indeed narrow the front of my explorer someday.


Mini Update

Got back this morning from out of town and went out to the garage to see what I can get done.

So far I've finished up the right turn signal bezel and finished up all the welding to make the bezel and fender one piece. Also got the turn signal mounting bracket made and installed. The right side of the vehicle is finished! (well, I still need to raise the headlight and bolt on the fender, but the fab stuff is done!)

I was going to finish up the hood (bump stop thingies and hood pin leashes) but I realized that the hood pin clips I have are garbage. So Now I'm off to make a return and find a better replacement.

I'll throw some pictures up later tonight when I'm finished for the night.

~Rev


Picture Update

A day late, but here is where I'm at right now. I would have gotten more done tonight but it's a bit brisk and I ran out of kerosene for the heater.

I needed to cut the doghouse skin to match the front edge of the hood.

592239961_2107820680_0.jpg


Then I had to make some brackets for the hood pins.

592239883_2107820421_0.jpg


I used 1.5 inch angle iron for these.

592239645_2107819606_0.jpg


592239494_2107819098_0.jpg


Also, I'd like to introduce my bestest friend.

592240120_2107821224_0.jpg


I wanted to finish up the right fender so I started by welding the seam where the turn signal bezel meets the fender. It took me a couple inches but I think I'm getting the hang of this whole welding thing.

592239383_2107818713_0.jpg


I welded inside and out, then ground it smooth.

592239321_2107818489_0.jpg


The next thing to tackle was the mounting brackets for the turn signal. I forgot to snap pictures while making them so I just got a few with the light installed.

There are two brackets, one slotted to accept the factory mounting tab.

592237789_2107813202_0.jpg


And one L shaped bracket with a nut welded on the back.

592237309_2107811515_0.jpg


Then I needed to wire the lights into the harness. Luckily I thought ahead and had plenty of length to connect them.

592237907_2107813614_0.jpg


The last thing to do was cut an angle at the back edge of the bezel.

592237953_2107813773_0.jpg


I also moved the headlights up a few inches and in doing so managed this.

592234249_2107800492_0.jpg


I was really happy that I had a brand new set of irwins I hadn't opened yet so this wasn't a major set-back. =]

592233480_2107797722_0.jpg


592233287_2107797006_0.jpg


The fender is a multi-purpose part. It serves well as a frosty beverage holder.

592234582_2107801720_0.jpg


And also as a work bench.

592234418_2107801108_0.jpg


And here's a video just because I was far too excited when I finished the wiring. (crappy phone camera)

th_Verizon_Wireless_Picture_Video_Messaging.jpg


The last thing I did today was make a bracket for the ignition brick. I just cut a 3.5x4in piece of 18ga sheet and drilled a couple holes to accept the nubbit thing on the brick and a machine screw with the nut welded on the back.

592231871_2107791943_0.jpg


592230314_2107786192_0.jpg


Then I just welded the plate to the right hood pin bracket.

592229932_2107784722_0.jpg


The combination of the sub-par welding ability and a mask that kept fogging up resulted in a less than pretty weld, but I'll re-weld it the next time I have the skin off.

592230088_2107785322_0.jpg


And that's pretty much it for tonight. I'm hoping I can score some more sheet tomorrow so I can hammer out the other fender.

Being this close to the end is bittersweet. On one hand, she'll be done and I will be a very happy camper. On the other hand, I'll have to pay registration and back-fees...

Oh, on a side note, does anybody know what can be done to level the front end out after doing a spring over axle in the back? I know this is the wrong forum and there have been posts about this, but I have yet to find a definitive answer and I thought I'd just ask.

~Rev


Finished bumper; Picture Update

Sorry if the updates are getting a bit boring. It's going to be little things here and there until I get more sheet metal (hopefully by the end of the week).

Last night I was able to bolt on the fender. I drilled 8 holes along the lip that meets the doghouse.

592955716_2110602718_0.jpg


Then I clamped it in place, made sure it was straight and level and marked for the holes in the doghouse. Then I just bolted it right up.

592955785_2110602961_0.jpg


Yay for no more clamps!! :D Still gotta drill the two holes to bolt it to the front quarter block-out.

Tonight I got to working on the bumper. The first thing to do was to just shorten it and cut off the angled braces that go from the mounts to the original ends of the bumper. (I did this a few days ago)

The next picture shows the hacked mounts.

592954670_2110598694_0.jpg


Then I needed to cut the ends at an angle. There wasn't really any measuring for this, I just kind of winged it and matched it up by eye.

592959507_2110616324_0.jpg


After I got the angles where I liked them, I made a cardboard template by tracing around the edge onto cardboard.

592959722_2110617072_0.jpg


Then I traced the template onto the sheet metal and cut out the rough shape along with two tabs to make welding it easier.

592955223_2110600864_0.jpg


Next I clamped at the tabs to make sure it was all lined up and welded the tabs and all the way around on the inside.

592955115_2110600467_0.jpg


592954930_2110599720_0.jpg


I left so much overhang in case I needed to run a weld on the outer edge. (Turns out I didn't}

After it was welded I cut/ground the excess off.

592954737_2110598955_0.jpg


I also tried to get it to match up with the plastic insert as best as I could.

592954855_2110599417_0.jpg


I was eventually able to get the metal to match up with the plastic almost spot on. So now here's the end result.

592954435_2110597801_0.jpg


592954090_2110596494_0.jpg


592954176_2110596816_0.jpg


It bugs me to no end that I couldn't straighten out the bumper where it got bent down a bit. I even tried the mini sledge to no avail. Oh well, this is just a temporary bumper until I get some more square tube.

I also tried making the front corner plates to cover the gap in the doghouse skin using the same "hang and bang" (heh, I like that term, thank you bcbid) but I ended up with a bowed piece of metal. :mad: Guess I'll just have to have it done on a break.

~Rev


I think that bumper looks good, considered sticking with it? Pretty cool watching this whole thing progress, keep it up.

Thanks. The plan is to make a bumper from square tube, but I am starting to think of ways to add a winch into this one. Now that I got the ends welded up, it's kind of growing on me. I've been trying to incorporate notable explorer bits here and there (hood, turn signals, quarter panels) and this bumper adds a lot in that aspect.

I'll be sketching out some tube ideas and some ways to add a winch to this one. If I do decide to keep the chopped stock bumper, I think I'll grab another one from the wrecking yard so I won't have to look at that dent. :p:

~Rev


Like Keeper, I also think the bumper looks good. But square tubing might be easier to hang a winch on.


Subscribing-I Like it-definitely Unique!!


I wonder if there is some kind of "bumper in front of wheels" law. Although there's alota hot rods that don't have bumpers at all.


Picture Update 12.2.10

Well, I didn't get as much as I would have liked to tonight. I ran out of gas for my welder and I supremely suck at welding with the core wire stuff (Can ya tell I'm not a welder. :p )

There was one thing that's been bugging me that I haven't addressed yet. The exposed body mount bolt.

593307397_2111982198_0.jpg


So after staring at it for a while, I came up with a plan. First I had to make a sort of cover piece.

593307118_2111981186_0.jpg


593307026_2111980850_0.jpg


Once I got it looking how I wanted, I held it in place and made my marks on the doghouse and body mount plate.

593306954_2111980590_0.jpg


593306853_2111980249_0.jpg


Making everything removable is really paying off as I put this thing together. (though, I just left the fender bolted on, didn't feel like taking out 8 more bolts, heh)

593306760_2111979919_0.jpg


Then I made my cuts.

593306578_2111979286_0.jpg


Moving back to the plate I had shaped, I drilled some holes along the mounting tab to weld in.

593306371_2111978536_0.jpg


Then I welded it up and put the skin back on the frame. (I had also cut along my line on the body mount plate)

593306237_2111978053_0.jpg


It will be capped in, I made a template already.

593306078_2111977441_0.jpg


I'm not sure if I want to keep it like that and cap it, or if I want to cut the top edge down at an angle, then cap (Input on this would be appreciated :) ). I'm getting more gas tomorrow so I should be able to finish this and do the other side.

Also,
I wonder if there is some kind of "bumper in front of wheels" law. Although there's alota hot rods that don't have bumpers at all.

I'm not aware of any laws regarding bumper width, I believe you do have to have a bumper (when the cops around here get bored, they write tickets for people with roll pans on their truck). I've seen quite a few trucks rolling around with bumpers only as wide as their frames. I guess I'll find out eventually.

~Rev


Bumper law

I got curious so I looked it up.

Taken from CA Vehicle code 28071
"Every passenger vehicle registered in this state shall be equipped with a front bumper and with a rear bumper. As used in this section, "bumper" means any device designed and intended by a manufacturer to prevent the front or rear of the body of the vehicle from coming into contact with any other motor vehicle. This section shall not apply to any passenger vehicle that is required to be equipped with an energy absorption system pursuant to either state or federal law, or to any passenger vehicle which was not equipped with a front or rear bumper, or both, at the time that it was first sold and registered under the laws of this or any other state or foreign jurisdiction."

Doesn't mention anything about width etc.

~Rev


I think for the time being, I'm just gonna cap it as is. I plan on installing a plug for jumper cables (something like this, hopefully I can find the plugs and make it myself, this kit is pretty pricey) in this piece so I need to get that and see how big it is. If I change my mind, I can always just cut an angle and re-cap.

~Rev

Edit, found where to get the plugs for cheap. =] google is my friend.


Join the Elite Explorers for $20 each year.
Elite Explorer members see no advertisements, no banner ads, no double underlined links,.
Add an avatar, upload photo attachments, and more!
.


Got gas for the welder today. Gonna finish up the body mount covers. I've decided that the right side cover will contain the power plug for jumpers (can also be used to winch power) and the left side will contain a quick connect for the compressed air.

I got to thinking, does anybody know of flush mount, or even just low profile air quick connects? I searched but found nothing online.

Anywho, time to get welding.

~Rev


Back
Top