410 fortune - 5.0L EFI 4R70W drivertrain conversion | Page 14 | Ford Explorer Forums - Serious Explorations

  • Register Today It's free!

410 fortune - 5.0L EFI 4R70W drivertrain conversion

I hate Ebay, but I will go there if I have to. I like to drive to the store and buy stuff, cash and carry :)


Join the Elite Explorers for $20 each year.
Elite Explorer members see no advertisements, no banner ads, no double underlined links,.
Add an avatar, upload photo attachments, and more!
.


Allright, more progress on the codes:
the OD light has stopped flashing, this is a good sign. This means that the reason it was flashing was temporary and after a certain number of key cycles it went away. You see until I got the linkage adjusted this well I could be driving in D and the truck would slip into either 2 or N (couple times). So I assume during one of these situations the computer set the code, then it took 12 or so key cycles of driving without this happening to clear the OD light code.
I am guessing this is a shift linkage/DTRS issue. With my new floor shifter I have been adjusting the linkage slightly to get it closer and closer to perfect. I now have the shifter detents matching the trans, and wouldnt you know it after a few days of driving like this, no more OD light.

If all goes according to plan I should have no MIL as of Monday and I can pass emissions.
 
Last edited:


Can you pass emissions? I'm in Colorado, too, and I thought when you got you emissions checked they looked up the VIN to determine the engine code. If you whould have a V6 in that then how will it pass with a 5.0?


It will pass with flying colors. :)
In Colorado it is based on the vehicle body, mine is a 88 BII, okay so they will check I have a cat converter installed, then they will check the MIL, then they will hook it up to the sniffer and check the numbers.
The 5.0L should burn cleaner then the speed density 2.9L ever did, well within the allowable range.
I just have to get rid of the MIL, and that will happen this week.

I have not forgotten about this thread, I still have some work to do and it is coming up shortly. The conversion is not complete until she has a new 06 sticker on the plate.

Currently I have:
Fitted the 96 Mustang floor shifter cable with the proper Ford parts to connect it to the trans shift arm, I had to order a couple small pieces through the dealer.

the OD button and light work flawlessly, if you recall I used the 96 Mustang shifter because it has the OD button built in and mounts to the floor. I ran the OD light into my stock gage cluster and my old REAR ANTILOCK light is now my OD OFF :)

I have been battling my OIL light, I used a dual sump Mustang pan with a oil level sender. It is wired just how it was with the 2.9L and the 4.0L, yet the light is on.
I believe the diode in the back of the light itself is bad, so I grabbed one at the junk yard, will tackle that problem soon

My wipers quit working after this conversion, which is odd because the motor and the switch are newer. So after messingwith it for a couple of hours I finally located a solid state relay box under the dash of the 88, this controls the intermittant wipers, I never knew it was there. Discontinued Ford part as of 10/05, Ford located one for me, $160. I said no thanks. Junk yard I picked up 5 of them for $20. Wipers work perfect, another 88 part gone.....(275K miles)

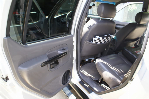
I removed my front seats and the stock 88 carpet, as you can see in the floor shifter picture not only is it brown/orange and my interior is Mocha (ongoing project) but it was quite hacked up after 3 different floor shifter setups. When I removed it I found some expected rust and some expected holes int he floor, it was also wet and smelled.
It is amazing how much noise the factory carpet hides. A new carpet kit is on order, in the correct color, but floor repairs are needed first :)

I picked up a 4.0L AC condensor (thanks Brett), once I install this sucker in front of my radiator (large job) I can have some hoses made and wire up my A/C system again, I have not had AC since I went 4.0L about 6 years ago.

I sent my old Transwerx built A4LD to Bill in CA (RangerX) for his wifes explorer, the trans was actually working fine as I found out during my conversion so we traded for some cool goodies. We shall see how that unit holds up, I have not heard of many people able to destroy a Transwerx built unit. Bill is working on the installation presently.....

Now for the big stuff:
Currently I still have a MIL
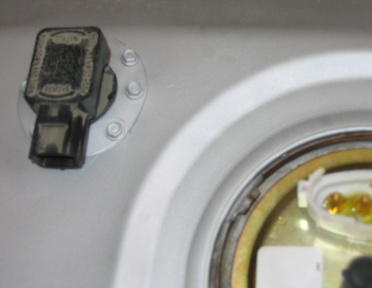
the codes are canister vent valve circuit incomplete, fuel tank pressure sensor, and fuel tank level circuit.
This is fantastic news because those are the 3 wires that have not been hooked up yet :) 
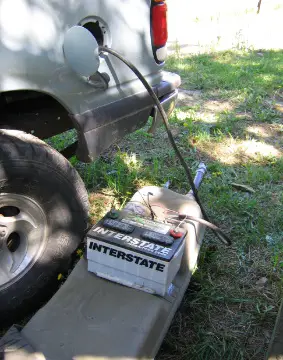
This week I am dropping the tank on my 96 Explorer donor truck and removing the necessary sensors and wiring from it. I am headed to the junk yard to purchase a complete 88 BII tank to modify. I have to cut some holes in the top of the tank for the pressure sensor.

once these sensors are intalled and wired in I expect the MIL to go away, I will then be able to pass emissions, which is good because my tags expired 05/05

Pictures and updates to come this weekend.....

SHE DRIVES AWESOME! I took her up into the mountains yesterday, I have towed the boat around quite a bit, and logged approx 1500 miles to date. I changed the oil at 1000 miles, I plan to change the trans fluid and filter at 3000. All is well, few small leaks have been fixed, mostly just tighten hose clamps. Not nearly as many vibrations as I expected from the solid engine mounts, it is still a comfortable daily driver.


Allright here we go....fuel tank modifications to accept OBD-II EVAP system and sensors

This is a 1996 5.0L Explorer 4 door gas tank (16 gal I believe):
289396extank.jpg

I was surprised to find this tank is metal and attaches with only a single strap, most Explorer's I have seen are plastic tanks (Gen I?)

This is the same tank next to a junk yard 88 BII tank (23 gallon):
289388bii96ex.jpg


This is the fuel tank pressure sensor:
2893sensor.jpg


This is how it mounts in the 96 tank:
2893sensormount.jpg


Here's where it gets tricky. I have to mount the pressure sensor in the 88 tank.
the best way to do this is similar to how ford mounts the pump. Rubber gasket and sheet metal screws.
Problem is cutting the piece i need from the Explorer tank, currently has about 10 gallons in it. I plan to empty tank, clean, fill with water, then cut.

instead of cutting a hole in the BII tank I plan to install the pressure sensor into the top of the in tank sending unit/pump. I believe there is enough room, I am going to pick up a new one at lunch today.

I will strip the surface rust fromt he new BII tank (junk yard special) and paint it, then install the new in tank sender/pump and modify it to accept the 96 explorer pressure sensor. Then swap tanks on my truck, and plug in the wiring for the new sensor, fuel tank level (not hooked up right now)

this should clear my MIL and I can then pass emissions withthe 5.0L powered BII.

I also picked up from Ford the necessary parts to mount the 96 Mustang floor shifter shift cable to my transmission shift arm, right now it is BOOTY fab, I will get pics of that too.

Other then that I have cleaned up the shop, it got a little messy durig the 6 month conversion, and I am now ready to pull in the green Explorer and strip it down to bare metal.....the bii gets body work, tube work, and paint this summer.
 
Last edited by a moderator:


Jamie, you're my hero for posting that 16 gallon explorer tank - I'm thinking of using one in my 4wd swap.

However, the 2dr sports used 16 gallon tanks, the 4dr Xs used 21 gallon tanks. For my reaserch, they are just longer.

Do you mind taking some measurements of your 16 gallon tank for me?


What a coincidence! I have an extra! hahaha

Need close up pics?
Its metal, did have a skid plate :)
Easiest tnak I have ever dropped actually, real snap, all hoses are quick release too.


yeah if that tank is from a 5.0 i would have to be from a 4 door an all 95-01 4 doors had 21 gal gas tanks. not 16. sports had 17 gal tanks though.

this is a great swap BTW!! i bet its very fun to drive!


OKay so that sucker holds 21 gallons if he is correct, I could never get it to take that much though when I was driving that truck? strange

the BII is ALOT of fun to drive now, it was fun before, now its even better!


does it have a any dents? i usealy fill up on E an i get about 18-20 gal in it. w/about 3-1 gal left.


410Fortune said:
What a coincidence! I have an extra! hahaha

Need close up pics?
Its metal, did have a skid plate :)
Easiest tnak I have ever dropped actually, real snap, all hoses are quick release too.

Thanks, but if it is indeed a 21 gal tank - I already have one! I was hoping for dimentions on the sport tank.

However, I'd like the measurements from the front and rear of the crossmember notch, to compare them to a junkyard sport tank.

The notch is hard to see from the bottom!


Hey! okay so you want the dimensions from the front and rear of the tank to the notch, the width of the notch and the depth? I can get those at lunch....

I prepped the BII tank yesterday for paint and cut a nice round hole in it for the sensor.
the next step is to empty the explorer tank (battery + fuel pump = works perfect!), air it out, fill with water, add a bit of dry ice, and cut out the piece I need.......


okay the new tank is installed complete with Explorer (OBD-II) pressure sensor:

First empty gas from tank into a truck:
2893gasswap.jpg


next I emptied the tank completely, aired it out, filled it with water, airied it out some more, let it sit, and then finally cut out the part I needed with a sawzall:
2893excut.jpg


more cutting and bench grinder & drill later the parts are ready to go on to the new junk yard BII tank. I re-used OEM O ring from the donor tank vent tube to seal up my two parts, ready for install here:
2893parts.jpg


After much cleanup and prep the BII tank was painted, washed out, cleaned out the inside, cleaned some more, then finally the new in tank sending unit, pump, and the Explorer pressure sensor are installed. All O rings got coated with vaseline prior to install, I used sheet metal screws to attach the new metal from the explorer tank, and the pressure sensor installs like stock:
2893newtank.jpg

2893sensorinstalled.jpg


Tank was hung:
2893tankhung.jpg


Everything connected up top & clearance:
2893topoftank.jpg


I even used the 96 Explorer gas cap & refurbished the paint:
2893excap.jpg


Finally with skid plate re-painted:
2893withskid.jpg


I ran out of time to wire up the new sensor, but with when I do I expect the MIL to go away (this is the only code I am still getting) Then I can pass emissions and the 5.0L conversion is officially completed.

Did I mention how much fun this thing is to drive?
 
Last edited by a moderator:


looks great!!!

Glad you didn't just start cutting away at the gas tank with fumes left in it! :p


Nice job!! Never thought a junk yard tank could look so good.


What did you paint the tank with, how did you prep it?

My new explorer sport tank is a little rusty on top.


Hey thanks guys!
The tank had some serious surface rust issues! It was starting to pit and eat into the tank.

All surface rust was removed with a wire wheel on the end of a drill, in fact during this conversion that sucker got ALOT of work, I have mastered the art of holding the damn drill with the wheel spinning :) I bought 3 different shapes and sizes of wire wheels when I started this, 2 of them are now down to the nubs :)
The entire tank was scrubbed with that sucker, I spent a couple hours on it, until there was no more rouge, just silver.

Then the tank was prepped with paint thinner and sprayed with the same high heat paint I used ont he intake, rust fighting spray paint. I used high heat because on my truck the exhaust comes kinda close to the tank.

I put on two coats.

Cutting on a gas tank is no fun. Even the tank I got from the junk yard, which looks to have sat for quite some time, still had fumes in it....I consulted many mechanics about the best way to do this, filling it with water was the most common solution, the next step is to put dry ice in there as well and keep the water flowing. Obviously you dont want to use something to cut it like a disc grinder that will throw spark., I used plenty of WD-40 and a drill to start, then a sawzall with WD-40 again. I also had my friend withthe extinguisher just in case and kept my face well clear of the blast zone, you can never be too careful. I have heard of people who ruined thier lives from exploding a gas tank while working on it, so you dont have to tell me twice!
 
Last edited:


Allright spent some time on the truck detailing and tying up loose ends, decided to get some pics:

grill through grill, engine bay after 3500 miles:
2893front1.jpg


the 96 Mustang shifter mounted interior, I ripped out the stock 88 (brown/orange) carpet finally. the new gages are installed, and I installed some temporary carpet to get me by until i can repair the floor (rust), heat/sound shield, and build a custom center console. The bottom half of the dash will also get painted at this time to match:
2893interior.jpg


Shifter, gages, ARB buttons, CB, temp carpet:
Again dash will be painted shortly and all this junk will be mounted into a custom center console/armrest/storage. I also need to extend the mustang shifter handle about 3":
2893shifterinterior.jpg


Installed the 96 Mustang shifter cable parts, I had to drill a hole in my 4R70W shifter arm to make it fit, came out perfect, shifts great!:
2893shift.jpg
 
Last edited by a moderator:


You ought to put a 1st gen explorer dash in there.


Join the Elite Explorers for $20 each year.
Elite Explorer members see no advertisements, no banner ads, no double underlined links,.
Add an avatar, upload photo attachments, and more!
.


Hell no! I hate those ugly things :)
hahahaha Mustang, maybe...

Dont worry the fake wood and stock gages wont last forever.
it iwll be easier to get my cage behind this style dash pad however.
The center console will come up to below the ash tray.
the plastic trim pieces are gone too.
I will retain the dash pad, vents, HVAC controls, stock head unit spot, speakers, and steering column, thats about it :)


Back
Top