Ford 'Quick Connect' Fuel Lines Suck! Fuel Filter Trouble! | Page 2 | Ford Explorer Forums - Serious Explorations

  • Register Today It's free!

Ford 'Quick Connect' Fuel Lines Suck! Fuel Filter Trouble!

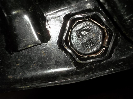
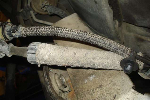
The tool needs to be able to slide down inside to release the filter, make sure you soak it with penetrating oil first, preferably overnight. If you have access to an airhose try to blow an debris out of it as well. You need to make sure that your tool fits properly, it should close around the line. I had to file down the outer part of the one I used to get it to fit inside the coupler, it took some time for sure. There seems to be no real science behind it, and it may take a bit of twisting and turning, a lot of cussing, but it will come off if you keep at it. Keep us posted and good luck.


Join the Elite Explorers for $20 each year.
Elite Explorer members see no advertisements, no banner ads, no double underlined links,.
Add an avatar, upload photo attachments, and more!
.


I have a 4X4 2002 Explorer Sport. Do I need to remove the front drive shaft to be able to remove the fuel filter ?


What size disconnect too did you use? I have tried both 3/8" and 1/2". Both seems to fit ok on the new filter. Is the tool supposed to wrap around completely and close the tool all the way?

me thinks the lines are 5/16". advance has two sizes if scissor tools. naturally the one you need is the more expensive,7.99. the above idea of filing a bevel on the contact side of the tool is well worth the effort before you start. just enough of a bevel to take the square edge off worked for me. that and pb.


For me it's always been a toss-up whether the disconnect tool works or not. Half the time it won't work on one end and no amount of fighting will make it. The thin metal fingers inside the fitting bend backwards and hang up.

Every time my best solution was cutting off the fuel filter at the base of its outlet so it's out of the way. Then with the chunk still stuck in the fitting, squish it so that the fingers release their grip a bit. Rotate it and twist it while pulling hard with vise grips and it will eventually come out, usually ripping the metal fingers out. Off to the parts store for a $2 box containing three new finger pieces. They just roll up and push inside the fitting and it works great.


Just my 2 cents,

I use the "donut" on the fuel line as a place to hold it so I can push the tool (the cheap scissor kind) into the fuel line, twist the fuel filter and line back and forth a couple times, then pull the filter and the line away from each other. Every time I've done it the tool and some gas hits me in the face. Sometimes it takes 2 or 3 tries but I never had to give up on it. I have done this on my Ranger that was in PA all of its life with the same results, not just here in FL. It Seems to me like if you push the tool into the line using the filter as leverage it binds up somehow.. idk


The "trick" seems to be to push the filter in along with the tool, or push the line towards the filter - just a tiny bit to push the filter away from the fingers so they can release.

Either that or get a deeper tool. The alloy ones are thicker so that helps as well.

Those little fingers get stuck in the locked position, and since most of the tools don't go deep enough into the fitting to overcome the friction on the fuel filter that's in there too, they won't release, the tool just bends the fingers but they never pop free because the ends are hung up on the filter still.

I've done this plenty, on both the fuel pump, fuel filter, etc. Once you remember to push in whatever you're trying to disconnect along with the tool, the fingers release no problem. You almost need three hands to do it, but once you figure out what works for you, try to remember how you did it and do it that way from then on.


Thanks for the great advice in this forum, it took me about an hour to change the fuel filter on my 92 Explorer. I used the Lisle Angled Disconnect Tool Set (39400), multicolored plastic. The blue one, second smallest, worked like a charm on the tank-end line, but not on the engine side. The yellow one, the smallest, did the trick, with a minimum of fussing. I didn't ding my knuckles -- didn't even curse. A couple of notes:

* Used no spray lube or cleaning fluid, but spinning the filter on the lines, and rotating the disconnect tool once it was fully inserted, may have helped.

* I did not relieve the fuel-line pressure. Did get a bit of a splash of gas, but had paper towels handy to soak it up. With the open tank-end of the filter hanging down, a steady stream of gas poured out. I caught about a half-cup in an old tin can. If I'd had the can ready from the start, I'd have caught a bit more.

Good luck, everyone!


The issues I had was pushing the clips back on the last time i did this. I dont remember exactly how but I pushed the retainer clip into the side of my thumb and got a very nice cut that blead very efficiently. Be care of this!


i bought the multi-colored plastic tools. there's a blue size and a gray size (i forget which is larger) i struggled with the size that seemed to fit for 2 hours, but no dice. then i tried the next size up (gray i think) and i had the fuel filter off in a couple of minutes. the trick seems to be to push the lines together and then push the tool in as far as possible. and you're right about finesse, rather than force, being the key. having 4 hands would have helped too...


think ford is bad, have any of you tried that screw in fuel filter used on some gm cars that have never been changed, and the lines just fall part with a wrench to it.


compressed air and then wd40 helps remove the filter. use compressed air to blow out the dirt grime in the fittings, then wd40 it up, then use the tools.


Either I got lucky or the brake cleaner really cleaned stuff out. It literally took me 5 minutes to change my fuel filter.


you can try neatly cutting 3/4 inch piece of a sharpie cap and use one of the disconnect tools to help back it into the fitting sometimes the cap is all you need .. also realize that the retaining ring for the connects is a flexable springy but bendable piece of metal and its a complete ring of teeth you need to push and twist at times or get lucky bridging the ring of retaining teeth theres gaps in the tools easy to miss one of the teeth its all it takes also remember to get that ring in shape to return the connection they need adjusted out a little so the connection will snap together

cool off come back at it...... it took me three times to get one of my lines off

I did the fuel pump access door mod as well as change my fuel filter and fuel pump with these lines and repaired two of the teeth and ring pieces inside the connectors with an electronics wire benders long nose pliers the rounded type


I know this is an old thread, but I wanted to say that this information was invaluable for me this past week. I spent hours trying to use the "sharpie cap" method to get my filter off and got nowhere. Thanks to the advice and encouragement in this thread I soaked it in PB Blaster and switched to a metal tool (Performance Tool / Wilmar model W83131). The filter came off in 5 seconds!


What I found that makes it hard to use the tool to release the hose is that metal bracket the filter sits behind makes it hard to get the tool up on the front end. When I replaced my filter I didn't reinstall that bracket. So the next time I go to replace the filter it will be a lot easier to get the tool on the hose.


When I did mine, I left the bracket on but unbolted it. Then a worm-style clamp holds it on the filter, loosen that and slide the bracket down the braided line. Then you have full access. The hardest part about doing this for me was finding the right size tool. I bought a 4-in-one but every one was too large. I had to go buy a second tool, then it came apart pretty easily.

Removing the metal bracket might allow more dirt/mud to get up there and make it harder to remove, just a thought.


"I then used a large 9" pair of needle noise pliers to squeeze the tool into the fitting.. Low and behold I heard a click and the fitting popped right off.." DeRocha

just adding my 2 cents....

I saw a video online that used a similar method as DeRocha explained. They cut a 1" end off a Sharpie marker cap, then cut a slit in the cap so that it can be put on the fuel filter stem. Then they used a pair of sturdy pliers to push the make-shift tool into the fuel line fitting and voila!


Join the Elite Explorers for $20 each year.
Elite Explorer members see no advertisements, no banner ads, no double underlined links,.
Add an avatar, upload photo attachments, and more!
.


This is more of a rant than a I need help post. I'm sure anyone that has attempted or succeeded in changing their fuel filter knows what a pain in the ass this job can be. I purchased two different sets of the disconnect tools, the little plastic one and the metal scissor type. After several attempts I was successful at releasing the end nearest the fuel tank, but I have spent 2 frustrating hours wrestling with the end near the engine. I'm not sold on either tool, I'm wondering of there is another one available that might make this task easier?? I'm wondering what the exact action is that will allow the clip to open up and free the fuel line? I'm going to shoot a little penetrating oil on the fitting tomorrow, do a little more twisting and pulling in hopes that it will losen up and pop free. This is easily the most annoying procedure in modern auto maintenance that I am aware of. It took me less time to pull my rear driveshaft and replace U-Joints than removing this little bugger. If anone has any tipe or things that might make this a little easier please let me know. Thanks much of you took the time to rad this whole post. :thumbsup:;)
I have found that before you even attempt to use any disconnect tool that if you press the fittings together as tightly as you can you will notice that it will move inward about 3/16 of an inch hold it there tightly then press the tool into the fitting you will hear a small click and it will release if you just try to press the tool in then you will bottom out on the connecting lip with the tool but with it pressed together it gives you just enough room to open the clips to make it simpler press the female end tightly on to the male end with the connecting lip hold it there tightly and then insert your tool and it will release


Back
Top