Joe Dirt
Explorer Addict
- Joined
- October 4, 2007
- Messages
- 13,325
- Reaction score
- 28
- Year, Model & Trim Level
- 07 Camry
Have a gen 2? Have that annoying clunk in the front when you go over small potholes, manhole covers, and cracks? Replaced everything else and haven't done these yet? Your sway bar bushings are shot.
Here we go...
Jack up your vehicle, place jackstands under the vehicle, and grab your tools. Ratchets, extensions, sockets, maybe a breaker bar, hacksaw if you live up north, and some grease.
First you will see these, your end links. Remove the bolt from the bottom on both sides. I used a socket on both sides. It is a pass-thru bolt, so you'll be holding it against itself only. I was replacing them, so I wasn't worried about bending it or anything.

Just leave it loose.
Now move over to your sway bar bushings... I think it is actually a 16mm bolt, but the 5/8 fit better for me.

Remove both

EDIT: I just replaced the bushings on my 2000, and they have horizontal mounts, as seen below. I had 13mm bolts in mine...
The rest of the writeup is exactly the same.

now back to our writeup...
Remove both and let the bar hang. Then maneuver the end links from the mounts and twist the bar down and off the truck- like so:

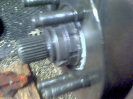
Now, if you're curious where those clunks and bangs are coming from, here is the space on a new, uncompressed MOOG bushing:

Here is the space on the old stock bushing:

That's a lot of open space...
...which allows the bar to bang around, resulting in this:

That black / shiny notch is worn down metal from the bar banging around against the mount- and your offending noise while crossing railroad tracks and Michigan potholes. (Larger Michigan potholes will snap your end links...)
Okay- to remove the endlinks if you're not from down south or lucky- if lucky, they will slide apart. If not lucky, i.e. ME, you get to cut them off- easiest way. The bolt corrodes, and will not slide through the housing, so cut it as close to the bottom as you like. Cut through the housing, it's just plastic.

For reference, it only took me about 20 seconds on each side to cut through. After that, they fall apart and out of the bar. I cut the second one 3/4 through and just hit it with a hammer and it snapped off and out.
Like this:

Now onto the new sway bar bushings.
I put some grease on both sides of the bushing. I also used some steel wool to clean out the inside of the mount. If your bushings are worn, you may have some residual bushing stuck to it. Chip it off with a screwdriver and steel wool it smooth for posterity.
put the bushing around the bar, then put the mount over the bushing.

Now go back under the car, lift up the sway bar up from the center, and use your other free hand to put one of the mounting bolts through the sway bar bushing mount and into the cross member. Start the bolt. Do the same with the other side.

Once there, (make sure you have proper orientation of the bar...) tighten the bolts a few threads, but not tight so you can have slack to maneuver the end links in if needed.
Grab your end new end links. Bam!

Carefully take them apart, and set the parts in order of how they came off if you'll forget it in 15 seconds.
Place the bolt and the top washer and then bushing through the top of the sway bar. Then the bottom upper bushing and washer, then the spacer housing... like this...

...then the top lower washer and bushing. Pass the bolt through the lower control arm and finish with the lower bottom bushing, washer, and the nut. There should be runner bushings contacting each side of the sway bar, and each side of the control arm. Hand tighten the nut. DO NOT TIGHTEN.
***Important- make sure the bolt passes down from the top to the bottom, and the nut on the bottom. Don't put it in upside down... That way if the nut comes loose, you won't have a bolt bouncing around under there and into something.
Repeat for other side...
Now move back to the sway bar bushings. Straighten them if needed, and tighten to somewhere between 65-90 lb. ft... Repeat for other side.

After your sway bar bushing brackets are tight, and the end links are still loose, LOWER THE VEHICLE. The end links need to be tightened with pressure on the bar.
Tighten them to between 10-13 lb. ft. they are not a tight fastener.
You can see how much my bushings squished- but all bushings are different, so I used a torque wrench. Repeat for other side.

We're done!

Hope this helps!
Here we go...
Jack up your vehicle, place jackstands under the vehicle, and grab your tools. Ratchets, extensions, sockets, maybe a breaker bar, hacksaw if you live up north, and some grease.
First you will see these, your end links. Remove the bolt from the bottom on both sides. I used a socket on both sides. It is a pass-thru bolt, so you'll be holding it against itself only. I was replacing them, so I wasn't worried about bending it or anything.
Just leave it loose.
Now move over to your sway bar bushings... I think it is actually a 16mm bolt, but the 5/8 fit better for me.
Remove both
EDIT: I just replaced the bushings on my 2000, and they have horizontal mounts, as seen below. I had 13mm bolts in mine...
The rest of the writeup is exactly the same.
now back to our writeup...
Remove both and let the bar hang. Then maneuver the end links from the mounts and twist the bar down and off the truck- like so:
Now, if you're curious where those clunks and bangs are coming from, here is the space on a new, uncompressed MOOG bushing:
Here is the space on the old stock bushing:
That's a lot of open space...
...which allows the bar to bang around, resulting in this:
That black / shiny notch is worn down metal from the bar banging around against the mount- and your offending noise while crossing railroad tracks and Michigan potholes. (Larger Michigan potholes will snap your end links...)
Okay- to remove the endlinks if you're not from down south or lucky- if lucky, they will slide apart. If not lucky, i.e. ME, you get to cut them off- easiest way. The bolt corrodes, and will not slide through the housing, so cut it as close to the bottom as you like. Cut through the housing, it's just plastic.
For reference, it only took me about 20 seconds on each side to cut through. After that, they fall apart and out of the bar. I cut the second one 3/4 through and just hit it with a hammer and it snapped off and out.
Like this:
Now onto the new sway bar bushings.
I put some grease on both sides of the bushing. I also used some steel wool to clean out the inside of the mount. If your bushings are worn, you may have some residual bushing stuck to it. Chip it off with a screwdriver and steel wool it smooth for posterity.
put the bushing around the bar, then put the mount over the bushing.
Now go back under the car, lift up the sway bar up from the center, and use your other free hand to put one of the mounting bolts through the sway bar bushing mount and into the cross member. Start the bolt. Do the same with the other side.
Once there, (make sure you have proper orientation of the bar...) tighten the bolts a few threads, but not tight so you can have slack to maneuver the end links in if needed.
Grab your end new end links. Bam!
Carefully take them apart, and set the parts in order of how they came off if you'll forget it in 15 seconds.
Place the bolt and the top washer and then bushing through the top of the sway bar. Then the bottom upper bushing and washer, then the spacer housing... like this...
...then the top lower washer and bushing. Pass the bolt through the lower control arm and finish with the lower bottom bushing, washer, and the nut. There should be runner bushings contacting each side of the sway bar, and each side of the control arm. Hand tighten the nut. DO NOT TIGHTEN.
***Important- make sure the bolt passes down from the top to the bottom, and the nut on the bottom. Don't put it in upside down... That way if the nut comes loose, you won't have a bolt bouncing around under there and into something.
Repeat for other side...
Now move back to the sway bar bushings. Straighten them if needed, and tighten to somewhere between 65-90 lb. ft... Repeat for other side.
After your sway bar bushing brackets are tight, and the end links are still loose, LOWER THE VEHICLE. The end links need to be tightened with pressure on the bar.
Tighten them to between 10-13 lb. ft. they are not a tight fastener.
You can see how much my bushings squished- but all bushings are different, so I used a torque wrench. Repeat for other side.
We're done!
Hope this helps!