aldive
Elite In Memoriam
- Joined
- January 17, 2001
- Messages
- 24,667
- Reaction score
- 28
- Year, Model & Trim Level
- 1999 XLT
After having seen what appears to be the ideal location for the tranny cooler and filter on Monmix’s Explorer ( http://www.explorerforum.com/forums/showthread.php?p=1131092#post1131092 ) ), I decided to relocate mine to a comparable location. Not only will the tranny cooler get excellent air flow, but also the tranny filter with the Cool Collar attached ( http://www.explorerforum.com/forums/showthread.php?t=125508&highlight=cool+collar ) will get direct air flow. This setup should yield a cooler operating transmission.
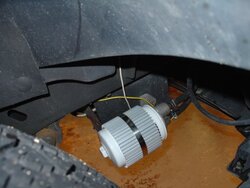
My ATF filter was previously mounted in the passenger’s side fender well ( see picture ) and the tranny cooler was mounted to the radiator behind the grill. These locations worked well and I had no problems. I was merely looking for a superior way/location to mount them. Monmix’s was the finest I have ever seen; I chose to emulate his installation.
I decided to purchase a larger tranny cooler ( than I presently had ) and I definitely wanted a stacked plate style cooler ( which allows better cooling than ordinary fin & tube coolers like I had ). Monmix used a B & M cooler in his installation and after discussions with him ( he even went out in the snow to measure for me ), I decided to also go with a B & M cooler. However, since I often tow a Jeep on a tandem trailer in the hot Florida weather, I opted for a larger tranny cooler with added cooling potential. As an added bonus,the location will allow the addition of a “pusher” electric fan if the need ever arises.
I ordered the B & M model 70264 ( SuperCooler 24,000 GVW 11"x6"x1-1/2" ) from Summit Racing ( http://store.summitracing.com/defau...k=KeywordSearch&Ntt=B+&+M+transmission+cooler ). The cooler cost $49.88.
The front bumper was removed very easily by taking off the 4 nuts that hold it in place. I also had to unplug the fog lights ( they did not need to be removed ). Once gently lifted, the bumper essentially sides off the 4 studs and is set aside. It can be done by oneself but it is much easier with a helper.
This new tranny cooler fit well in the location I choose ( see picture ). I simply drilled holes in the lower radiator support and used self tapping screws to attach the cooler.
The remote tranny filter ( http://store.summitracing.com/defau...110&Ntk=KeywordSearch&Ntt=transmission+filter ) location required me to fabricate a mounting bracket. On my chop saw, I cut a piece of 3/16 “ steel plate to fit between the mounting bolts for the auxiliary factory tranny cooler which is mounted to the radiator bracket. The steel plate was cut to 3” and drilled to use the existing factory cooler bolts and for the three holes for the tranny filter bracket. The steel mount was meticulously cleaned with lacquer thinner and then painted flat black to avert any rust formation.
New ATF hose ( 3/8” hose that came with the B & M cooler ) was used to route the lines. Everything was buttoned up and the hoses secured with tie wraps. The motor was then cranked to check for any leaks; as expected, there were none.
The electrical signal wire to the transmission temperature gauge ( http://www.dakotadigital.com/Detail.cfm/-/Category=133/PartNumber=ODYR-08-3/product.htm ) had to be rerouted. The ground from the ATF filter housing also had to be rerouted.
The bumper was reattached. This was accomplished with a helper and is quit a bit more difficult than removing it due to the alignment process.
This relocation project cost $49.88 for the B & M tranny cooler ( I had on hand al the extra materials ) and took about 1 ½ hours to accomplish.
A road test will soon be performed to evaluate the new setups effect on tranny operating temperature; a report will follow.