A/C Rear Line Leak | Page 7 | Ford Explorer Forums - Serious Explorations

  • Register Today It's free!

A/C Rear Line Leak

Not only are the lines corroded and cracked. The rear evaporator likely is pinholes and the blower motor corroded. The car is old enough and high mileage enough that I'd advise putting adblock off plate on at the front manifold. This will allow you to charge the system and use the front cooling. Probably about $300 total to do that.
Are you talking about your 2010 Explorer? If so, you are in the wrong Forum.

Peter


Join the Elite Explorers for $20 each year.
Elite Explorer members see no advertisements, no banner ads, no double underlined links,.
Add an avatar, upload photo attachments, and more!
.


Its right at the entry into the evaporater at a right angle right at the tip...wish was in the middle so i can do these kits
Why not? You buy the complete replacement hose and the splice kit. You cut off the part of the new hose (right angle fitting and maybe a foot or so of straight section - whatever makes sense) to replace the damaged portion of your old hose and splice it in. This way you don't have to drop the subframe to replace the entire hose and the total repair cost should be a few hundred bucks instead of a few thousand.


Why not? You buy the complete replacement hose and the splice kit. You cut off the part of the new hose (right angle fitting and maybe a foot or so of straight section - whatever makes sense) to replace the damaged portion of your old hose and splice it in. This way you don't have to drop the subframe to replace the entire hose and the total repair cost should be a few hundred bucks instead of a few thousand.
2011 Explorer Rear AC Line Set -FE37190

Another interesting option , it even says do not need to remove the old lines and snake these through and anchor them.


Definitely better option than blocking off your rear a/c and losing its function especially if you have passengers/kids.


A/C system won't hold any pressure. After trying to fill it briefly today and smelling refrigerant occasionally, I put the car on ramps to look. Then noticed a wet spot of refrigerant oil on the drive behind the muffler and also saw the UV dye above the muffler where the lines enter for the back A/C evaporator.

It looks like its leaking at the large diameter line (suction/low pressure?) where it connects with these male torx bolts. I can't see anywhere where the line itself looks compromised and that round glow around the circumference of the pipe down and to the left of the torx bolt in the pic is suggesting to me that is where the leak is. It could be on the pipe itself though and I'm not sure how to be positive about this.

Any thoughts on how to proceed? Any advice for me? I'm not sure what to call these parts to search for them either if anyone knows? Is this auxillary evaporator? I'd like to swap out parts myself here if possible, pump it down, and fill it up, or maybe just pay someone to do it if it's not an arm and a leg. Given I've already found it, maybe its cheaper just to take it in somewhere local and point them to it? Couldn't believe I actually found the leak after reading post-after-post of hidden leak horror stories. Thanks in advance for any help.

MVIMG_20200516_163359.jpg


^^ Your thread was merged with this existing one on the same issue. That entire configuration looks like a bit of a mess. I don't know if it can be repaired or not. I am sure the dealer will recommend replacing the lines. One member was quoted $2500 to do that. Another, I believe, had Mr. Lube repair the line for $1500 but yours doesn't seem to be an easy fix given the location.

Peter


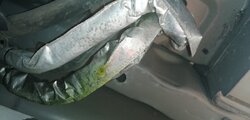
I decided to get a better look at things and take action!!! The thermal wrap is easily removable with scissors or rubber-gloved hands right along its seam and so I began removing it. Be careful of the rubber hose that is part of the a/c line above the muffler behind a crimped fitting. What a UV dye mess in there! The pin hole leak on the low side suction tube is shown in the pic and was immediately apparent after attempting a fill as residual r-134 and oil/dye were still escaping at the time.
IMG_20200516_203459_2.jpg

Indeed, as others note in this thread, Ford's design of a loose fitting slip-over thermal wrap allows for gravel/sand/dust to build up between the wrap and aluminum tubing causing wear and exacerbating rock strikes. Mine had quite a lot in there. A properly designed heat shield could have offered the same radiant heat barrier from the exhaust as well as flying rock strike protection without the sand/gravel build-up flaw, but I digress.

Given the small hole size I decided on an epoxy patch. Soldering, brazing seemed like too much heat close to the rubber o-ring fitting 6 inches away, and the flux would go in the hole, etc. There are a lot of off-the-shelf epoxy products with magical marketing claims out there. Avoid them in my opinion. ALUM BOND is the product I decided on that seemed most appropriate with specific claims about its ability to bond aluminum tube in A/C systems. You can't buy it off the shelf in my area, it has to be ordered and shipped (took 1 day). Its made by a manufacturer of HVAC equipment, is designed for aluminum exterior A/C applications, and seems to be praised by HVAC repair personnel in anecdotal comments for this type of pinhole fix.
IMG_20200518_163405_2.jpg

I removed all the crummy thermal wrap and started cleanup with denatured alcohol. I covered the pinhole with a small circle of tape while doing this and sanding around the tube. 150 grit SC paper or cloth seems to work well. A quick shot of refrigerant allowed for gas to be squirting out while I sanded around the hole, hopefully preventing system contamination. Some more quick wipes with denat alcohol to clean things up and a quick tap on the schrader valve to release any residual pressure, ready to go. Here's what it looked like right before I applied the epoxy compound:
IMG_20200519_153832_3.jpg

Mixed up the 2 part epoxy well, calls for 2 minutes of mixing. I did 4 stripes in the bowl A/B/A/B and mixed the crap out of them until uniform and then did a quick thin coat application everywhere I wanted it. Then after some more mixing and minutes of time it had thickened and I applied enough to wrap the tube thoroughly with some thickness to it. It can be tooled with a wet glove and ultimately I was using a wet paper towel to tool it around a bit where it sagged/dripped during set time. The hole is on the rear-facing side so I wanted good thick coverage there. I had to come back to it several times over the course of 90 min - 2 hrs and make sure it was how I wanted it to be. Here's what the fix looks like the next morning:
IMG_20200520_062033_2.jpg

I'm pretty happy with the way it turned out and am confident it will hold. I'm waiting on a pump and thermal wrap delivery to finish the job. You'll HAVE TO REPLACE the thermal wrap especially on the rubber hose above the muffler!!! It rained like cats and dogs here over the last few days so I'll have to pump down for 24 hrs to be sure of water evacuation. I'll follow up and let you know how things go. I hope this helps somebody in a similar spot with a similarly small hole to fix on a real long run of a/c tubing.

To be clear, if this doesn't work, I plan to use the aftermarket autocoolingsolutions flexible hose replacement kit shown at this link. Replacing the hard lines looks to be a giant pain ITA as you follow them through from the muffler to up behind the engine near the firewall. With the flexible ones, you'd just thread them through easy peezy, but we'll see how this vacuum holds and go from there.

***If this hasn't happened to you yet, please consider REMOVING AND REPLACING the sand & gravel-collecting thermal wrap above your muffler***


If that were mine, I'd try a piece of rubber and a hose clamp first. I patched one of my copper water lines like that about 20 years ago and it's still good. Mind you, you do have a sight curve there as well so I'm not sure if this patchwork would work but it is an easy thing to try.

Peter


Hi Folks,

Add me to the list of Explorer owners with the rear A/C line leak. My 2016 XLT with 49,000km is leaking. I came out the other day and could hear a hiss coming from the rear. NOT GOOD. Sure enough I stripped away the rear insulation which was full of A/C coolant and right on the bend was a spot where it looks like corrosion had flaked off.

This job looks stupid expensive. I'm thinking of splicing in a new section with the 5/8 fitting as I"m not dropping the rear subframe to get the line out. Has anyone tried the replacement hoses from auto cooling solutions? 2011 Explorer Rear AC Line Set -FE37190

They say they only fit 2011 to 2015 but I'm thinking thats because of body changes more than anything. Is the larger diameter line the liquid line or suction line? I don't want to order the wrong line.
 

Attachments

  • IMG_2453.jpg
    IMG_2453.jpg
    47.3 KB · Views: 210


Hi Folks,

Add me to the list of Explorer owners with the rear A/C line leak. My 2016 XLT with 49,000km is leaking. I came out the other day and could hear a hiss coming from the rear. NOT GOOD. Sure enough I stripped away the rear insulation which was full of A/C coolant and right on the bend was a spot where it looks like corrosion had flaked off.

This job looks stupid expensive. I'm thinking of splicing in a new section with the 5/8 fitting as I"m not dropping the rear subframe to get the line out. Has anyone tried the replacement hoses from auto cooling solutions? 2011 Explorer Rear AC Line Set -FE37190

They say they only fit 2011 to 2015 but I'm thinking thats because of body changes more than anything. Is the larger diameter line the liquid line or suction line? I don't want to order the wrong line.

Large line is the suction line. I have a weird tool squeeze mark on mine right where your hole is located....curious. Not sure about the fitment to the '16 and later versions of the a/c system, but they do LOOK the same on these '14, '16, and '17 explorer ford parts links.

Just try and patch it all around like I did. It's only $10.00 for the Alum Bond, some sandpaper, soap/water and denatured alcohol to clean it up. PULL THE SCHRADER VALVE right before you apply the aluminum patching epoxy!!! If you don't, gas comes out the line, even if its been emptied, and will make bubbles and a failed patch. Gouge around the sanded clean hole with a rattail file a little bit to give it some texture to grab onto as well!

Either way, good luck, I'd bet the ACS replacement lines would fit. You do have to buy both of them as a set and they're close to $400.00 though.


If you can get a hose clamp in there then you could try the method I used for my leaking copper water line in the house. (post #128)

Peter


Add my 2016 Ford Explorer XLT to the list also. Just discovered this yesterday. What a crappy design. I had no idea where to look for the leak until I saw this group discussing it. I immediately went and looked at the spot and sure enough, there's the dye. Once I locate the hole I will update with what I do.
 

Attachments

  • IMG_20200612_175136.jpg
    IMG_20200612_175136.jpg
    85.1 KB · Views: 201
  • IMG_20200612_180930.jpg
    IMG_20200612_180930.jpg
    101.6 KB · Views: 160


Welcome to the Forum. :wave:
Interested in seeing where the leak is.

Peter


Thanks. I own 2 Explorers so I need to fix my 2016 and make sure It doesn't happen to my 2015.


It looks like it's right on the outside of the bend where it's silvery there. A squirt of r134a in the low side service port and run around back will tell you right quick. Cut the stupid metal wrap all the way off, you'll have to cover the rubber hose with radiant heat tape later anyway.


It looks like it's right on the outside of the bend where it's silvery there. A squirt of r134a in the low side service port and run around back will tell you right quick. Cut the stupid metal wrap all the way off, you'll have to cover the rubber hose with radiant heat tape later anyway.
Thanks for the help. I will be tackling this tomorrow. I will let you know what I find and how we fix it.


Thanks for the help. I will be tackling this tomorrow. I will let you know what I find and how we fix it.
I also had leaks in both front and rear AC lines. just got my 2013 Explorer back from dealer at a cost of $1800.30. labor alone was over $1200.00. Way too much for a SUV that is only 7 years old with only 59,000 miles.


OK it's repaired (not to factory standards) and working great. So in the picture you can see the leak is coming from the hole that runningonfords pointed out. So we sanded and cleaned the area then epoxy over the hole and covered that with rubber and a hose clamp to keep the rubber on. Filled with refrigerant and tested. It works great now. I will update over time to see how it holds.

We also replaced the motor for the dual climate control.
 

Attachments

  • IMG_20200617_152752.jpg
    IMG_20200617_152752.jpg
    87.7 KB · Views: 201
  • IMG_20200617_155344.jpg
    IMG_20200617_155344.jpg
    84.7 KB · Views: 146


An update. It's only been 2 days but it's holding perfectly. A/c is working great and stays cold.


Join the Elite Explorers for $20 each year.
Elite Explorer members see no advertisements, no banner ads, no double underlined links,.
Add an avatar, upload photo attachments, and more!
.


Large line is the suction line. I have a weird tool squeeze mark on mine right where your hole is located....curious. Not sure about the fitment to the '16 and later versions of the a/c system, but they do LOOK the same on these '14, '16, and '17 explorer ford parts links.

Just try and patch it all around like I did. It's only $10.00 for the Alum Bond, some sandpaper, soap/water and denatured alcohol to clean it up. PULL THE SCHRADER VALVE right before you apply the aluminum patching epoxy!!! If you don't, gas comes out the line, even if its been emptied, and will make bubbles and a failed patch. Gouge around the sanded clean hole with a rattail file a little bit to give it some texture to grab onto as well!

Either way, good luck, I'd bet the ACS replacement lines would fit. You do have to buy both of them as a set and they're close to $400.00 though.

Any update on your attempt to patch with Alum Bond?


Back
Top