C
-
Performance Upgrades - Maintenance - Modifications - Problem Solving - Off-Road - Street Trucks.
Covering the Explorer, ST, Sport, Lincoln Aviator, Sport Trac,
Mercury Mountaineer, Mazda Navajo, Ford Ranger, Mazda Pickups, and the Aerostar.
Featuring H.I. - Human Intelligence.
Register Today It's free!
You are using an out of date browser. It may not display this or other websites correctly.
You should upgrade or use an alternative browser.
You should upgrade or use an alternative browser.
- Status
- Not open for further replies.
Elite Explorer members see no advertisements, no banner ads, no double underlined links,.
Add an avatar, upload photo attachments, and more!.
C
CopyKat
wow what a difference between the phone and a video, just for everyone out there it sounds deadly over the phone
It just doesn't sound the same in video or over the phone. It's got a nice growl to it.
C
CopyKat
are you going to dyno it? i wonder how much more hp/tq it has over stock.
there is a dyno 20 min from my place. For giggles I may take it there just to get some numbers. If I can get 170-180 at the wheels I'll be happy as all getout.
- Joined
- August 3, 2000
- Messages
- 31,726
- Reaction score
- 8,388
- City, State
- NORTH IDAHO, 7B
- Year, Model & Trim Level
- B2 "Slightly" Modified
- Callsign
- FOURTEN
4 days now.... have you driven it????????????????????????????????????????????????????????????????????????????????????????????????????????????????/
C
CopyKat
4 days now.... have you driven it????????????????????????????????????????????????????????????????????????????????????????????????????????????????/
Not yet. My coolant leak has returned, and I still have a bunch of little things to clean up and finish. Mounting the boost gauge and making a harness for the injectors.
Also the dump of snow we had before I started it, is still melting making it pretty sloppy here in the yard. I don't feel like working on a sloppy wet/muddy vehicle.
It'll give me time to get the front 4.10 pig installed and get my mudflap/splash guard brackets made.
C
CopyKat
once all the kinks are worked out, take it back off and send it to me
haha funny guy!
:
C
CopyKat
Got it all back together. I used the compressed paper gasket from Felpro. It is thicker than the tin one I had in before. I think this helps better in the V between the heads. Filled the rad with coolant and fired it up. After about 5 min of running I re torqued the lower intake. The wrench moved about 70° before the 216 in/lbs was reached. This was a step I missed with the last gasket. It may have been fine. I'll check them again after a bit more run time.
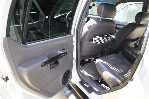
Got the gauge pod finished and mounted. Also wired up the light in the gauge.


Just waiting for the damn snow to go away and dry up some. so I can get this thing out and start tuning. It will be in the shop for a bit more. I've got the Front 4.10 geared pig to install, splash guard/mud flaps to put on and I may start on the rear bumper.
Got the gauge pod finished and mounted. Also wired up the light in the gauge.
Just waiting for the damn snow to go away and dry up some. so I can get this thing out and start tuning. It will be in the shop for a bit more. I've got the Front 4.10 geared pig to install, splash guard/mud flaps to put on and I may start on the rear bumper.
C
CopyKat
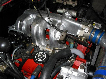
Got some Ricer components in the mail yesterday.
More fab work to be done to install this piece. The discharge will be routed back into the low pressure side of the intake.

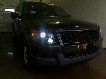
Also got some new headlights. bye bye sealed beams, hello H4's.

Still more cool stuff coming in the mail.
More fab work to be done to install this piece. The discharge will be routed back into the low pressure side of the intake.
Also got some new headlights. bye bye sealed beams, hello H4's.
Still more cool stuff coming in the mail.
- Joined
- August 3, 2000
- Messages
- 31,726
- Reaction score
- 8,388
- City, State
- NORTH IDAHO, 7B
- Year, Model & Trim Level
- B2 "Slightly" Modified
- Callsign
- FOURTEN
dude you will love the H4's, I ditched my Sylvania xtrea vision sealed beams years ago for Hella H4 4x6 squares, FAR SUPERIOR with Sylvania Ultra Vision bulbs
I then broke about 3 of those Hella lenses, at $60 ea it was not cheap! Now I have IPF housings and they are covered in CLEAR BRA
I have not had a chip or crack since
I highly recommend the clear bra on your new lights, after like 7 years, still no yellow, no cracks, etc
hopefully the ground is clearing up and you can drive this sucker soon! Cant wait to hear results
C
CopyKat
Ya I've been thinking of swapping them sealed beams out, for quite some time now. I'll have to look around for that film see if I can find some. I wanted to get some for the fog lights on our Civic but one lens is now cracked. My wife has a habit of following too close to fully loaded gravel trucks. The front of the car is littered with stone chips. On a black car its unfortunate that you can see every single stone chip.
It's almost too late now to get one of those clear bra's for the car. The damage is already done.
The front of the car is littered with stone chips. On a black car its unfortunate that you can see every single stone chip. It's almost too late now to get one of those clear bra's for the car. The damage is already done.
- Joined
- August 3, 2000
- Messages
- 31,726
- Reaction score
- 8,388
- City, State
- NORTH IDAHO, 7B
- Year, Model & Trim Level
- B2 "Slightly" Modified
- Callsign
- FOURTEN
screw the paint save the glass!
Colorado = windshield and paint screwed the first year
Colorado = windshield and paint screwed the first year
C
CopyKat
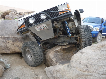
As you can see in the last pic the truck is kinda laid up. But the beam is ready to go back in. I'm out of town for the weekend so next week it should be back together and it may come out for a short ride. I want to test and see how these Durango springs work out.
C
CopyKat
Axle is back in the truck and it's now back on all four wheels. I replaced the rotors and the pads while I had it apart. They were the original rotors and pads the D44 axle came with when I got it.
Testing out travel and measuring for bumpstops. The coils limit the travel by 3.5".

Bumpstop

Why trimming of the axle window is necessary for long travel.

Blowoff valve mounted. Need to make the low pressure side back into the intake.

Started on the rear reciever, and the bumper will soon follow.

Testing out travel and measuring for bumpstops. The coils limit the travel by 3.5".
Bumpstop
Why trimming of the axle window is necessary for long travel.
Blowoff valve mounted. Need to make the low pressure side back into the intake.
Started on the rear reciever, and the bumper will soon follow.
C
CopyKat
About 90% done. Just need the injector harness and then tune the injectors.
Video to come.

Video to come.
C
CopyKat
Elite Explorer members see no advertisements, no banner ads, no double underlined links,.
Add an avatar, upload photo attachments, and more!.
C
CopyKat
Knocking more things off my list of "to-do's"

No during pictures. Just when I took a break to paint it.


With spare tire on rack.

No during pictures. Just when I took a break to paint it.
With spare tire on rack.
- Status
- Not open for further replies.
Featured images


Featured images
Similar Threads
- Sticky
- Replies
- 63
- Views
- 155,920
- Replies
- 4
- Views
- 1,240
- Replies
- 13
- Views
- 2,497