- Joined
- November 23, 1999
- Messages
- 1,986
- Reaction score
- 6
- City, State
- Dracut, MA
- Year, Model & Trim Level
- 1997 Sport
Here are the steps needed to Fix the Broken Recliner Lever on 1995+ Explorers. Below is the Drivers side, I assume the Pass. Side is the same but Mirrored.
(For Disscussion on this topic, please go here: Dead Link Removed )

Tools Needed:
#1 Phillips Screwdriver
#2 Phillips Screwdriver
#2 Stubby Phillips Screwdriver
3/8” Ratchet
Metric Socket(Can not remember size)
Torx Bit(Can not remember size)
----------------------------------------------------------------------------------------------------------------

Step 1,
Remove screws holding Side Cover on.
----------------------------------------------------------------------------------------------------------------

Step 2,
Remove seat Controls from Side Cover.
----------------------------------------------------------------------------------------------------------------

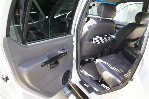
Step 3,
Un-Hook & Remove the Seat Back Cover, This can be done by unhooking bottom edge(Red Arrow) and also by reaching your arm inside the cover and finding where it attached to the steel seat support inside of the back of the seat. Then Slid it up and off of the Seat Back Frame. (It may seem that this will be hard to re-attach when you go to put it back together but I assure you that it actually goes back together quite easily.)
----------------------------------------------------------------------------------------------------------------

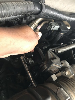
Step 4,
Using 3/8” Ratchet and the Correct Torx Bit, Remove the 2 upper bolts attaching the Recliner Assembly to the Seat Back.
----------------------------------------------------------------------------------------------------------------

Step 5,
Using 3/8” Ratchet and Correct Metric Socket, Remove the 2 lower bolts attaching the Recliner Assembly to the Base of the Seat.
----------------------------------------------------------------------------------------------------------------

Step 6,
Using 3/8” Ratchet and Correct Metric Socket, Replace the 2 lower bolts attaching the NEW Recliner Assembly to the Base of the Seat.
----------------------------------------------------------------------------------------------------------------

Step 7 A,
It might be Easier to re-assemble if you have The Reliner Assembly in a Reclinmed Position As shown in this Photo.
----------------------------------------------------------------------------------------------------------------

Step 7 B,
Using 3/8” Ratchet and the Correct Torx Bit, Replace the 2 upper bolts attaching the NEW Recliner Assembly to the Seat Back.
----------------------------------------------------------------------------------------------------------------

Step 8,
Replace the Seat Back Cover, This can be done by sliding the Cover back over the Seat Back Frame, once all the way on, reach up inside the cover and find hooking edge and hook it back on to the steel back support of the Seat Back Frame. Then work the front edge under the Seat Back and hook it to the Rear Edge as seen in Photo.
----------------------------------------------------------------------------------------------------------------

Step 9,
Replace the Side Side Cover, Reattaching the Seat Controls First.
----------------------------------------------------------------------------------------------------------------

Step 10,
Stand back and Admire your work.
----------------------------------------------------------------------------------------------------------------

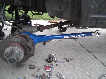
OLD Broken Recliner Assembly
----------------------------------------------------------------------------------------------------------------

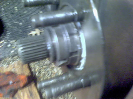
NEW Recliner Assembly
----------------------------------------------------------------------------------------------------------------

OLD & NEW Recliner Assembly's
----------------------------------------------------------------------------------------------------------------

Red Arrow: Rivets
Blue Arrow: Thick Arm
Yellow Arrow: Thin Lever that breaks
Purple Line: Place where the Break happens
(For Disscussion on this topic, please go here: Dead Link Removed )
Tools Needed:
#1 Phillips Screwdriver
#2 Phillips Screwdriver
#2 Stubby Phillips Screwdriver
3/8” Ratchet
Metric Socket(Can not remember size)
Torx Bit(Can not remember size)
----------------------------------------------------------------------------------------------------------------
Step 1,
Remove screws holding Side Cover on.
----------------------------------------------------------------------------------------------------------------
Step 2,
Remove seat Controls from Side Cover.
----------------------------------------------------------------------------------------------------------------
Step 3,
Un-Hook & Remove the Seat Back Cover, This can be done by unhooking bottom edge(Red Arrow) and also by reaching your arm inside the cover and finding where it attached to the steel seat support inside of the back of the seat. Then Slid it up and off of the Seat Back Frame. (It may seem that this will be hard to re-attach when you go to put it back together but I assure you that it actually goes back together quite easily.)
----------------------------------------------------------------------------------------------------------------
Step 4,
Using 3/8” Ratchet and the Correct Torx Bit, Remove the 2 upper bolts attaching the Recliner Assembly to the Seat Back.
----------------------------------------------------------------------------------------------------------------
Step 5,
Using 3/8” Ratchet and Correct Metric Socket, Remove the 2 lower bolts attaching the Recliner Assembly to the Base of the Seat.
----------------------------------------------------------------------------------------------------------------
Step 6,
Using 3/8” Ratchet and Correct Metric Socket, Replace the 2 lower bolts attaching the NEW Recliner Assembly to the Base of the Seat.
----------------------------------------------------------------------------------------------------------------
Step 7 A,
It might be Easier to re-assemble if you have The Reliner Assembly in a Reclinmed Position As shown in this Photo.
----------------------------------------------------------------------------------------------------------------
Step 7 B,
Using 3/8” Ratchet and the Correct Torx Bit, Replace the 2 upper bolts attaching the NEW Recliner Assembly to the Seat Back.
----------------------------------------------------------------------------------------------------------------
Step 8,
Replace the Seat Back Cover, This can be done by sliding the Cover back over the Seat Back Frame, once all the way on, reach up inside the cover and find hooking edge and hook it back on to the steel back support of the Seat Back Frame. Then work the front edge under the Seat Back and hook it to the Rear Edge as seen in Photo.
----------------------------------------------------------------------------------------------------------------
Step 9,
Replace the Side Side Cover, Reattaching the Seat Controls First.
----------------------------------------------------------------------------------------------------------------
Step 10,
Stand back and Admire your work.
----------------------------------------------------------------------------------------------------------------
OLD Broken Recliner Assembly
----------------------------------------------------------------------------------------------------------------
NEW Recliner Assembly
----------------------------------------------------------------------------------------------------------------
OLD & NEW Recliner Assembly's
----------------------------------------------------------------------------------------------------------------
Red Arrow: Rivets
Blue Arrow: Thick Arm
Yellow Arrow: Thin Lever that breaks
Purple Line: Place where the Break happens