Guys,
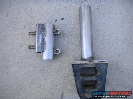
Just got a pair of those aftermarket halo projector fog lights for my '02 Explorer.
They look nice, are marked with the SAE and DOT stamps in the glass and so far seem to be of a good quality.
They're all over eBay. If you type in "halo" and "explorer," they'll come up.
Now a gripe to get out of the way. It took me a month to get these! I let my Paypal account lapse over a year ago because of all the horror stories and the Federal investigations into their practices. I prefer to pay by USPS money order.
I don't know what it is about these sellers of Japanese, Chinese and Taiwanese auto parts, but they insist on treating USPS money orders like an out-of-state personal check, indicating that it must first "clear" the bank before the item is sent.
As a lot of them have post office boxes for their mailing addresses, why they just don't open the envelopes in the post office and walk the few steps to the counter to get the cash is absolutely beyond me. I've tried in the past to explain that a USPS money order can be cashed immediately at the post office or a bank, but to no avail. Oftentimes, the sellers of these products have limited English ability and I suspect that they are not aware that a USPS money order is not a personal check.
So after the USPS money order "cleared," I received an email indicating that my items will ship "shortly" and that took about a week before the seller got around to it...
I suspect that many times, eBay sellers such as these may not even have the items they're selling but purchase them from overseas upon receiving payment and then resell them.
OK, getting back to the fog lights... After I examined them, I hooked one up to a 12v power supply to check out the halo ring. There are a pair of wires, one black, one red. Naturally, the red wire will go to the parking light + and the black to the parking light - or to a ground point somewhere else.
Regarding the halo, it's illuminated with a pair of T-1¾ 5mm white LEDs. These LEDs are the type of white LEDs that have a distinct purplish/bluish white glow to them, much like very purplish fluorescent lighting. The nature of the serrated halo seems to bring out that purple/blue element of the light.
Being that I will have to occasionally drive my Explorer to Pennsylvania where citation-happy police constantly patrol on the lookout for illegal "ornamental lighting" (and that's ANY lighting that is non-original to the vehicle, trust me, I checked with the appropriate agency in Harrisburg), I can see where this blue/purple light could be problematic. Police in PA also don't like to see anything but amber up front and red in the rear. Blue? That's definitely asking to get your wallet lightened.
So, I'm going to take a drive up to Radio Shack and get some white LEDs. The white LEDs sold at Radio Shack are of a whiter light and their LEDs are also rather bright, and are of a higher mcd.
I've considered ordering several different batches of LEDs from Mouser Electronics and testing them out for the most aesthetically pleasing white that doesn't go too far into the blue range. I may still do this.
As I am sure some of you know, white LEDs are actually blue LEDs with phosphors added to provide the white light. This is why they have varying degrees of the bluish tint.
The LEDs are removed by pulling out a rectangular white rubber grommet. They are obviously soldered to resistors, which in turn are soldered to the wires and then covered with shrinkwrap. It would be a simple matter to replace the LEDs. If one desires, one could also experiment with the resistor value in order to get varying degrees of brightness.
You might also experiment with different color LEDs if you can get away with that sort of thing in your jurisdiction. Radio Shack has all manner of colors — you could go crazy and use pink LEDs...
It might be possible to also insert two T-1 3mm LEDs in place of the T-1¾. This way, you could get a composite color of sorts, say by using blue and white LEDs side by side to get a cool blue/white glow.
I will add that while the grommet is tight, I am going to add silicone around the grommet so that moisture won't seep into the halo and cause the LED leads to rust.
Stay tuned. Photos to follow.