Xeek
Explorer Addict
- Joined
- March 21, 2010
- Messages
- 2,995
- Reaction score
- 20
- City, State
- Virginia Beach, VA
- Year, Model & Trim Level
- 1991 xlt
so the previous owner had a sagging headliner and decided to rip it off, leaving the foam exposed. and shove pennies in the board and write on the foam.

so i followed the same idea from this thread: http://www.explorerforum.com/forums/showthread.php?t=283525
i ordered from the same website, i got light grey suede and two cans of glue. it came to $60 and some change with a 15% off coupon code i found.
tools needed:
T50 or T45 security socket, cant remember which. for the seat belts and hidden 5th bolt holding each seat down.
phillips screwdriver
13mm socket, for the remaining bolts in the seats
automotive trim tools, to remove the 'christmas tree' push pins carefully
7mm socket 1/4" drive, for the o-****-handle
this was done on a 94 xlt with the 1st gen exploder interrior, things may vary by trim level and year.
start by removing the seats. i have the split 60/40 bench, yours may not be and could have different bolts. unclip the seatbelt warning light before removing the drivers seat.
take the phillips and remove the 4 screws holding each sun visor on. then remove the a-pilar screws and remove the plastics.
take the 7mm socket and a small extension and remove the o-****-handle
there will be a black pin on each side near the rear plastic trim. turn then vertical to help with removing the headliner, or use the trim removal tool and take them out now.
now take the T50 socket and unbolt the seat belt from the floor and pop off the cap and unbolt it from the top.
unscrew 6 screws holding the panel under the rear window on and remove it
use the trim tool to remove the 5 christmas trees from each rear panel and the 1 black christmas tree on each side hidden behind the panel removed previously. both plastics can now be removed after feeding the seat belt through.
pop off the dome light cover and remove the 3 screws.
at this point the headliner should fall forward. now remove the clothes hook with a phillips thats above the rear window and the headliner will be free.
now onto the pictures. you need to stand at the passenger door and rotate the headliners front towards you and stand it up. getting it out will require a little squeezing but due to the contour of the headliner it doesnt show any bends when you do it.
the fact that i cut out a hole for a 2nd gen exploder overhead console mayve helped flex the headliner more for me. so yours may bend a little more, but its not noticeable.


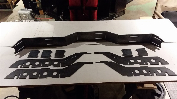
after its out


the fun for me is i had to scrape off all the foam with a razor blade. if you still have your headliner fabric on, carefully peel it off and the foam should come off with it, if not time for a mask and a razor blade for you also.
after it was clean i brushed it off and blew compressed air on it to get the dust off. then take the new material and lay it on, trim to leave yourself plenty of extra.
take half and fold it over and spray the glue on the foam and the headliner board, i used almost a whole can on each half. figured more was better.
press it on, work out the wrinkles and then move to the other half and repeat.


after, flip it over trim the edges with enough overlap and spray more glue on the foam and headliner and glue the edges to the back. cut out all your holes and fold then back and glue them down also(you can see mine in the pics of the headliner removal)

reverse the whole process and you end up with this. i still havent put the a-pilars back in cause of the ohc project and the lighted vanity mirrors project so i still need to run more wires. but other then that, the end result!


so i followed the same idea from this thread: http://www.explorerforum.com/forums/showthread.php?t=283525
i ordered from the same website, i got light grey suede and two cans of glue. it came to $60 and some change with a 15% off coupon code i found.
tools needed:
T50 or T45 security socket, cant remember which. for the seat belts and hidden 5th bolt holding each seat down.
phillips screwdriver
13mm socket, for the remaining bolts in the seats
automotive trim tools, to remove the 'christmas tree' push pins carefully
7mm socket 1/4" drive, for the o-****-handle
this was done on a 94 xlt with the 1st gen exploder interrior, things may vary by trim level and year.
start by removing the seats. i have the split 60/40 bench, yours may not be and could have different bolts. unclip the seatbelt warning light before removing the drivers seat.
take the phillips and remove the 4 screws holding each sun visor on. then remove the a-pilar screws and remove the plastics.
take the 7mm socket and a small extension and remove the o-****-handle
there will be a black pin on each side near the rear plastic trim. turn then vertical to help with removing the headliner, or use the trim removal tool and take them out now.
now take the T50 socket and unbolt the seat belt from the floor and pop off the cap and unbolt it from the top.
unscrew 6 screws holding the panel under the rear window on and remove it
use the trim tool to remove the 5 christmas trees from each rear panel and the 1 black christmas tree on each side hidden behind the panel removed previously. both plastics can now be removed after feeding the seat belt through.
pop off the dome light cover and remove the 3 screws.
at this point the headliner should fall forward. now remove the clothes hook with a phillips thats above the rear window and the headliner will be free.
now onto the pictures. you need to stand at the passenger door and rotate the headliners front towards you and stand it up. getting it out will require a little squeezing but due to the contour of the headliner it doesnt show any bends when you do it.
the fact that i cut out a hole for a 2nd gen exploder overhead console mayve helped flex the headliner more for me. so yours may bend a little more, but its not noticeable.
after its out
the fun for me is i had to scrape off all the foam with a razor blade. if you still have your headliner fabric on, carefully peel it off and the foam should come off with it, if not time for a mask and a razor blade for you also.
after it was clean i brushed it off and blew compressed air on it to get the dust off. then take the new material and lay it on, trim to leave yourself plenty of extra.
take half and fold it over and spray the glue on the foam and the headliner board, i used almost a whole can on each half. figured more was better.
press it on, work out the wrinkles and then move to the other half and repeat.
after, flip it over trim the edges with enough overlap and spray more glue on the foam and headliner and glue the edges to the back. cut out all your holes and fold then back and glue them down also(you can see mine in the pics of the headliner removal)
reverse the whole process and you end up with this. i still havent put the a-pilars back in cause of the ohc project and the lighted vanity mirrors project so i still need to run more wires. but other then that, the end result!