- Joined
- April 1, 2012
- Messages
- 391
- Reaction score
- 42
- City, State
- Salt Lake City, Utah
- Year, Model & Trim Level
- 1993 Explorer
Well the day has dawned! I finally get to dive into Saturday with no plans or events getting in the way! I get an entire day alone with the mistress ") The first thing on the agenda though was to get the James Duff kit all hung and ready for paint.
The first thing on the agenda though was to get the James Duff kit all hung and ready for paint.

After getting them all hung I gave them one last wipe down with a micro fiber towel to remove any stuff that got stuck to them after sitting in the garage for a week. I then whipped out a can of Rust-Oleum Rubberized Undercoating and got started. I found the 3M stuff is indeed good stuff, however, it is susceptible to scratching. The Rust-Oleum stuff withstands scratching quite a bit better so I decided to go along with it. The first coat took 2 cans. I plan on doing another coat after. When all is said and done I will peel off the James Duff logo stickers on the radius arms revealing the logo with blue letters against a black background. I also plan on painting the coils Red (Blue just doesn't fit my Explorer that well).
So, with this out of the way I could finally turn my attention back to my pride and joy. On the jack stands she goes!

First I decide to take the sway bar off. What a PITA!!! You'd think it would be the simplest part? As it turned out, the bolt on the passenger side was so rusted in that I had to pry and ratchet in order to remove it.

After I got the bolts out I noticed the 'threading' that had been cut into the sleeve because of all the rust.

After that I realized that the tires would have to come off. Probably should have loosened those lug nuts while it was on the ground huh? Oh well, I made do with a block to keep the tires from moving. As luck would have it though my super power would kick into play. Now I've sheared a few bolts in my time *cough* *hitch* *cough* but this was one I didn't see coming.

Yeah, I ended up hammering on a socket that was a size smaller, then sledging it on until it was mashed in, then, with a little elbow grease and a lot of luck, I broke it loose. WHEW!
Next was some easy stuff. I disconnected the brake sensor.

Then I disconnected the brake lines. To plug them up I banked my money on some folded duct tape, two quarters, and a spring clamp.

BAM! No leaks.
Then of course I addressed the steering linkage. The driver side nut didn't have a cotter pin. The passenger side cotter pin was in so tight I had to run wire though it and around a wrench so I would have something to pull on. Yes, it ended in one hell of a bruise when the cotter pin broke loose and the whole operation sent me flying backwards.

After fighting and fighting the pitman arm/steering link connection I decided to just go to Auto Zone and get a pitman arm puller. One bike ride and a min or two of prying later; the pitman arm came off no problem!

Still haven't figured out a way to get it off the steering linkage though... any suggestions?
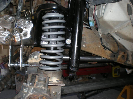
Next I took off the coil and shocks on the driver side.

At this point I recalled some advice I was given by Adamsbro while working on 'The Hulk'. After the horrific battle of standing, blocking, and making any attempt to anchor the axle it was determined that going for the stud would be better while the axle is still on the vehicle. Thanks Again Adamsbro!
Now I decided to do something sneaky. I bought a Craftsman ratcheting wrench (I know! I couldn't believe they had one that was 1 1/8"!!!) from Sears just for this stud. I then re-applied the coil washer and nut to act as a guide for the wrench so that it couldn't twist or contort and fly off the stud or strip it.

Then I went ahead and used another trick I learned from Adamsbro while Duking it with his stud. I double wrenched the Craftsman ratchet wrench, put my foot on the end, grabbed the frame, and PUSHED!

Just as the wrenches were about to touch the frame from bending and giving I heard a small crack and felt the slightest nudge as the wrenches touched the frame. I quickly re-aligned the wrenches and Eurika! The next push gave way to a 1/8 amount of turn!
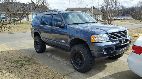
Well, between running errands for an extra jack, pipe wrench, clamps, more paint, pitman puller, and Taco Bell I called it a day. Here is what she looks like right now.

Looking forward to another day at the grind tomorrow! I'll be getting my a$$ out of bed at 0800 hours to get something done. Hopefully there will be enough to make a worth while post. I think I need to thank Adamsbro (Bryan) for letting me see his truck first hand. It has been a HUGE help to review his thread and call upon what he ran into before to get past all the sillyness that showed up whether I was ready or not. Thanks again for reading, any advise or comments are always welcome!
The first thing on the agenda though was to get the James Duff kit all hung and ready for paint.After getting them all hung I gave them one last wipe down with a micro fiber towel to remove any stuff that got stuck to them after sitting in the garage for a week. I then whipped out a can of Rust-Oleum Rubberized Undercoating and got started. I found the 3M stuff is indeed good stuff, however, it is susceptible to scratching. The Rust-Oleum stuff withstands scratching quite a bit better so I decided to go along with it. The first coat took 2 cans. I plan on doing another coat after. When all is said and done I will peel off the James Duff logo stickers on the radius arms revealing the logo with blue letters against a black background. I also plan on painting the coils Red (Blue just doesn't fit my Explorer that well).
So, with this out of the way I could finally turn my attention back to my pride and joy. On the jack stands she goes!
First I decide to take the sway bar off. What a PITA!!! You'd think it would be the simplest part? As it turned out, the bolt on the passenger side was so rusted in that I had to pry and ratchet in order to remove it.
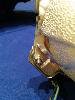
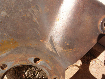
After I got the bolts out I noticed the 'threading' that had been cut into the sleeve because of all the rust.
After that I realized that the tires would have to come off. Probably should have loosened those lug nuts while it was on the ground huh? Oh well, I made do with a block to keep the tires from moving. As luck would have it though my super power would kick into play. Now I've sheared a few bolts in my time *cough* *hitch* *cough* but this was one I didn't see coming.
Yeah, I ended up hammering on a socket that was a size smaller, then sledging it on until it was mashed in, then, with a little elbow grease and a lot of luck, I broke it loose. WHEW!
Next was some easy stuff. I disconnected the brake sensor.
Then I disconnected the brake lines. To plug them up I banked my money on some folded duct tape, two quarters, and a spring clamp.
BAM! No leaks.
Then of course I addressed the steering linkage. The driver side nut didn't have a cotter pin. The passenger side cotter pin was in so tight I had to run wire though it and around a wrench so I would have something to pull on. Yes, it ended in one hell of a bruise when the cotter pin broke loose and the whole operation sent me flying backwards.
After fighting and fighting the pitman arm/steering link connection I decided to just go to Auto Zone and get a pitman arm puller. One bike ride and a min or two of prying later; the pitman arm came off no problem!
Still haven't figured out a way to get it off the steering linkage though... any suggestions?
Next I took off the coil and shocks on the driver side.
At this point I recalled some advice I was given by Adamsbro while working on 'The Hulk'. After the horrific battle of standing, blocking, and making any attempt to anchor the axle it was determined that going for the stud would be better while the axle is still on the vehicle. Thanks Again Adamsbro!
Now I decided to do something sneaky. I bought a Craftsman ratcheting wrench (I know! I couldn't believe they had one that was 1 1/8"!!!) from Sears just for this stud. I then re-applied the coil washer and nut to act as a guide for the wrench so that it couldn't twist or contort and fly off the stud or strip it.
Then I went ahead and used another trick I learned from Adamsbro while Duking it with his stud. I double wrenched the Craftsman ratchet wrench, put my foot on the end, grabbed the frame, and PUSHED!
Just as the wrenches were about to touch the frame from bending and giving I heard a small crack and felt the slightest nudge as the wrenches touched the frame. I quickly re-aligned the wrenches and Eurika! The next push gave way to a 1/8 amount of turn!
Well, between running errands for an extra jack, pipe wrench, clamps, more paint, pitman puller, and Taco Bell I called it a day. Here is what she looks like right now.
Looking forward to another day at the grind tomorrow! I'll be getting my a$$ out of bed at 0800 hours to get something done. Hopefully there will be enough to make a worth while post. I think I need to thank Adamsbro (Bryan) for letting me see his truck first hand. It has been a HUGE help to review his thread and call upon what he ran into before to get past all the sillyness that showed up whether I was ready or not. Thanks again for reading, any advise or comments are always welcome!