desitdt
Well-Known Member
- Joined
- May 9, 2009
- Messages
- 116
- Reaction score
- 0
- City, State
- Tallahassee Florida
- Year, Model & Trim Level
- 2000 Explorer XLT AWD
For the last few months on an off i have been working on utilizing a Nook Color tablet as a headunit for my ford explorer. I wanted a double din screen but I did not want to spend i whole bunch of money setting it up. I could have bought a cheap pioneer double din but I hate how crappy the interfaces look on cheap units. Plus there is just so much more that can be done by using an android tablet such as google maps, all of the android apps, multi homescreen interface, ect. The main thing that i wanted to accomplish was having a tablet and a radio in my dash so that i could still have radio stations without having to use tethering all the time. I also wanted to make the tablet removable so that i could take it out and load music and whatnot onto it. I also want to dock it into one connector so that it can charge and output audio through the usb port. Understand that i started this project when the nook color was the best bang for the $ and i got it brand new for $80. I'm thinking about buying a Nexus 7 and selling the nook color as it may be easier to integrate the electronics in the end. The nexus 7 is smaller in height and length compared to the nook color so it would be easy to switch.
The first thing i had to decide was where to put everything. after a bit of thinking i decided to move the radio into the ac din, and move the ac controls where the top pocket was in the lower console.
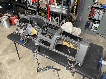
From here i had to figure out a way to make the tablet removable, and i decided to go out and find a double din fascia that would look good on the tablet. A trip to my local car audio installer yielded this beauty.


Im not really sure what this goes to but it would be best to go to a local shop and find something on hand you can use. It will be much easier to use the straight clean lines of a premade faceplate that making one yourself. I believe i paid like $8 for this one piece. As you can see it fit pretty nice. I wanted something that did not cover up the homescreen button as i figured i would use it all the time.


So i needed to make something the tablet could slide in and out of. The tablet fit perfectly in the fascia so i just added pieces of plexiglass to the top and the bottom of the fascia so that the tablet could just slide into it. Then i added a piece of thin mdf to the back so that it made a sleeve. You will understand better after seeing the picture below.

You can see that i actually glued the piece togeather with the tablet inside, this was so that everything lined up perfectly or as close to perfect as possible. I also added two pieces of suede around the tablet as it was glued as i planned on using them to prevent scratching of the tablet in the final installation.
After this i ran into a problem that i knew would happen. It would be impossible to fit the screen into the bezel and keep all the surrounding buttons. I could have kept everything if i had dismantled the nook and done away with the body but like i said i wanted this removable. You can see below how much space my slide in assembly would take up of the bezel. I decided i wanted to keep my 4-Wheel drive selector and cigerette plug in tact and do away with the other three. My rear wiper motor and rear defrost are broken, so it was not a big deal for me. I will relocate the fog light button somewhere else later. The bezel you see here is from the junkyard and did not have the rear defrost feature, in case your wondering.

I took some acetone and sandpaper to that crap rubber finish to get it off, then I traced my tablet sleve assembly onto the bezel and cut it out with a dremel.


By this time your probably wondering how i am going to get the thing in and out of the dash. Well my first try was to fiberglass around the tablet sleve and make the sleve slide out on drawer slides, you can see what i mean with the pictures below.

Well it was a great idea in theory, but horrible in practice for a few reasons.
1) I realized just how hard it would be to get all of the lines to match up and look nice
2) It would look bad to make more lines in the bezel than needed and would look beter if the whole bezel were to just slide out.
So instead i started fiberglassing and bondoing the whole thing into the bezel, making sure there was enough room on the side for the tablet to slide in and out.

Before i got too far i knew i would have to do some modifying to the ac part of the pezel to accomidate the radio. The radio will not fit through the ac control hole so i had to cut a little bit.

Then i put the bezel into my car and test fitted the radio. Initially the radio stuck out pretty far and i didn't like that. The reason that it sticks out so far is because the RCA and 3.5mm connectors on the back of the radio were hitting the HVAC duct and not letting it go any further. I went up to Radioshack and got six 90deg RCA adapters and one 3.5mm 90deg adapter and it helped out a lot.

I put the trim ring that came with the radio around the radio as i was planning on using it to fiberglass the best line i could get. After a bit of positioning i got the perfect look and the trim ring was touching three spots on the bezel which allowed me to glue it into place.


After the glued dried i stretched and glued some cloth around the bezel and attached it to the outside of the trim ring. If I were to glue the cloth to the inside if the trim ring i would have lost my clean straight edge and i would have made the trim ring to small to fit on the radio.

Cut off any excess cloth that was not needed, after the glue dried.

Then some fiberglass here and there.

After some sanding and Bondo.

More sanding and bondo, you can now see that i am creating some lines around where the radio will be that make the overall piece look better.

And finally a test fit in the car, also in this picture can see the AC controls have been moved into the top pocket of the lower console. I will be doing a writeup of how i did that in the post below.

Took it out and sprayed it with sandable primer so i can see all the spots i need to fix.

The first thing i had to decide was where to put everything. after a bit of thinking i decided to move the radio into the ac din, and move the ac controls where the top pocket was in the lower console.
From here i had to figure out a way to make the tablet removable, and i decided to go out and find a double din fascia that would look good on the tablet. A trip to my local car audio installer yielded this beauty.
Im not really sure what this goes to but it would be best to go to a local shop and find something on hand you can use. It will be much easier to use the straight clean lines of a premade faceplate that making one yourself. I believe i paid like $8 for this one piece. As you can see it fit pretty nice. I wanted something that did not cover up the homescreen button as i figured i would use it all the time.
So i needed to make something the tablet could slide in and out of. The tablet fit perfectly in the fascia so i just added pieces of plexiglass to the top and the bottom of the fascia so that the tablet could just slide into it. Then i added a piece of thin mdf to the back so that it made a sleeve. You will understand better after seeing the picture below.
You can see that i actually glued the piece togeather with the tablet inside, this was so that everything lined up perfectly or as close to perfect as possible. I also added two pieces of suede around the tablet as it was glued as i planned on using them to prevent scratching of the tablet in the final installation.
After this i ran into a problem that i knew would happen. It would be impossible to fit the screen into the bezel and keep all the surrounding buttons. I could have kept everything if i had dismantled the nook and done away with the body but like i said i wanted this removable. You can see below how much space my slide in assembly would take up of the bezel. I decided i wanted to keep my 4-Wheel drive selector and cigerette plug in tact and do away with the other three. My rear wiper motor and rear defrost are broken, so it was not a big deal for me. I will relocate the fog light button somewhere else later. The bezel you see here is from the junkyard and did not have the rear defrost feature, in case your wondering.
I took some acetone and sandpaper to that crap rubber finish to get it off, then I traced my tablet sleve assembly onto the bezel and cut it out with a dremel.
By this time your probably wondering how i am going to get the thing in and out of the dash. Well my first try was to fiberglass around the tablet sleve and make the sleve slide out on drawer slides, you can see what i mean with the pictures below.
Well it was a great idea in theory, but horrible in practice for a few reasons.
1) I realized just how hard it would be to get all of the lines to match up and look nice
2) It would look bad to make more lines in the bezel than needed and would look beter if the whole bezel were to just slide out.
So instead i started fiberglassing and bondoing the whole thing into the bezel, making sure there was enough room on the side for the tablet to slide in and out.
Before i got too far i knew i would have to do some modifying to the ac part of the pezel to accomidate the radio. The radio will not fit through the ac control hole so i had to cut a little bit.
Then i put the bezel into my car and test fitted the radio. Initially the radio stuck out pretty far and i didn't like that. The reason that it sticks out so far is because the RCA and 3.5mm connectors on the back of the radio were hitting the HVAC duct and not letting it go any further. I went up to Radioshack and got six 90deg RCA adapters and one 3.5mm 90deg adapter and it helped out a lot.
I put the trim ring that came with the radio around the radio as i was planning on using it to fiberglass the best line i could get. After a bit of positioning i got the perfect look and the trim ring was touching three spots on the bezel which allowed me to glue it into place.
After the glued dried i stretched and glued some cloth around the bezel and attached it to the outside of the trim ring. If I were to glue the cloth to the inside if the trim ring i would have lost my clean straight edge and i would have made the trim ring to small to fit on the radio.
Cut off any excess cloth that was not needed, after the glue dried.
Then some fiberglass here and there.
After some sanding and Bondo.
More sanding and bondo, you can now see that i am creating some lines around where the radio will be that make the overall piece look better.
And finally a test fit in the car, also in this picture can see the AC controls have been moved into the top pocket of the lower console. I will be doing a writeup of how i did that in the post below.
Took it out and sprayed it with sandable primer so i can see all the spots i need to fix.