- Joined
- November 11, 2005
- Messages
- 56,700
- Reaction score
- 1,188
- City, State
- Brooklyn, NY
- Year, Model & Trim Level
- 88 89 93 95 96 Aerostars
We've had some nice warm weather this summer in NY this year. My 1995 3.0L van's temperature gauge usually rests in the middle during normal driving. Lately it's been warming up faster than usual, and during acceleration it's been climbing up a little too much. Last week it actually hit the H on the gauge even though I had the heater on to help cool it down! :fire: I don't know how old the thermostat is since I'm not the original owner, but I would assume that it might be the original just like most other things on this van. These are the parts which I chose to use since I originally purchased each one for a different vehicle a while back, and never used them:

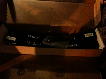
This gasket cost more than the regular paper gaskets but it's much better quality. You don't have to use any gasket paste, and it's ready to use immediately. It's much thicker than the thin paper gaskets.
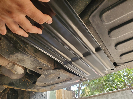
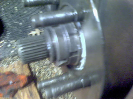
I had to use caution while removing & reinstalling these old bolts since they were very hard to turn with a 3/8" drive ratchet. I didn't want to strip the engine block threads or crack the bolts off. One trick is to keep reversing the direction while you turn the socket whenever it gets stiff. Tighten the bolt, then loosen it a little until it feels free, then tighten it again until it feels stiff, then reverse it again. It will take longer to do but it's a safety precaution. Here's the first bolt removed:

There's very limited room to work. I didn't remove the upper radiator hose. I left it attached to the upper thermostat housing with a hose clamp, and moved it aside after I got the second bolt out.
The second bolt is a littler harder to reach but still possible to disconnect without removing any parts:

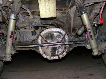
The thermostat housing lifted off easily but the thermostat was stuck to the gasket:

A little coolant spilled out but not too much when the housing was removed. I had to tap the thermostat a few times to get it loose. The temperature on it says 197 degrees, and it has a small hole to bypass fluid just in case it gets jammed. This is a failsafe thermostat. It allows a small amount of fluid to pass through even if it jams.
Make sure that the new thermostat has the curved point facing up when it's installed. Place the gasket inside next then put the housing back with the bolts. Don't completely tighten one bolt before you install the next bolt. Go back & forth to each bolt to tighten them, then refill the correct mixture of coolant into the radiator while the engine & heater are running. Reinstall the cap, and keep the engine & heater running while you check for leaks.
This gasket cost more than the regular paper gaskets but it's much better quality. You don't have to use any gasket paste, and it's ready to use immediately. It's much thicker than the thin paper gaskets.
I had to use caution while removing & reinstalling these old bolts since they were very hard to turn with a 3/8" drive ratchet. I didn't want to strip the engine block threads or crack the bolts off. One trick is to keep reversing the direction while you turn the socket whenever it gets stiff. Tighten the bolt, then loosen it a little until it feels free, then tighten it again until it feels stiff, then reverse it again. It will take longer to do but it's a safety precaution. Here's the first bolt removed:
There's very limited room to work. I didn't remove the upper radiator hose. I left it attached to the upper thermostat housing with a hose clamp, and moved it aside after I got the second bolt out.
The second bolt is a littler harder to reach but still possible to disconnect without removing any parts:
The thermostat housing lifted off easily but the thermostat was stuck to the gasket:
A little coolant spilled out but not too much when the housing was removed. I had to tap the thermostat a few times to get it loose. The temperature on it says 197 degrees, and it has a small hole to bypass fluid just in case it gets jammed. This is a failsafe thermostat. It allows a small amount of fluid to pass through even if it jams.
Make sure that the new thermostat has the curved point facing up when it's installed. Place the gasket inside next then put the housing back with the bolts. Don't completely tighten one bolt before you install the next bolt. Go back & forth to each bolt to tighten them, then refill the correct mixture of coolant into the radiator while the engine & heater are running. Reinstall the cap, and keep the engine & heater running while you check for leaks.
") ^)
^)