I went and change those spark plugs this weekend. Figured I will complete this thread by documenting the job and adding a few bits of information which I learned.
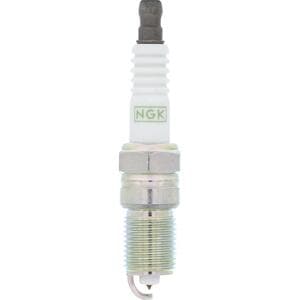
Fist off I went and purchased a set of NGK 3403. I general I am a fan of NGK plugs and run them in most engines I own. Typically I would stick with the manufacture recommended: Motorcraft for Ford, Denso for Toyota. However I deviated this time and put both NGK plugs in my Ford and Toyota.The platinum tip of the NGK plugs are much finer than the ones found on the motorcraft SP-493. The current plugs had only about 50K on them (if the service records are correct). They however had a bit of wear. These are the MC plugs with NGK boxes. Laid out left to right from cylinder 1 to 8 (top to bottom on the second picture). I drew out a diagram on the box, and am pretty sure that is also the correct firing order and cylinder naming convention. The passenger side bank appeared to run leaner than the driver side. Cylinder #4 was the "leanest". The wear on each plug was also inconsistent. Some electrodes had more wear, others had more wear on the strap.
The NGK plugs I installed:
Job went pretty easily. Not sure the time it took as my wife and son where working on "their" project of installing a basket ball hoop that he received for Christmas. And of course their project is MY project. But it was a mid day project maybe 1 to 2 hours start to finish, working slowly.
Here are some tips I have for the job.
7mm, coil pack hold down bolt. WTF? Why not an 8mm like the rest of the engine world.
You should have a selection of extensions and swivels on hand prior to the job both in 3/8" and 1/4" drive. I would much rather have the tools then deal with pulling the fuel rail.
Each spark plug requires a different combination of swivels and extensions. In cylinder #6 or 7 I had to disassemble the extension and socket and fish the socket and spark plug out with a long bent nose needle nose pliers. You could have removed a small something or other on the fuel rail, but it looked like it would leak fuel. I rather not try to seal back up the fuel system if I did not have to.
I also had a 1/4" handled driver (like a screw driver) as the threads on the 7mm bolt holding the coils down are long. + I had a impact driver I used to remove bolts and spark plugs. Install was all done by hand.
Remove the upper airbox and rubber intake track.
Remove the 2 valve cover vent lines. These have a small release button. Feel around the plastic base of the connector. You will feel a protruding nub. Push in on the nub and it will release the catch. Took me a little while to figure out, as I am prying on the catch. This will give you more room to work and not have to remove anything else.
Everything else is pretty straight forward. Be careful with the coil pack's electrical connector. By this point in time, they are all pretty old and brittle. I broke one of the retainer clips and now have some tape securing the plug in place.
So far is seems like the engine is idling a tad more smoothly. Time will tell if I yielded any additional MPGs. I also added my ski rack for an upcoming visit of my family. I am sure any MPG gains seen from the plugs will be canceled out by the "air brake" I just added.