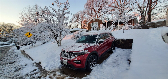
AviatorGuy
Member
- Joined
- April 27, 2009
- Messages
- 21
- Reaction score
- 0
- City, State
- Pittsburgh PA
- Year, Model & Trim Level
- '03 Aviator AWD v8
Took the plunge and ordered the TRUXXX #102010 kit from Fat Bob's garage. This kit is made for the 06+ Explorer and Mountaineer but will fit 3rd Gens with some minor modification which I will hopefully explain.
Here is a link to the kit:
http://store.fatbobsgarage.com/ford-explorer-25-lift-kit-2006-2010-p3948.aspx
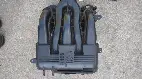
Here is the TRUXXX kit:

Compare this to the RoadBully Kit:

I had Roadbully make me up a kit last year and after waiting forever to get it I decided not to install it and promptly sold it. I would strongly recommend anyone that wants a spacer kit to forget the Roadbully kit and go with the TRUXXX instead. The quality of the TRUXXX kit is 10,000 times better which is what you would expect from a commercially made product vs. a homemade. The only thing I don't like about the TRUXXX spacer is that it isn't welded around the full circumference like the Roadbully is. It only has beads in alternating 3" sections. I do however like the ultra heavy duty pressed in studs of the TRUXXX vs the bolts with a few spot welds on the Roadybully. The powedercoat finish on the TRUXXX is on a different planet from the Roadbully. Much smoother and more consistent which again, is what you would expect. The TRUXXX comes with a warranty card (though I don't think it will cover it installed on a 3rd Gen because you need to modify it) It also includes new alignment specs for after the lift is installed which is quite nice.
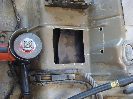
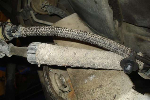
The front spacers bolt in with zero issues. The rears need to have the bolt holes enlarged a small amount on the spacer and on the mounts on the truck itself. Because the spacer has a larger diameter stud than stock, you actually need to drill away a little more material in the mounts on the truck itself to get the holes to line up. You also need to enlarge the 2 holes on the bump stops to reuse them. See the pictures below:
Here you can see just how little drilling you need to do to get these to fit on your shocks. The drilling on the spacer took about 5 minutes. The drilling on the truck was a little bit more involved. My Craftsman 19.2v cordless couldn't do jack on the shock mounts on the truck. The steel is just too hard. I had to step up to my corded to get those reamed out a bit. The bump stops I put in my vise and drilled out a little and they went on without a hitch.


To Install the Fronts I had to remove in this order: un-bolt sway bar, remove 3 bolts off top of shock (easier said than done), unbolt bottom shock bolt (big 24mm beast that requires a breaker bar), remove nut on ball joint and pop out (mine was froze, had to use a pitman arm puller to get out). Shock comes out fairly easily.
To Install rears remove in this order: unbolt sway bar, remove 3 bolts off top of shock, lift off bump stop, unbolt bottom shock bolt, remove bolt that holds rear knuckle to lower control arm, I also had to remove the rear caliper to get enough room to get it out. Begin prying down on lower control arm. This requires help and a long board or prybar. Have to wrestle shock in and out.
Couple of Tips I can offer after installing this.
1. Have your PB Blaster or WD40 ready for this job. Most of the suspension parts are rusted like crazy and don't want to come out.
2. Do yourself a favor and buy a bunch of extra nuts before you begin. I broke a lot of the stock nuts getting them off. The nuts on the 3 studs on each shock take a 13mm wrench. I bought a 13mm flexhead gearwrench like this
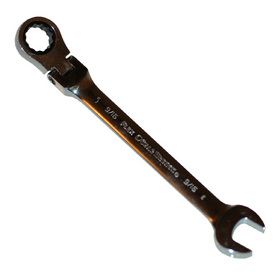 and it worked perfectly to get into the tight spaces and get them off. The nut itself is a 8M 1.25thread. I broke off at least 1 stud on the top of each shock getting them off no matter how much lube i used. It's ok, you only need an inch of thread to bolt to the spacers, and they are like 2" long. The nut that goes on the new studs on the spacer is a 10M 1.25 thread. This take a 14mm wrench to install. Home Depot has all these in stock at at .20c a piece. GO buy a bunch before you start.
3. I needed a pitman arm puller
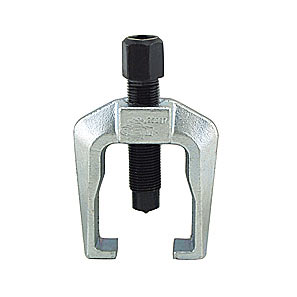 on the fronts to get the ball joint to pop out of the knuckle. In the roadbully directions it says you can bang this out with a hammer which I tried a bit but it wasn't happening plus why damage your ball joints?
4.On my rears I ended up removing the brake calipers and this gave me some extra clearance to get the shock in and out. Didn't need to do this on the fronts. I still had to use about a 10' piece of 2x4 to get enough leverage forcing the lower control arm down enough to get the shock/spacer back in.
5. On both the fronts and rears once you put the shocks back in with the spacer, on the big bolt that goes through the bottom eye of the shocks, slide it through and thread the nut on a couple turns before you jack it back up. I learned the hard way its a pain to try and get this back in once everything else is bolted up.
Any other questions or if you get stuck post here and hopefully I can help.
Here is a link to the kit:
http://store.fatbobsgarage.com/ford-explorer-25-lift-kit-2006-2010-p3948.aspx
Here is the TRUXXX kit:
Compare this to the RoadBully Kit:
I had Roadbully make me up a kit last year and after waiting forever to get it I decided not to install it and promptly sold it. I would strongly recommend anyone that wants a spacer kit to forget the Roadbully kit and go with the TRUXXX instead. The quality of the TRUXXX kit is 10,000 times better which is what you would expect from a commercially made product vs. a homemade. The only thing I don't like about the TRUXXX spacer is that it isn't welded around the full circumference like the Roadbully is. It only has beads in alternating 3" sections. I do however like the ultra heavy duty pressed in studs of the TRUXXX vs the bolts with a few spot welds on the Roadybully. The powedercoat finish on the TRUXXX is on a different planet from the Roadbully. Much smoother and more consistent which again, is what you would expect. The TRUXXX comes with a warranty card (though I don't think it will cover it installed on a 3rd Gen because you need to modify it) It also includes new alignment specs for after the lift is installed which is quite nice.
The front spacers bolt in with zero issues. The rears need to have the bolt holes enlarged a small amount on the spacer and on the mounts on the truck itself. Because the spacer has a larger diameter stud than stock, you actually need to drill away a little more material in the mounts on the truck itself to get the holes to line up. You also need to enlarge the 2 holes on the bump stops to reuse them. See the pictures below:
Here you can see just how little drilling you need to do to get these to fit on your shocks. The drilling on the spacer took about 5 minutes. The drilling on the truck was a little bit more involved. My Craftsman 19.2v cordless couldn't do jack on the shock mounts on the truck. The steel is just too hard. I had to step up to my corded to get those reamed out a bit. The bump stops I put in my vise and drilled out a little and they went on without a hitch.
To Install the Fronts I had to remove in this order: un-bolt sway bar, remove 3 bolts off top of shock (easier said than done), unbolt bottom shock bolt (big 24mm beast that requires a breaker bar), remove nut on ball joint and pop out (mine was froze, had to use a pitman arm puller to get out). Shock comes out fairly easily.
To Install rears remove in this order: unbolt sway bar, remove 3 bolts off top of shock, lift off bump stop, unbolt bottom shock bolt, remove bolt that holds rear knuckle to lower control arm, I also had to remove the rear caliper to get enough room to get it out. Begin prying down on lower control arm. This requires help and a long board or prybar. Have to wrestle shock in and out.
Couple of Tips I can offer after installing this.
1. Have your PB Blaster or WD40 ready for this job. Most of the suspension parts are rusted like crazy and don't want to come out.
2. Do yourself a favor and buy a bunch of extra nuts before you begin. I broke a lot of the stock nuts getting them off. The nuts on the 3 studs on each shock take a 13mm wrench. I bought a 13mm flexhead gearwrench like this
3. I needed a pitman arm puller
4.On my rears I ended up removing the brake calipers and this gave me some extra clearance to get the shock in and out. Didn't need to do this on the fronts. I still had to use about a 10' piece of 2x4 to get enough leverage forcing the lower control arm down enough to get the shock/spacer back in.
5. On both the fronts and rears once you put the shocks back in with the spacer, on the big bolt that goes through the bottom eye of the shocks, slide it through and thread the nut on a couple turns before you jack it back up. I learned the hard way its a pain to try and get this back in once everything else is bolted up.
Any other questions or if you get stuck post here and hopefully I can help.


 You can buy them new online for like $50 each. They are more a temporary solution for me. I was in the process of lifting and wanted to get my bigger tires on and haven't decided on wheels yet. They are factory backspacing. -44mm. The tires did rub just a bit at full lock, but I wanted a little wider stance so I'm running a 1" hub-centric spacer as well. Once I decide on new wheels I'll buy the correct offset and lose the spacers. I can't decide If i want all black or black with a silver lip...?