How to: - Accusump installation in Ford Explorer | Ford Explorer Forums - Serious Explorations

  • Register Today It's free!

How to: Accusump installation in Ford Explorer

Prefix for threads which are instructional.

2000StreetRod

Moderator Emeritus
Joined
May 26, 2009
Messages
10,597
Reaction score
334
City, State
Greenville, SC
Year, Model & Trim Level
00 Sport FI, 03 Ltd V8
Engine analysis has revealed that most of the wear occurs when the engine is cranked and started without oil pressure. In the case of the SOHC V6 engine, timing chains are most likely to slip when the spring/hydraulic left front and right rear tensioners have little or no oil pressure. I decided to install a pre-oiler to reduce future engine wear and the chance of timing chain slippage. There are two types of pre-oilers. One type is an electrical pump that draws oil from the bottom of the oil pan and forces it into the engine oil galleries. It requires drilling a hole in the oil pan and running an oil line/hose to the pump. The other type is an oil accumulator that consists of a piston inside a cylinder that stores air pressure on one side and oil pressure on the other.

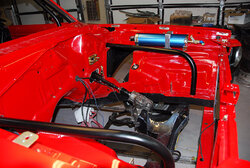
I decided to incorporate an oil accumulator and selected the 3 quart capacity Accusump by Canton Racing shown in the photo below.
Accusump.jpg


The system consists of the accumulator (piston and cylinder) and a oil control valve. I chose an electric solenoid controlled valve energized by the ignition switch. An additional switch prevents the valve from being open when the ignition is on. This allows retention of the pressurized oil in the accumulator when the ignition is on but there is no intention to start the engine. When I received the accumulator the air pressure gauge reading was 60 psi. This proved that there were no leaks on the air side and that the piston would be fully extended toward the oil side. There is a pressure bleed valve next to the gauge and I used it to reduce the air pressure to the recommended 7 to 10 psi.

There are several types of solenoid valves. I chose the one suitable for pre-oiling but not for racing. It has a rapid discharge capability but a slow fill capability.


Join the Elite Explorers for $20 each year.
Elite Explorer members see no advertisements, no banner ads, no double underlined links,.
Add an avatar, upload photo attachments, and more!
.


Nice! I'm going to be running the same one:
 

Attachments

  • DSC_2465.jpg
    DSC_2465.jpg
    113 KB · Views: 4,699


Oil connection

The best place to connect the Accusump oil line is at the spin on oil filter adapter. I had previously installed a replacement adapter for my remote oil filters and oil coolers as shown in the photo below.
BADPTR2.JPG

My adapter was from a kit I purchased about 20 years ago for my 1970 Jeep Wagoneer but never installed. If you don't have a remote oil filter then you'll need a spin on adapter that provides a connection to the block oil input port. I also installed a Moroso Racing check valve (on the left in the photo) that prevents the oil from the Accusump from flowing anywhere except into the block. Without the check valve, oil would flow backwards thru the oil coolers, the remote oil filter, the oil pump and into the oil pan.

The hose to the Accusump is in close proximity to the passenger side exhaust downpipe and catalytic converter. To protect it from the exhaust heat I installed some heat sleeving as shown in the photo below.
HEATSHLD.JPG

The hose is routed downward next to and then under the frame rail.

The photo below shows the hose routing on the accumulator side of the frame rail. The red arrow identifies a section of larger diameter hose that I inserted to prevent the oil hose from being chafed.
 

Attachments

  • Hose.jpg
    Hose.jpg
    53.8 KB · Views: 4,212


That is tight! How much wear on the engine does this cut down on? I've seen engines run without oil go for quite a while, let alone the milliseconds when the engine is started.


Bearing wear

That is tight! How much wear on the engine does this cut down on? I've seen engines run without oil go for quite a while, let alone the milliseconds when the engine is started.

I read a report on an engine that ran for over 400,000 miles with an oil accumulator. When the engine was torn down for inspection the bearings were still in good condition. It takes several seconds after engine start for the oil pressure to increase to the normal idle value. I installed a real oil pressure sending unit and gauge so I could watch it. Most people don't prefill their oil filter when they replace it. That results in almost a full quart of oil that must be pumped before oil even starts flowing into the block. My odometer reads approximately 150,000 miles and I plan to rebuild my engine in the next year or two. I want the rebuilt engine to outlive me.


Accumulator mounting

Since I had previously removed my side steps I decided to mount the accumulator to the inner body underside. There were already two exterior trim mounting holes at the desired spacing and location as identified by the blue arrows in the photo below.
Mount1.jpg

The frame rail is a sturdier alternative mounting location.

I had to use a right angle drive as shown in the photo below to drill the upper mounting holes for the Accusump supplied mounting brackets.
Mount2.jpg


I mounted the top of the brackets with hex head sheet metal screws and the bottom with black trim bolts and locknuts as shown below.
Mount3.jpg


The Accusump instructions state that the accumulator can be mounted in any position but that mounting the oil end slightly higher than the air end will prevent air from accumulating in the oil side. I mounted mine horizontally. I decided if I periodically let all of the oil discharge from the accumulator prior to start up the piston would displace all of the air on the oil side. I can tell when all of the oil has discharged by watching the oil pressure rise and then drop after turning on the ignition.

Note: If the solenoid valve is closed (using the toggle switch) after discharge the oil pan will contain an excess of 3 quarts and foaming may occur. The accumulator should always be allowed to refill after engine start.


Solenoid wiring

The disassembled solenoid is shown in the photo below.
Solenoid.jpg

The cover is removed by depressing it and then extracting the circlip. I stripped off extra insulation on one lead and passed it thru a ground lug and then soldered it to the lug. I attached the lug at the bottom of the housing and then attached the end of the stripped lead to the solenoid terminal above. I attached the other lead to the other solenoid terminal. The hole for the leads was excessively large so I inserted a smaller grommet into the provided large grommet to keep out moisture. I attached black tape to the ground wire to be able to distinguish it from the other lead. The wired solenoid is shown below.
Solnoid2.jpg


Underside wiring

The ground strap lug shown in the photo below is convenient to utilize for the Accusump. I soldered a terminal lug to the solenoid ground wire and attached it to the frame rail.
BothLds2.jpg


There is also a body plug in a convenient location. Using pliers I carefully pulled the flexible plug down thru its opening. I then drilled a hole thru the plug for the other solenoid lead - do not try to punch a hole or the plug will tear. I ran the lead thru the plug with the larger diameter at the bottom instead of the top. I routed a stiff wire under the floor carpet pad to the opening and then used it to pull the solenoid lead to the desired interior location. I then pushed the plug with the solenoid wire into the opening as shown above.

I wrapped the two solenoid wires with a spiral loom as shown below.
BothLds.jpg


Interior wiring

I originally planned to install the toggle switch in the vicinity of the instrument panel so I removed the side trough panel and routed the wire in it as shown below.
TopWire1.jpg


However, I could not find a suitable place to mount the toggle switch so I decided to mount it on the center console. The center console on my Sport easily comes apart for removal. But it is very difficult to thread a wire under the carpet pad at the transmission tunnel. I was forced to remove the front seat mounting bolts as shown below in order to lift the carpet and pad.
TopWire2.jpg


The next step was to thread the power wire from the console area forward under the carpet along the top of the transmission tunnel. To raise the carpet pad I attached a long extension to my 1/2 inch breaker and taped the two together to prevent separation. Then I forced the breaker bar assembly under the pad along the path for the wire as shown below.
TopWire3.jpg


With the wiring for the toggle switch in place I drilled a hole in the front of the center console base, soldered the wires to the switch, installed the center console base and switch and wrapped the wires with spiral loom as shown below.
TopWire4.jpg


Power connection

I already had an ignition controlled power source from wiring my wideband air/fuel ratio meter. I merely connected to the source using a trailer type quick connect as shown below.
TopWire6.jpg

The other wire/connector is for data logging the analog output of the A/F ratio meter. I cable tied the wires together and tucked them out of the way between the bottom of the OBD-II port and the lower instrument panel.

The photo below shows the switch mounted in the center console in the enabled position.
TopWire5.jpg


Protective cover

I didn't want to expose my new Accusump to rocks and road tar so I built a protective cover for it. I constructed a frame using 6x6 post anchors and aluminum stock as shown below.
Cover1.jpg


I cut the front, side and bottom out of sheet metal.
Cover2.jpg


I sprayed rust preventive primer on the components.
Cover3.jpg


I also sprayed the components with undercoating.
Cover4.jpg


I read a report on an engine that ran for over 400,000 miles with an oil accumulator. When the engine was torn down for inspection the bearings were still in good condition. It takes several seconds after engine start for the oil pressure to increase to the normal idle value. I installed a real oil pressure sending unit and gauge so I could watch it. Most people don't prefill their oil filter when they replace it. That results in almost a full quart of oil that must be pumped before oil even starts flowing into the block. My odometer reads approximately 150,000 miles and I plan to rebuild my engine in the next year or two. I want the rebuilt engine to outlive me.

Dale, Nice Job!

I would like to do the same. Can you tell me where I can get one?


I found this on Ebay: http://cgi.ebay.com/ebaymotors/REVO...ptZMotorsQ5fCarQ5fTruckQ5fPartsQ5fAccessories

http://cgi.ebay.com/ebaymotors/52MM...ptZMotorsQ5fCarQ5fTruckQ5fPartsQ5fAccessories

Also saw this auction. http://cgi.ebay.com/ebaymotors/CANT...4b3QQitemZ230490264755QQptZRaceQ5fCarQ5fParts

Did you manifold the the 2 sending units so you have a light and gauge?

CJ


Accumulator and indicators

That Accusump looks to be the same as mine but may not have the mounting brackets that cost another $20 or so. Also, it doesn't have any valve. The solenoid valve is $100 or more.

For my oil pressure gauge I'm currently using an AutoMeter oil pressure sending unit to drive my pillar mounted AutoMeter transmission temperature indicator. I have switches to select between engine oil temp, ATF temp and oil pressure. The ATF temp scale must be interpreted to read oil pressure. I plan to add a pod cup for a stand alone AutoMeter oil pressure indicator.


Accusump installation and suggested components

Hello,

I have just bought a 2001 Ranger, 117,000 miles and am in the process of making it road worthy after it had sat for awhile in a field. It is a 4 door extended cab 4x4, 4 liter SOHC, silver and is in very good condition considering. However, I want to keep this vehicle in good shape, I have a 93 Mustang convertible that is anything but stock once you lift the hood and look underneath, hence the username lady351. Getting back to the Accusump, would you please relay the parts that you ordered and the oil pressure selection process? Also, does a remote oil filter installation hurt this particular engine, I have a 351 Windsor in the Mustang and most everyone I talked to and all that I read suggested that it was not recommended for that particular engine. Have you had any trouble with yours, also, is there a mount for the filter with an intermediate cooler type arrangement that would satisfy the Accusump installation by saving weight and space? Anything that you could pass on would be appreciated. Thank you very much.


oil accumulator & remote filter

Hello,
I have just bought a 2001 Ranger, 117,000 miles and am in the process of making it road worthy after it had sat for awhile in a field. It is a 4 door extended cab 4x4, 4 liter SOHC . . . would you please relay the parts that you ordered and the oil pressure selection process? Also, does a remote oil filter installation hurt this particular engine, I have a 351 Windsor in the Mustang and most everyone I talked to and all that I read suggested that it was not recommended for that particular engine. Have you had any trouble with yours, also, is there a mount for the filter with an intermediate cooler type arrangement that would satisfy the Accusump installation by saving weight and space? Anything that you could pass on would be appreciated. Thank you very much.

I'm not familiar with the 2001 Ranger but you should have pretty much the same engine as mine. I ordered the older 3 quart Accusump (24-006) with mounting brackets because I had lots of space available. I purchased my solenoid valve from another source. You should be able to find all of the information you need at http://www.accusump.com/. According to Accusump a 1 quart accumulator is large enough to pre-oil most all engines. Frankly, I would have preferred to install an electric oil pump but I couldn't find a suitable item and I didn't want to drill a hole in the oil pan. An electric oil pump avoids oil change problems (depleting the oil in the accumulator means a dry start) and too much oil in the pan at start up. The Accusump has provided trouble free operation with quiet starts every time it has been enabled. Today while testing my new fuel line I accidently started the engine for the first time in over a week without the Accusump enabled. My engine sounded like an old sewing machine for several seconds until the oil reached the valve train.

I've had a remote full flow and bypass oil filter on my vehicle for about 18 months with external oil coolers. My filters are mounted vertically preventing them from draining when the engine is off. If they were mounted in a way that would allow them to drain then the filters would have to fill on engine start delaying when oil pressure activates the camshaft chain tensioners. When I change my filters I prefill them with oil even though the Accusump has enough capacity to fill them and still pressurize the system. I'm not aware of a combined cooler/accumulator from Accusump.


I plan on doing this install soon. Newbie question though... where do you get the hose and fittings for a reasonable price? Is there much difference/need between the rubber hose and the stainless hose? The kits that canton sells seem way overpriced. I assume you can't just go to the hardware store and use the fittings made for water plumbing. (i.e. it needs to be an auto specific application).


Oil adaptor

Finally getting around to the accusump install for pre-oiling purposes. Trying to save some money though...

Does anyone know if I can use this sandwich adapter using only the outlet and just plug the inlet(s)? Its only $37 instead of $70 for the canton single outlet. I'm not planning on installing an oil cooler or secondary filter.


Join the Elite Explorers for $20 each year.
Elite Explorer members see no advertisements, no banner ads, no double underlined links,.
Add an avatar, upload photo attachments, and more!
.


Canton's tech support is pretty good. Give them a call, can't hurt to ask.

contact_us.png


Back
Top