- Joined
- October 5, 2008
- Messages
- 3,152
- Reaction score
- 446
- Location
- Humid, Damp, and Hot
- City, State
- Houston, TX
- Year, Model & Trim Level
- '98 EB, '93 Limited
I had some time so I figured I would get this 'how-to" rolling.
Disclaimer: I, Dan Jones, am not in any way liable for how this tutorial is to be used. I am also not liable for any, accidents, problems, or issues that develop from using this tutorial. All precautions should be taken first before attempting this type of work on a vehicle. Please be careful.
Post 1: Important Information and Intro
Post 2: Front Suspension and Axle
Post 3: Transmission and Transfer Case
Post 4: Rear Axle
Post 5: Finishing Up
The 4x4 swap on a Explorer is a straightforward if time consuming process. It is not easy, nor is it economical. Fortunately, most of the conversion can be done in stages if you need to have your truck running during the swap. In this thread I am going to deal with a 4wd conversion on a 2wd Auto (specifically, Red)
The beginning specs on my Explorer when I started:
1994 XLT
2wd I-beam setup
2wd A4LD transmission
Ford 8.8 rear axle w/ 3.08 gears
Info you need to know first!
Axles:
There are two axles on a 4wd swap:
The front axle, the D35 Twin Traction Beam

and the Ford 8.8 rear axle

YOU MUST USE THE SAME GEARS FRONT AND REAR!! Ignoring this warning will turn your transfer case into a boat anchor.
Compatible Ford gear ratios for the D35 from weakest to strongest.
3.27 (relatively easy to find)
3.55
3.73 (Very easy to find)
4.10 (Difficult to find)
(Since the 3.08's were never used in ANY front D35 axle my rear axle had to go.)
If you are going to be wheeling this rig hard, I wouldn't go any less than a 3.73. A 3.27 is a pretty wimpy setup and a 3.55 is decent. Its a choice on your part, deal with a smaller gear ratio to match your rear gears to save money, or replace both front and rear axles to get a better ratio. In my case I didn't have any choice, but even if I did I still would have gotten the shorter gears.
Also at this phase you have the choice of going with manual hubs, if your D35 does not already have them.
Don't underestimate this part of the swap. It is not easy, but it does give you a lot of openings to replace hard to get to parts, so take advantage of it.
Hubs:
Hubs are the link that connect your front wheels to the axle. With them unlocked there is no power to the front tires, locked you are in 4 wheel drive. There are two types of hubs for the D35, the Warn Manual Hubs made for Ford and the Ford Automatic Hubs. The hub is supposed to be the weakest link in the 4x4 drive line. It is designed to break if too much stress is put on the axle, making it a failsafe against expensive breakage.

A manual locking hub is pretty much what it says, you have to get out of the vehicle to manually lock or unlock the hubs. The original Ford manual hubs are much stronger than the auto, but lack convenience. They are also much less of a maintenance issue than the autos.

The Ford Auto hubs allow the driver to stay inside the vehicle while using the motion of the front axle to lock and unlock the hubs. This is convenient, but requires more parts to make it work. Over a period of time these hubs can get gunked up and start chattering, locking and unlocking the front axle, and causing all sorts of disturbing sounds. If the maintenance is not done regularly the internals will wear out quickly. It is also physically weaker than its manual counterpart. Most people switch to the manual hubs after their autos break.
Transmission:
This is another hiccup in the road to 4wd eliteness. As always, you have a choice on what transmission you want powering your rig.
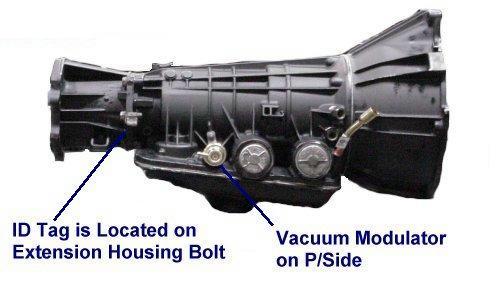
First is the A4LD Auto. It is a decent tranny, but not overly reliable. It is meant to do one thing, and one thing only: push a 5300lb SUV down the road with stock tires. You start adding larger rubber and bigger gears, expect to beef up this transmission as you go along or you Ex will be hemorrhaging ATF at your next trail run.

The next choice is the ol' reliable M5OD manual. Once you put this in and follow basic maintenance you will be set for the life of this truck. One problem, if your truck is not a manual to begin with, expect to lose a couple years off the end of your life getting it in.
Now this is a clarification for everybody on these transmissions: A 2WD A4LD OR M5OD WILL NOT WORK WITH A TRANSFER CASE. No if, ands or buts. You MUST replace the tail shaft with one from a 4WD. It is better in the case of a the A4LD to get a 4WD rather than trying to convert the 2WD. The 4WD has a deeper pan and bigger filter to compensate for the extra stress on the transmission.
Transfer case:
The transfer case is integral to making your 4wd system work, and personally my favorite part of the drive line.
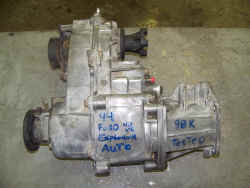
You realistically have only one choice: the Borg Warner 1354 Manual transfer case. But as if in penalty for the simplicity of this decision you now are headed down the path of actually finding one! These are getting very scarce as they are constantly being used to replace the electric 1354 (more on that later). If you find one in a junkyard, grab EVERY piece associated with it, arm linkage, shifter, boot, electrical harness for the dash lights, and floor plate. If not you will be on a perpetual hunt for each of these items. Be prepared for a wait.
In honorable mention is the BW 1354 Electric. There is one problem with this case and only one. The shift motor. It is a rather expensive piece to replace when it goes bad which does tend to happen often. This is not a realistic choice for a 4wd swap. To get it to work you would have to delve into a whole lot of electrical wiring and schematics to get it to work and buy a lot of extra parts. BUT, if you can stand getting down under your truck every now and then to switch it into gear, then grab it and the SHIFTSTER (http://theshiftster.com/) and get 'er done.
Driveshafts:
Oh yes, you are not done yet. You still have to get power to those new axles. As you may already know, there are two drive shafts with a 4wd setup, a front and a rear. And yes, they both must be had.

A 2wd drive shaft is aluminum and uses a slip joint to attach to the tranny. The replacement is steel, made to fit the transfer case and expandable to fit 4 door's and sports. It will also work with the M5OD as well as the A4LD. Nice of Ford, aye?

The front drive shaft is also steel and is expandable. It bolts to the transfer case through a double cardan joint. (http://www.4x4wire.com/toyota/maintenance/tacoma_4runner_30k/double_cardan.jpg) It's basically three universal joints piled together to make a strong joint. Anyway, at the JY grab all the bolts off of both ends of the drive shaft.
Miscellaneous:
Yes there are miscellaneous parts.
You will need a longer 4x4 speedometer cable, 4x4 rotors, transfer case skid plate, 4x4 drivers side drop bracket and other parts I have forgotten.
AGAIN, I will reiterate this is NOT an easy or economical swap. With that in mind let's press on.
Parts Needed:
D35 front end
4x4 tranny of your choice (and associated parts)
BW 1354 transfer case
Rear axle (possible)
Front drive shaft
Rear drive shaft
4WD speedometer cable
4wd rotors
Transfer case skid plate
4wd drivers side drop bracket
All associated nuts and bolts
Transfer case shifter
All vent tubes for tcase, tranny, front, and rear axle
Parts that would be nice:
Shifter boot
Electric harness for manual tcase
Manual locking hubs
Next up:
Stage 1: Front Suspension and Axle.
Disclaimer: I, Dan Jones, am not in any way liable for how this tutorial is to be used. I am also not liable for any, accidents, problems, or issues that develop from using this tutorial. All precautions should be taken first before attempting this type of work on a vehicle. Please be careful.
Post 1: Important Information and Intro
Post 2: Front Suspension and Axle
Post 3: Transmission and Transfer Case
Post 4: Rear Axle
Post 5: Finishing Up
The 4x4 swap on a Explorer is a straightforward if time consuming process. It is not easy, nor is it economical. Fortunately, most of the conversion can be done in stages if you need to have your truck running during the swap. In this thread I am going to deal with a 4wd conversion on a 2wd Auto (specifically, Red)
The beginning specs on my Explorer when I started:
1994 XLT
2wd I-beam setup
2wd A4LD transmission
Ford 8.8 rear axle w/ 3.08 gears
Info you need to know first!
Axles:
There are two axles on a 4wd swap:
The front axle, the D35 Twin Traction Beam
and the Ford 8.8 rear axle
YOU MUST USE THE SAME GEARS FRONT AND REAR!! Ignoring this warning will turn your transfer case into a boat anchor.
Compatible Ford gear ratios for the D35 from weakest to strongest.
3.27 (relatively easy to find)
3.55
3.73 (Very easy to find)
4.10 (Difficult to find)
(Since the 3.08's were never used in ANY front D35 axle my rear axle had to go.)
If you are going to be wheeling this rig hard, I wouldn't go any less than a 3.73. A 3.27 is a pretty wimpy setup and a 3.55 is decent. Its a choice on your part, deal with a smaller gear ratio to match your rear gears to save money, or replace both front and rear axles to get a better ratio. In my case I didn't have any choice, but even if I did I still would have gotten the shorter gears.
Also at this phase you have the choice of going with manual hubs, if your D35 does not already have them.
Don't underestimate this part of the swap. It is not easy, but it does give you a lot of openings to replace hard to get to parts, so take advantage of it.
Hubs:
Hubs are the link that connect your front wheels to the axle. With them unlocked there is no power to the front tires, locked you are in 4 wheel drive. There are two types of hubs for the D35, the Warn Manual Hubs made for Ford and the Ford Automatic Hubs. The hub is supposed to be the weakest link in the 4x4 drive line. It is designed to break if too much stress is put on the axle, making it a failsafe against expensive breakage.
A manual locking hub is pretty much what it says, you have to get out of the vehicle to manually lock or unlock the hubs. The original Ford manual hubs are much stronger than the auto, but lack convenience. They are also much less of a maintenance issue than the autos.
The Ford Auto hubs allow the driver to stay inside the vehicle while using the motion of the front axle to lock and unlock the hubs. This is convenient, but requires more parts to make it work. Over a period of time these hubs can get gunked up and start chattering, locking and unlocking the front axle, and causing all sorts of disturbing sounds. If the maintenance is not done regularly the internals will wear out quickly. It is also physically weaker than its manual counterpart. Most people switch to the manual hubs after their autos break.
Transmission:
This is another hiccup in the road to 4wd eliteness. As always, you have a choice on what transmission you want powering your rig.
First is the A4LD Auto. It is a decent tranny, but not overly reliable. It is meant to do one thing, and one thing only: push a 5300lb SUV down the road with stock tires. You start adding larger rubber and bigger gears, expect to beef up this transmission as you go along or you Ex will be hemorrhaging ATF at your next trail run.
The next choice is the ol' reliable M5OD manual. Once you put this in and follow basic maintenance you will be set for the life of this truck. One problem, if your truck is not a manual to begin with, expect to lose a couple years off the end of your life getting it in.
Now this is a clarification for everybody on these transmissions: A 2WD A4LD OR M5OD WILL NOT WORK WITH A TRANSFER CASE. No if, ands or buts. You MUST replace the tail shaft with one from a 4WD. It is better in the case of a the A4LD to get a 4WD rather than trying to convert the 2WD. The 4WD has a deeper pan and bigger filter to compensate for the extra stress on the transmission.
Transfer case:
The transfer case is integral to making your 4wd system work, and personally my favorite part of the drive line.
You realistically have only one choice: the Borg Warner 1354 Manual transfer case. But as if in penalty for the simplicity of this decision you now are headed down the path of actually finding one! These are getting very scarce as they are constantly being used to replace the electric 1354 (more on that later). If you find one in a junkyard, grab EVERY piece associated with it, arm linkage, shifter, boot, electrical harness for the dash lights, and floor plate. If not you will be on a perpetual hunt for each of these items. Be prepared for a wait.
In honorable mention is the BW 1354 Electric. There is one problem with this case and only one. The shift motor. It is a rather expensive piece to replace when it goes bad which does tend to happen often. This is not a realistic choice for a 4wd swap. To get it to work you would have to delve into a whole lot of electrical wiring and schematics to get it to work and buy a lot of extra parts. BUT, if you can stand getting down under your truck every now and then to switch it into gear, then grab it and the SHIFTSTER (http://theshiftster.com/) and get 'er done.
Driveshafts:
Oh yes, you are not done yet. You still have to get power to those new axles. As you may already know, there are two drive shafts with a 4wd setup, a front and a rear. And yes, they both must be had.
A 2wd drive shaft is aluminum and uses a slip joint to attach to the tranny. The replacement is steel, made to fit the transfer case and expandable to fit 4 door's and sports. It will also work with the M5OD as well as the A4LD. Nice of Ford, aye?
The front drive shaft is also steel and is expandable. It bolts to the transfer case through a double cardan joint. (http://www.4x4wire.com/toyota/maintenance/tacoma_4runner_30k/double_cardan.jpg) It's basically three universal joints piled together to make a strong joint. Anyway, at the JY grab all the bolts off of both ends of the drive shaft.
Miscellaneous:
Yes there are miscellaneous parts.
You will need a longer 4x4 speedometer cable, 4x4 rotors, transfer case skid plate, 4x4 drivers side drop bracket and other parts I have forgotten.
AGAIN, I will reiterate this is NOT an easy or economical swap. With that in mind let's press on.
Parts Needed:
D35 front end
4x4 tranny of your choice (and associated parts)
BW 1354 transfer case
Rear axle (possible)
Front drive shaft
Rear drive shaft
4WD speedometer cable
4wd rotors
Transfer case skid plate
4wd drivers side drop bracket
All associated nuts and bolts
Transfer case shifter
All vent tubes for tcase, tranny, front, and rear axle
Parts that would be nice:
Shifter boot
Electric harness for manual tcase
Manual locking hubs
Next up:
Stage 1: Front Suspension and Axle.


