Drako99
Member
- Joined
- August 5, 2014
- Messages
- 27
- Reaction score
- 5
- City, State
- Edmonton, AB
- Year, Model & Trim Level
- 2013 Explorer XLT
So after reading many many threads asking the same thing about how to remove the grill on a 2011+ Explorer I got the gist of it and tackled it myself.
I completed the plasti dip of my grill but forgot to take pictures along the way so I went back and removed the grill AGAIN and took some pictures along the way.
This is to help supplement the many other grill removal threads out there and I hope it helps.
Front Grille

Step 1 - Open Hood, get 10mm Socket and small flat screwdriver
Remove SEVEN (7) of the 10 mm bolts circled in GREEN and the TWO (2) push rivet fasteners circled in RED


The top plastic cover then should come off freely

Step 2 - VERY GENTLY pry the grille away from the engine compartment and tilt it forward to expose the FOUR (4) very tricky nuts (10mm). TWO (2) are near the middle, and are the easier of the 4. The other TWO (2) are down by the headlights and are VERY tricky/hard to remove

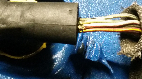
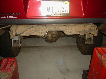
You can see the back side of the bolt, which has the nut on it, at the tips of my fingers. This is one of the center ones.

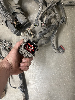
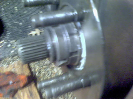
Just above the White pointer stick (very technical) is the back of the bolt showing the nut near the passenger side headlight.

Step 3 - Remove the grille
This can be very tricky so TAKE YOUR TIME
Seen here is the back of the grill, circled in RED are the FOUR (4) bolts that had the nuts on them. Circled in GREEN are the SIX (6) clips holding the bumper in place. Careful, I broke one doing this write up.


Grilel removed -

Reverse the process to reinstall,
Hope this helps!!!
I completed the plasti dip of my grill but forgot to take pictures along the way so I went back and removed the grill AGAIN and took some pictures along the way.
This is to help supplement the many other grill removal threads out there and I hope it helps.
Front Grille
Step 1 - Open Hood, get 10mm Socket and small flat screwdriver
Remove SEVEN (7) of the 10 mm bolts circled in GREEN and the TWO (2) push rivet fasteners circled in RED
The top plastic cover then should come off freely
Step 2 - VERY GENTLY pry the grille away from the engine compartment and tilt it forward to expose the FOUR (4) very tricky nuts (10mm). TWO (2) are near the middle, and are the easier of the 4. The other TWO (2) are down by the headlights and are VERY tricky/hard to remove
You can see the back side of the bolt, which has the nut on it, at the tips of my fingers. This is one of the center ones.
Just above the White pointer stick (very technical) is the back of the bolt showing the nut near the passenger side headlight.
Step 3 - Remove the grille
This can be very tricky so TAKE YOUR TIME
Seen here is the back of the grill, circled in RED are the FOUR (4) bolts that had the nuts on them. Circled in GREEN are the SIX (6) clips holding the bumper in place. Careful, I broke one doing this write up.
Grilel removed -
Reverse the process to reinstall,
Hope this helps!!!