2nd gen lift question | Page 3 | Ford Explorer Forums - Serious Explorations

  • Register Today It's free!

2nd gen lift question

true! now everyone's feeling the "normal" SoCal price 😂 and if you click the button next to the add image (looks like a smiley face) it should bring uo the menu of smileys... scroll till you find the bouncing green guy! (or just copy paste ;)):bounce:


Join the Elite Explorers for $20 each year.
Elite Explorer members see no advertisements, no banner ads, no double underlined links,.
Add an avatar, upload photo attachments, and more!
.


So that's how you add all those! Nice, thank you! :thumbsup:


no problem! :D


Mine I believe are B tbars if I read it right a few months ago, theres I believe a 1" higher height difference than before. OEM keys, yeah, tried swapping them but they were too large in diameter even though they claim to fit. But I did have to trim more off the passenger side than the driver side, so there are some odd differences. It works until I decide to just go the coilover route. Different bars will support more lift than others, can get longer torsion bolts to tighten a bit further as well, and the wear they've had affects it. I guess I just didn't get too lucky when it came to my trucks suspension. But as said, other than a little trimming, they do fit fine. Definitely suggest the trakmotive route, so nice so far honestly. Also, measure from your center hub to the top fender lip, want to say its 19" stock, so however far beyond that is how much you've lifted it.
I got 21.5 from hub to fender.


I got 21.5 from hub to fender.
Dang man, think mine is 20"? Need to check it again in a bit I guess. Yours are definitely in better shape I guess, or a higher ranked Tbar, like maybe a 1?


Dang man, think mine is 20"? Need to check it again in a bit I guess. Yours are definitely in better shape I guess, or a higher ranked Tbar, like maybe a 1?
Yeah maybe. I’ll check what the vin tag says tomorrow. I know this truck wasn't sagged at all when I got it. That’s why when I raised it the first time I over extended the axles. I just went with what I remembered from my old X and it was too much.


@Sandman92 Sweet looking machine! It is a shame to cut up the nice lines, so I don't blame you there. Also, no trimming means less risk for rust. If you're just going to run 33's without wide stancing it like mine, the 4" Superlift is probably the BEST way to go (not the cheapest). Beat the Search function dead before you spend a cent, though, and see what tire sizes and tire widths others run before you decide what to do. Superlift with 32's is safe for sure, if you do 7" or 8" wide rims. Some of the boys on here run 33's with a 4" Superlift and no trimming, but I don't know the tire or wheel widths on their builds. Not likely you could do a 10" wide like mine without trimming, especially not with 33x12.50's.

31's you can run easily on just the key re-index and some shackles for the rear. I don't recommend cranking the bars, people say the effect is the same, but it isn't. The function of the keys is to relocate the bars somewhat so that the "passive" (with vehicle's weight evenly distributed) height is higher, without the need to crank the adjuster bolts all the way to the end. Cranking the bolts all the way to the end is perfectly acceptable, of course, but then you can't play with it any more if you do decide you want a bit more (or less, for those who are lowering) height, as well as the fact that you stay closer to the end of your travel limit if you crank them, whereas the re-index keeps the travel parameters within stock measurements, while still giving you the additional inch or two of clearance. CHANGING TORSION BAR KEYS WILL NOT GIVE YOU MORE TRAVEL. The idea is to prevent you from LOSING down travel. They're basically lift blocks, for torsion bars, nothing less and nothing more.


yep! basicslly tbar crank or keys all they do is adjust the preload and make room for larger tires which do give you more clearance!


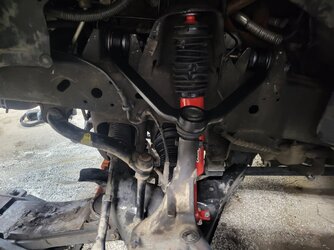
Hi guys! I'd like to avoid any fender trimming so 31s may be in my future. I'll need to measure and see how much space I have after a lift. Here's a few pics of the Ex!
Side note: one of my favorite vehicles to take off road when I was a kid was a 66 scout 800, 4 cylinder 3 speed manual on 31" mud tires. It was impressive off road completely stock.
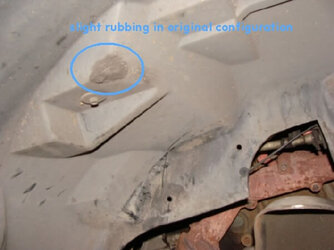
I have a 95 Sport and found that 31" tires (Toyo Open Country A/T II 265/70R16) just touched the front fender liner and aft plastic fender trim, even after TT and longer rear shackle. I used a modest 1" body lift for liner clearance and a small tidy trim to the inboard lip of the trim piece. This has worked great for years of street/bad gravel roads while looking like it was designed that way. I think the slams on body lifts early in this thread focus are misplaced - the real goal is ground clearance and angle between obstacle and axle, as provided by larger tires. Both body and suspension lifts are paths to fitting larger tires while addressing practical fitting/clearance issues. I admire the builds that use "just enough" of several tweaks to fit monster tires without rubbing.

FenderLiner.jpg


Me too
Form follows function

Suspension lifts or drop brackets simply lower the suspension only which in effect raises the frame drivetrain and body raising your center of gravity.
A body lift only raises the body, not the drivetrain and frame, lesser of two evils
To me on an explorer only a 2” body lift is acceptable because the 3” stretch causes so many issues
Putting in stiff springs (or cranking the t bars) only changes your ride height, at the cost of Down travel, which ruins your handling and the ride.

This is a balancing act
The goal is to fit larger tires so we can gain ground clearance and increase the size of the traction patch
A combination of suspension lift, body lift and trimming, is the smart approach to clearing the larger tires


Well said. Few consider the loss of downtravel, which hurts ride, and traction and your also maxing out travel a lot more.


Nothing rides worse then a truck with maxed out ride height and no down travel available!!! Hay wagon
I would rather sawzall the fenders and inner metal structure fun flares or better yet go full fiberglass
I took a bfh to my metal fenders to make 33’s fit… then I saved up and bought some front glass fenders.


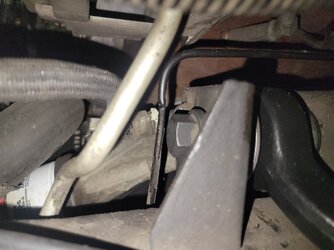
Hey guys just giving an update! I got all the parts installed and then realized I forgot the two outer Axle seals... so I'm waiting on those and will probably be able to finish the explorer this weekend. On the driver's side the UCA was a huge pain to get out. I ended up cutting one of the bolts out and getting a new one at the hardware store. (Grade 8). After I got the control arm in I noticed the most forward bolt had a gap between the bracket and factory square washer. I removed the washer and bolt only to find a brake line pinched in there! I got a whole new hard line ordered. I thought about coupling it but the space is was to tight to get a flaring tool in there.. all this work should be a huge improvement. 3/4 ball joints were toast and 1 tie rod had about 1/8"-3/16" of play!
I'm thinking I may order new keys lift the front shackle the rear for now because I have them and get an alignment. When I save up and order tires I'll probably do f150 springs in the rear to help with the sag. It's not as bad as some explorers but I do notice it.


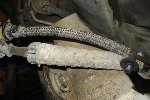
Here's a picture of the DS nearly complete and a pic of the smashed brake line.

20220328_052022.jpg 20220328_052043.jpg


Dang!!
Yes getting the alignment bolts out of the uca is a real pita
First you have to unhook the Evap fuel vapor Line from its clips as well as some the brake lines, this gives you room to work

Next you need to get both sides loose so that the control arm can move out to the furthest outward position freely
Now you can wiggle out the front bolt followed by the rear

Install is in the reverse order

You do realize that the uca bolts are flat on one side to allow them to slip inside the alignment cams right? Cannot just use a grade 8 bolt here

You should consider getting an adjustable alignment kit comes with two new uca bolts and eccentric camber adjusters. I paid $12 for the last one I bought in rockauto, parts stores carry these as well

Brake likes in that area are a pita to work on

Good
Job this far this is not easy work!! But it gets easier each time


looking great!!!! keep up tbe work!:D


Dang!!
Yes getting the alignment bolts out of the uca is a real pita
First you have to unhook the Evap fuel vapor Line from its clips as well as some the brake lines, this gives you room to work

Next you need to get both sides loose so that the control arm can move out to the furthest outward position freely
Now you can wiggle out the front bolt followed by the rear

Install is in the reverse order

You do realize that the uca bolts are flat on one side to allow them to slip inside the alignment cams right? Cannot just use a grade 8 bolt here

You should consider getting an adjustable alignment kit comes with two new uca bolts and eccentric camber adjusters. I paid $12 for the last one I bought in rockauto, parts stores carry these as well

Brake likes in that area are a pita to work on

Good
Job this far this is not easy work!! But it gets easier each time
Didn't know that about the bolts! I did notice the flat part. I'll order a new set! Do you have a PN for it?


Didn't know that about the bolts! I did notice the flat part. I'll order a new set! Do you have a PN for it?
This is the part number for all those little bits on the upper control arm, from Moog of course for the nice trustworthy suspension parts. Theres also a link to it on Advanced Auto
#K80065


Join the Elite Explorers for $20 each year.
Elite Explorer members see no advertisements, no banner ads, no double underlined links,.
Add an avatar, upload photo attachments, and more!
.


Does it matter which way I install the fasteners?
I want to say they only go one way, but my bet just to be careful would be to try and match them up how they were before. If you're not sure, chrisfix has a video from doing the control arms and talks about it a bit. Always a good channel for repairs on our trucks!


Back
Top