00whxploder
Well-Known Member
- Joined
- February 9, 2010
- Messages
- 115
- Reaction score
- 1
- City, State
- Fitzgerald, GA.
- Year, Model & Trim Level
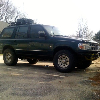
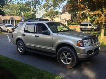
- 2000 xls 4x4 now
I have found a great deal of info on this web site that I have compiled to take your V6 Ex from 2wd to 4wd .
Note Info takin from http://www.explorerforum.com/forums/showthread.php?t=85487&highlight=awd+control+trac Thanks to stadx2's
Items needed:
Mechanics:
4r55e or 5r55e 4x4 tail housing
4r55e or 5r55e 4x4 output shaft
BW1354 Electric shift
Front drive shaft
Rear drive shaft Based on door size 2dr or 4dr
Dana 35 front axle gear matched to your rear
CV axles
4x4 Knuckles
4x4 hubs
4x4 rotors
all bolts and nuts
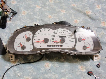
Radio bezel with 4WD switch
Electronics:
Wire harness that connects tcase
Torque on demand Relay
T-Case shift relay
Generic Electronic Module (GEM)
Radio bezel 4x4

T-Case wiring

Torque on-demand relay

Shift Relay

GEM

Install
The first step in my swap was installing the electronics.
The first item I installed was the wire harness section that went from under the seat, through the floor, and to the transfer-case.
First you’ll need to take out the drivers seat so you can get underneath the carpet to access the plug.

This is the electrical plug you need to access. In the Ford electrical book, this plug is called C200.


After finding connector C200, find the rubber floor grommet just to the right of the connector and remove.

Now run the transfer-case wire harness through the floor and plug into the harness C200.

This is what the wire harness should look like under the truck. It’s the dirty light blue one on the right.

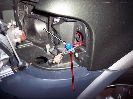
The next item to install is the Torque-on-Demand relay, which is located behind the passenger side air-bag.
IMPORTANT! Whenever handling air-bags remove the negative cable from your battery to avoid any chance of air-bag deployment!

Once the air bag is out of the way, to the left you will see a connector like this, into which you plug your Torque-on-Demand relay.

The Torque-on-Demand relay plugged in.

There is a small rivet on the relay on one side and a nut on the other that hooks and bolts onto behind a metal plate to the left of the air-bag like this.

The next items to install are the Transfer-Case Shift Relay and the replacement Generic Electronic Module. They are both located behind the radio bezel.The Transfer-Case Shift Relay plug harness is gray; it’s located deeper down forward and to the left of the radio and has a plastic plug capping it off.

After removing the plug cap, plug in the Transfer-Case Shift Relay.

The next item to install is the replacement Generic Electronic Module (GEM).You will need to check with your Ford dealer parts department to find out what GEM you will need.
The GEM is directly to the left of the radio. Remove the two bottom screws and the four large electrical plugs on it, then lift up and to the right to remove.


Now with the new GEM and t-case shift relay in place, put the dash back together using the new radio bezel with the 4WD controls on it. DUH!
The electrical plug for the 4WD switch was the one that was plugged onto the back of your original bezel into a “dummy” plug. That plug goes into your “real” 4WD switch.

Last photos coming soon.
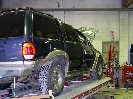
Last things you need to do is have a shop or do yourself swap out the output shaft and install the tail shaft housing.
Mate the t-case to new 4x4 tranny.

Install tanny
Proceed to following:
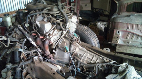
Remove 2wd spindles and rotors and install 4wd knuckles and hubs
Install front axle assemly and front cv axles.
Connect Front and rear drive shafts
Don't forget to oil up before you test drive you new 4WD
Note Info takin from http://www.explorerforum.com/forums/showthread.php?t=85487&highlight=awd+control+trac Thanks to stadx2's
Items needed:
Mechanics:
4r55e or 5r55e 4x4 tail housing
4r55e or 5r55e 4x4 output shaft
BW1354 Electric shift
Front drive shaft
Rear drive shaft Based on door size 2dr or 4dr
Dana 35 front axle gear matched to your rear
CV axles
4x4 Knuckles
4x4 hubs
4x4 rotors
all bolts and nuts
Radio bezel with 4WD switch
Electronics:
Wire harness that connects tcase
Torque on demand Relay
T-Case shift relay
Generic Electronic Module (GEM)
Radio bezel 4x4
T-Case wiring
Torque on-demand relay
Shift Relay
GEM
Install
The first step in my swap was installing the electronics.
The first item I installed was the wire harness section that went from under the seat, through the floor, and to the transfer-case.
First you’ll need to take out the drivers seat so you can get underneath the carpet to access the plug.
This is the electrical plug you need to access. In the Ford electrical book, this plug is called C200.
After finding connector C200, find the rubber floor grommet just to the right of the connector and remove.
Now run the transfer-case wire harness through the floor and plug into the harness C200.
This is what the wire harness should look like under the truck. It’s the dirty light blue one on the right.
The next item to install is the Torque-on-Demand relay, which is located behind the passenger side air-bag.
IMPORTANT! Whenever handling air-bags remove the negative cable from your battery to avoid any chance of air-bag deployment!
Once the air bag is out of the way, to the left you will see a connector like this, into which you plug your Torque-on-Demand relay.
The Torque-on-Demand relay plugged in.
There is a small rivet on the relay on one side and a nut on the other that hooks and bolts onto behind a metal plate to the left of the air-bag like this.
The next items to install are the Transfer-Case Shift Relay and the replacement Generic Electronic Module. They are both located behind the radio bezel.The Transfer-Case Shift Relay plug harness is gray; it’s located deeper down forward and to the left of the radio and has a plastic plug capping it off.
After removing the plug cap, plug in the Transfer-Case Shift Relay.
The next item to install is the replacement Generic Electronic Module (GEM).You will need to check with your Ford dealer parts department to find out what GEM you will need.
The GEM is directly to the left of the radio. Remove the two bottom screws and the four large electrical plugs on it, then lift up and to the right to remove.
Now with the new GEM and t-case shift relay in place, put the dash back together using the new radio bezel with the 4WD controls on it. DUH!
The electrical plug for the 4WD switch was the one that was plugged onto the back of your original bezel into a “dummy” plug. That plug goes into your “real” 4WD switch.
Last photos coming soon.
Last things you need to do is have a shop or do yourself swap out the output shaft and install the tail shaft housing.
Mate the t-case to new 4x4 tranny.
Install tanny
Proceed to following:
Remove 2wd spindles and rotors and install 4wd knuckles and hubs
Install front axle assemly and front cv axles.
Connect Front and rear drive shafts
Don't forget to oil up before you test drive you new 4WD