B&A painted front bumper trim and valance | Page 2 | Ford Explorer Forums - Serious Explorations

  • Register Today It's free!

B&A painted front bumper trim and valance

Well, finally, it's was nice enough today to shoot some paint on my ugly front end trim. The valance came off pretty easy, but I had to TUG and TUG and TUG to get the upper trim off! Whatever the case, here's the paint formula I used:

Washed and dried all pieces in the shower (because of their size) with soap and water.

4 coats of Duplicolor Adhesion Promoter.
4 coats of Duplicolor Flexible bumper black paint
2 coats of Duplicolor Clear Coat.

This works VERY well if you have just a little patience. By the looks of it, it should hold up very well. Don't let anybody tell you that you can't make these things look good with just rattle can paint, because you can.

TIP: I picked up a little accessory at Autozone called the "Krylon Can Gun." Basically it's a gun attactment that fits over the top of spray paint cans and you can trigger shoot everything. A steal at only $4.

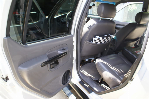
Below is a before shot:
 

Attachments

  • explo.jpg
    explo.jpg
    55.6 KB · Views: 1,154


Join the Elite Explorers for $20 each year.
Elite Explorer members see no advertisements, no banner ads, no double underlined links,.
Add an avatar, upload photo attachments, and more!
.


I figured out how to get the top piece off the bumper. it tucks under the body, but if you lift it up, you can squeeze it out. For the lower hitch part and the trim above the rockers, I just masked everything off really well. It came out better than I expected. Looks SOOOO much better than the stock purple color. One can of adhesion promoter and one can of clearcoat, two cans of flexible bumper black should be plenty for the rear.

Try it, just take your time and it'll look GREAT!


Join the Elite Explorers for $20 each year.
Elite Explorer members see no advertisements, no banner ads, no double underlined links,.
Add an avatar, upload photo attachments, and more!
.


Great job Hartman!
How did you paint your taillights black ? Or is it just a plastic protection ? I really like that all-black look.


Thanks for the compliments. Those are just blackouts on the tail lights. Those will come off when Altezzas come out. :D


I really like your truck! UNTIL the thought of it with Altezzas! You will look like a ricer, plus all black looks so sweet, good job on the bumper, you should make the 3rd brake light up top black too it kinda stands out


i agree 100% with silverblade... altezzas will really kill the nice look of your explorer in my opinion. BUT, its just MY opinion.


yeh I agree keep the blackouts or do that thing with the clears (not altezzas) and black slotted covers. Either would be cool if you ask me.


yea, if you wanna do something cool wiht the taillights, do clears with black covers... just not altezzas


Yeah, come to think of it, regular altezza's would mess the look of the back up! Carbon fiber ones would look cool, but I think I might do the clear tail thing with the slotted covers. Only thing that's keeping me from doing it is the legal thing, cops are a lot more picky about clear tails than clear corners. :eek:


Originally posted by COOLCHRISCUSH
i agree 100% with silverblade... altezzas will really kill the nice look of your explorer in my opinion. BUT, its just MY opinion.

And I completely agree with those two guys. Your ride looks awsome now, why mess with the tailights? The bumper trim paint looks great BTW.


Yeh the carbon fiber ones would look better....but do what you want.


CAUTION! Old thread back to life

So myquestion for you Hartman is......

does the front and rear upper bumper trim just pull right off the bumper with clips on the underside????? and will it 'snap' back on when you are ready to put it back together? Please gimme details....you know what i'm up to...everyone else is in the dark.

I hope i can find some flex paint

later man...did you get my pics i sent ya?


The upper front piece on the bumper has little plastic wedges coming out of it that stick into holes in the chrome bumper behind. First unhook the trim on the ends of the bumper (in the wheel well) and then just tug forward and it will come loose.

The rear is the same way, just pull straight up on the trim piece. After you get it loose, you'll find out that the ends of the trim extend up into the body. You can shimmie these out quite easily.


I just looked at the before pic earlier in this thread, WOW that's a wakeup call! It seems like that pic was taken 3 years ago instead of 6 months!


Did it snap right back into place when you were done painting it?


Originally posted by Yomie
Did it snap right back into place when you were done painting it?


Yes it just snaps back into place.


Damn Hartman you just got all the cool ideas don't you??? Nice job!!!!!!!


Originally posted by Hartman
Yes it just snaps back into place.

Hey thanks man.

Damn i'm gonna have to come to your place one weekend to do some painting on my rig too! Then we could cruise deep downtown, lol :D


mmm...looks sweeet...wonder if i could find some of that in deep emrald green, or whatever my color is called ;) dang, things would be so much simpler if my truck was just black


Join the Elite Explorers for $20 each year.
Elite Explorer members see no advertisements, no banner ads, no double underlined links,.
Add an avatar, upload photo attachments, and more!
.


Back
Top