defroster door lever broken | Page 2 | Ford Explorer Forums - Serious Explorations

  • Register Today It's free!

defroster door lever broken

I am surprised that so far only 2 of us have chimed in on this thread. Number12, this is an issue for us since we live in Middle TN. Last week we had 80 degrees and tornadoes on Wednesday and then frost on Friday and Saturday morning...


Join the Elite Explorers for $20 each year.
Elite Explorer members see no advertisements, no banner ads, no double underlined links,.
Add an avatar, upload photo attachments, and more!
.


this is an issue for us since we live in Middle TN.
In that case, I would recommend redesigning the dashpot (vacuum motor) connection so it can't rip the handle off the flap. I have considered adding a spring between the dashpot rod and the flap lever so the dashpot can pull all it wants and not break anything. You could consider making the flap handle longer so its range of motion is as large as the movement of the dashpot. You could add a slotted extension to the dashpot rod so some of its range of motion is defeated.

When I see a bad design, I re-design it instead of buying more of exactly the same parts and installing them.


I am surprised that so far only 2 of us have chimed in on this thread. Number12, this is an issue for us since we live in Middle TN. Last week we had 80 degrees and tornadoes on Wednesday and then frost on Friday and Saturday morning...
Too cold here in Chicago for a repair now, but this summer I want to be prepared, so I'm following this thread with interest. My left foot and leg are uncomfortable when it's real cold. Along with having an arm repair plan or junkyard flapper arm beforehand; I'd also like to be ready to "screw mod" the actuator arm as mentioned above so it doesn't retract too far; or something to prevent this arm from breaking again. The 3D printed metal? arm idea sounds like something I'd contribute to or buy. Slotting the dashpot rod idea sounds good too; or how about moving the actuator a little? I'm sure a lot of others have or will have this same problem...


or how about moving the actuator a little? I'm sure a lot of others have or will have this same problem...
The retractor has too much range of motion like Ford forgot to install a "stop" in the vacuum chamber. Altering the mounting won't fix that unless you change the attack angle a LOT.

This car has a butt load of design flaws. The flapper modulator motors have too much range of motion and plastic gears so they commit suicide. The outdoor air flap is designed wrong so it falls out. The rear sway bar mounts are on springy nut holders which don't hold and you can't buy new ones so you have to redesign the rear sway bar mounts. The cheap metal casting which holds the shifter lever fractures. The plastic thermostat housing is famous on the 4 liter and the plastic intake manifold is famous on the 4.6 liter. If the ceiling lights won't go out, it might cost you a whole instrument panel because that's where the computer is to interpret the door switches. Should I continue?

It doesn't matter. This website is a monument to how many ways Ford can have a "better idea".


could you drill a hole threw the arm and put a long 6/32 screw threw it and attach it with a lock nut?


could you drill a hole threw the arm and put a long 6/32 screw threw it and attach it with a lock nut?
I have not figured out how to do that. If you can, fine. This is all about a vivid imagination required to redesign something better than the original. Any way to stop the vacuum motor from ripping the handle off the flap is an improvement.


I couldn't quite figure out how John Cris actually got the box out, so I pulled out my trusty service manual, and lo and behold, the diagram for the Plenum chamber (its official name). Looks like what he came up with will work. 5 screws and it should pop out.Nice work John! guys like you with inginuity make America work. However, I think I'm going to visit a junkyard first and try to find an intact unit and try carving on it to get it out. hope these diagrams make it a little
easier to understand.
IMG_8411.JPG
IMG_8410.JPG

Couldn't have been located in a worse place.


I actually bought a replacement air box as my lever is broken off as well. I have the old one gerry rigged with some wire and it appears to be holding its own but I'm sure eventually it's going to break.

By the way, I found this air box on eBay for $50! They guy bought it but never used it! Keep an eye out there!

The part number for the air box is: 1L2Z-18B259-AC

Duct1.jpg


Duct2.jpg


Well, I'm back from the junkyard, and have some 'tricks' to make your removal easier. The arm I found just had a little lock on piece broken, and now I can see why the pin breaks- with the locking tab broken, there is quite a bit of 'slop' (or using a Ford term, 'play') of the arm within the door end, then boom! the whole thing breaks off.
IMG_8425.JPG

IMG_8426.JPG

The fix is fairly simple: jam something between the broken piece and the remaining arm end and force it back into the door end where it will lock back into place so there will be no slop. By the way, I found that almost every arm in the other 3 junked explorers looked like this, so there is hope. First thing: John Cris had it right, you got to cut the metal piece out, so I used a Dremel with a 1" cut-off disc hooked up to a small inverter that was connected to a portable jump start unit. I went pretty far back to cut, but you only have to go about 2/3 the way at the most. I cut the sides of the brace first, but couldn't get through the middle- too thick. So I tried bending it slightly up and down, and finally just pried it up and it broke loose. Turns out it's pot metal! (Why use steel when you can use a zinc/tin combo?) Brittle as hell, so cutting the wings and then scoring the middle is the way to go.
IMG_8413.JPG

Next was the big air ducts on each side. Can't use the Dremel on them except to start a slot. From then on, a hacksaw blade in a small holder that exposes the blade about 6 inches. the material is VERY thin, almost sheet-like, and cuts quickly. Since I was in a junkyard, I didn't care how straight the cuts were. You will be saving these pieces from your own vehicle, so cut them nicer than I did. Removed the front vent deflector first.Then I removed 2 black screws from the top of the unit, and three gold tone screws from the bottom. Removed 2 silver screws from the defroster duct piece on top, but it wouldn't come off, so I pulled the unit forward and it disconnected from the drivers side the defroster flex tubes.You might look back there and say I'll never get that back on- wrong. Don't worry, this is normal since I found they were not connected correctly at the factory- just slightly in the tube..The ford manual picture I posted earlier makes it look like they are part of the unit, but they are not! After pulling the unit, I noticed a third screw under the metal brace area in the middle In picture below- don't pull this piece out! Take this screw out and the defroster duct piece can come off the unit and left in the vehicle, and now the unit can be pulled out.
IMG_8418.JPG

IMG_8419.JPG
Disconnect the yellow air line at it's connector on the right side, and out it comes.Took about 30 minutes my first run through, with the metal cutting taking almost half of that, until I learned the snap-off method. I do think that going to a junkyard will be the only solution for most, and they don't care what you carve up. I got the whole unit for 10 bucks, since I wanted to see how it works and maybe try to re-engineer the thing using it as my test bed. Door in unit comes out for examination, and that's where the little broken off piece lived. A real sloppy way to actuate the door. I'm using some hose to the actuator that I can suck on to pull the metal arm back and forth (don't laugh, it works- but a lot of sucking..) Looks like the post about putting a screw through the actuator's arm to control it's retraction will be the fix. Make sure to drill the hole is as close to the bend in the arm as you can.
IMG_8436.JPG
IMG_8438.JPG
IMG_8439.JPG

One last trick: I was able to get my fat fingers on the arm on other units without removing them or cutting anything. Horribly difficult, and the problem is you risk breaking the plastic arm doing so while they are in place.(ask me how I know) I do think that if you remove all the screws and cut just the left duct you can jigger it to the right for total access the actuator and arm. Won't need the rest of it so why remove it all? Total of maybe 15 minutes max, knowing what I know now. Certainly feel more confident carving up my own explorer now. BTW, this also accesses the dreaded blend door, so if (and when) that plastic piece of crap breaks, you can easily remove the unit now to fix that. Good luck to all, I'm on to replacing a collapsed engine valve lifter (a far easier job). I apologize for the length of this post, but it beats the hours removing the dash, plus as John Cris said above, even if you did, you still would not be able to remove the bottom screw of the actuator. See my next post for the issues I had Ifixing it on my Explorer...

IMG_8414.JPG


Well, I'm back with the removal and repair of MY 2005 Explorer air unit to fix my door. First thing I noticed was that my unit was a dual temperature setup- not too different. It had two air blend doors down inside and they do some fancy dancing when the dual temp function is chosen- fun to watch.
IMG_8452.JPG
'll First of all, the cutting of the metal brace and ducts were the same as above. The defroster duct will come out on the driver's side.Don't panic when you see how far back that connection is- solution is very simple- I'll address it later on at the end of my post. However, the middle screw of the defroster ductwork was not fastened to anything- and here's why-while cutting and removing the left side duct, a piece of something wedged against it and the dash slid out. It looked brand new, and I couldn't see where it went.
IMG_8449.JPG
Turns out it was supposed to go INSIDE the air plenum box to divide the air for the dual temperature control. Never got installed, but thankful someone stuffed it near the unit.
IMG_8450.JPG

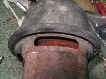
The next difference was the size of the 2 actuator cans on each side- they were bigger...so naturally the unit wouldn't slide out like the one in the junk yard.
IMG_8451.JPG
So unscrewed the left can and swung it out of the way. Problem solved.
Everything else about the removal is the same as my previous post.
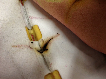
Here's how I fixed the arm. I tried everything-Gorilla glue (won't stick to plastic) construction adhesive (need rough surfaces) and I finally hit on this solution- Take a small piece of thin plastic- thick enough to sandwich between the round pin and the broken locking tab to bring it back to it's original height. Then take a small piece of super heavy duty duct tape and put it on top of the tab and wrap it around the sides- but not around the bottom of the pin. This gives it the correct amount of thickness so the duct tape wedges in the flat of the hole- and the adhesive part on the locking tab prevents it from coming out. Just be sure when you put it in, you don't have to remove it again or you will have to start the process all over again
IMG_8447.JPG
IMG_8448.JPG

Finally, I put some nuts on the stopping shaft I inserted into the actuator to bring it forward slightly- this keeps the door from actually touching the top of the unit when it is actuated- just about a 1/64th of an inch- so that there will be no strain on the delicate lever.
IMG_8456.JPG

Two last things-While the box is out, you can use the Dremel to drill a hole for the new support for the cut metal brace. Goes through that pot metal in about 2 seconds- no need for any fancy angle drill
IMG_8454.JPG
The finished brace installed for (hopefully) the last time
IMG_8458.JPG
By the way, this is how to set up the aluminum tape to get the ducts in place without screwing the tape up. Do NOT use duct tape here (even though it's a duct) because it will detererate with the heat inside the car. The aluminum stuff it made for furnace/ac work.
IMG_8457.JPG

Finally, the last duct you have to connect is the one that popped out so easily from the driver's defroster duct assembly that came off the top of the box. Turns out it was never properly connected at the factory- the hose was just kinda hanging on it- which is why it came out so easy. The fix is real easy- get under the dashboard on the drivers side and stick your arm up between the steering column and the gas pedal. Surprisingly, there is nothing up there except for this duct and its hose. Just grab the hose and slide it on the duct. You should here a very faint snap when it's locked on- again, something the factory didn't do right.
OK, I've taken enough space here, but I feel it's important since this information is NOWHERE ELSE. Short of replacing the heater core (yes it's down there if you want to peek at it), this is the single most buried item in the vehicle. I love this forum, and will try to document more of my fixes to keep my 13 year beast going (I'll spare you the pain of ripping into my 6 CD changer- somebody on u tube has posted a great video for that). Thanks for listening.


Back
Top