Greg_DonWindsor
Elite Explorer
- Joined
- February 25, 2007
- Messages
- 384
- Reaction score
- 77
- City, State
- Calgary, Alberta
- Year, Model & Trim Level
- 2008 Limited V8 4x4
Now that temperatures have finally warmed up here in Eastern Canada, and I had a long weekend at my disposal, finally decided to install the G2 rear differential cover I had purchased a few months ago. Removal of the spare tire allows for more working room beneath the truck. Use of a jack and stands was not required.
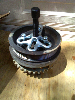
Removal of the stock diff cover was fairly simple, and was done completely with hand tools, a 1/2inch socket driver to be exact. Once the 10 bolts were loosened, I left the top bolt in, loosely, to hold the stock cover on while I tapped near the base with a hammer and screwdriver to get it unstuck from the diff housing. The old fluid was drained into a pan. (Note: be careful not to scratch the mounting surface of the diff housing, a few light taps is all it takes.) I placed a lint free rag over the internals as I used a razor blade to scrape off any remaining gasket material from the housing's mounting surface. Pictured below is the rear diff with the stock cover removed.

The only slight problem I ran into was that the new, larger G2 diff cover would not fit between the rear sway bar and onto the diff housing. I solved this problem by disconnecting the rear sway bar at both of the link ends, and rotating it up and out of the way to allow mounting of the new cover. The G2 is a nice unit, with a built in o-ring gasket, so no gasket maker is required in it's installation. The new 1/4inch allen key bolts were installed and tightened in a star pattern. I then added one small bottle of friction modifier, and approximately 4 32fl.oz. bottles of Lucas 75w140 synthetic gear oil, using a syringe style suction pump. Fluid was added until it just began to trickle out of the fill hole, located on the front of the diff housing (ie:facing the front of the truck). Even though I filled up from the dipstick hole on top of the new cover, the magnetic fill plug on the front of the diff housing was left removed to ensure proper fluid level, and to clean the magnet of any metal shavings. Reinstall the stock fill plug once the fluid level is correct.

Pictured below is the finished product.

Overall installation time was approximately 45 minutes at a relaxed pace. I'd recommend this cover for anyone who wants a more aggressive look, increased fluid capacity, and greater ease of rear diff fluid changes down the road. The drain plug on the bottom of the cover allows fluid changes without having to remove the cover.
Removal of the stock diff cover was fairly simple, and was done completely with hand tools, a 1/2inch socket driver to be exact. Once the 10 bolts were loosened, I left the top bolt in, loosely, to hold the stock cover on while I tapped near the base with a hammer and screwdriver to get it unstuck from the diff housing. The old fluid was drained into a pan. (Note: be careful not to scratch the mounting surface of the diff housing, a few light taps is all it takes.) I placed a lint free rag over the internals as I used a razor blade to scrape off any remaining gasket material from the housing's mounting surface. Pictured below is the rear diff with the stock cover removed.
The only slight problem I ran into was that the new, larger G2 diff cover would not fit between the rear sway bar and onto the diff housing. I solved this problem by disconnecting the rear sway bar at both of the link ends, and rotating it up and out of the way to allow mounting of the new cover. The G2 is a nice unit, with a built in o-ring gasket, so no gasket maker is required in it's installation. The new 1/4inch allen key bolts were installed and tightened in a star pattern. I then added one small bottle of friction modifier, and approximately 4 32fl.oz. bottles of Lucas 75w140 synthetic gear oil, using a syringe style suction pump. Fluid was added until it just began to trickle out of the fill hole, located on the front of the diff housing (ie:facing the front of the truck). Even though I filled up from the dipstick hole on top of the new cover, the magnetic fill plug on the front of the diff housing was left removed to ensure proper fluid level, and to clean the magnet of any metal shavings. Reinstall the stock fill plug once the fluid level is correct.
Pictured below is the finished product.
Overall installation time was approximately 45 minutes at a relaxed pace. I'd recommend this cover for anyone who wants a more aggressive look, increased fluid capacity, and greater ease of rear diff fluid changes down the road. The drain plug on the bottom of the cover allows fluid changes without having to remove the cover.