little x
Explorer Addict
- Joined
- March 21, 2005
- Messages
- 1,320
- Reaction score
- 0
- City, State
- SW VA
- Year, Model & Trim Level
- '91 XL
First off: What you do to your truck is done by you, not me. This is just an overview of what I have done to my truck. If you do the same and it F’s your truck up, or someone steals it, or you kill yourself, It’s Not My Fault!
This is a write up of how to install a push button starter on your 1st gen X. I have been running my truck this way for 3 years now with no problems. If you set up your truck the same way as mine then you will be able to start and run the truck without the key. But, the steering wheel will be locked without the key. So the engine runs, but you can’t drive it any where. I find this useful for warming the truck up in the mornings without anyone being able to steal it. And plus it just looks cool.

My set up is using one switch to turn on the accessories, one switch to turn on the ignition, and a push button for the starter. I bought this mounting plate to make the installation go a little smoother and look a little flashier, but it’s not required. You could just pick up a few high amp switches and a button at the local parts store and put them just about anywhere.
First off disconnect your battery. There are several Hot wires you may be messing with.
Now you need to remove the plastic part of the dash that is underneath the steering column. First disconnect the hood release, it is held on with 2 bolts.

Then unscrew the 2 bolts at the bottom corners of the panel, and remove it, the top is just wedged in.

Now you need to remove the two large bolts that support the steering column. The wheel will sag down giving room to access the ignition switch which is on the top of the steering column, close to the firewall.


Disconnect the ignition switch, there are clips on the front and back.


This is a pic of my ignition switch, after some wires have been trimmed.

By now you should have already planned out where you are going to mount your switches and push button. Have you? Ok then. What you are going to do is cut off certain wires that are running to your ignition switch, and extend them to the switches and button you are installing.
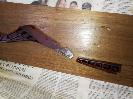
Here is a diagram of the Ignition Switch. Each wire with a black bar across it is going to be cut and run to a switch. The wire colors in this diagram and the next remain the same. I’m not 100% sure what the “proof” wires are, or what the ignition bypass circuit is, so I left those wires, and the 2 power wires all connected up.

You will need to run 2 power wires from the battery to your switches, every other wire (except for one jumper) comes from the cut ignition switch wires.

Wire up you switches and button.

Reinstall the ignition switch so that the proof wires will still get power. Reconnect the steering column support. Put the dash panel back on. Reconnect the hood release. Reconnect the battery and start it to see if it works.
Let me know if you have any questions.
This is a write up of how to install a push button starter on your 1st gen X. I have been running my truck this way for 3 years now with no problems. If you set up your truck the same way as mine then you will be able to start and run the truck without the key. But, the steering wheel will be locked without the key. So the engine runs, but you can’t drive it any where. I find this useful for warming the truck up in the mornings without anyone being able to steal it. And plus it just looks cool.
My set up is using one switch to turn on the accessories, one switch to turn on the ignition, and a push button for the starter. I bought this mounting plate to make the installation go a little smoother and look a little flashier, but it’s not required. You could just pick up a few high amp switches and a button at the local parts store and put them just about anywhere.
First off disconnect your battery. There are several Hot wires you may be messing with.
Now you need to remove the plastic part of the dash that is underneath the steering column. First disconnect the hood release, it is held on with 2 bolts.
Then unscrew the 2 bolts at the bottom corners of the panel, and remove it, the top is just wedged in.
Now you need to remove the two large bolts that support the steering column. The wheel will sag down giving room to access the ignition switch which is on the top of the steering column, close to the firewall.
Disconnect the ignition switch, there are clips on the front and back.
This is a pic of my ignition switch, after some wires have been trimmed.
By now you should have already planned out where you are going to mount your switches and push button. Have you? Ok then. What you are going to do is cut off certain wires that are running to your ignition switch, and extend them to the switches and button you are installing.
Here is a diagram of the Ignition Switch. Each wire with a black bar across it is going to be cut and run to a switch. The wire colors in this diagram and the next remain the same. I’m not 100% sure what the “proof” wires are, or what the ignition bypass circuit is, so I left those wires, and the 2 power wires all connected up.
You will need to run 2 power wires from the battery to your switches, every other wire (except for one jumper) comes from the cut ignition switch wires.
Wire up you switches and button.
Reinstall the ignition switch so that the proof wires will still get power. Reconnect the steering column support. Put the dash panel back on. Reconnect the hood release. Reconnect the battery and start it to see if it works.
Let me know if you have any questions.