Roadrunner777
Explorer Addict
- Joined
- February 5, 2011
- Messages
- 2,044
- Reaction score
- 346
- City, State
- Bemidji, MN
- Year, Model & Trim Level
- 94 4x4 Sport 88k
Rebuilding the Ford 8.8" Traction Loc Clutch Pack
By: Roadrunner777 (my friends call me Phil)
Parts:
Ford Racing Traction Lok Kit
Ford Racing Friction Modifier Note: Some people using full synthetic gear lube say they can get away without the Friction Modifier. You would then soak your clutches in your gear oil. Do not install dry clutches.
Optional: If you want to replace the plastic factory cover, this is the time. I recommend: Riddler Diff Cover
Also, if you are the least bit suspicious of your rear wheel bearings or seals, this is definitely the time to change them, while the axles are out. Mine are fine, and I was on a little bit of a time crunch, so I didn't do them.
3 Quarts of your favorite 75W-140 gear lube.
Tube of your favorite sealer, I like Ultra-Blue for stuff that doesn't get too hot, that's what I used here.
Tools:
Jack and 2 jackstands
Small parts bowl or baggies.
Lug wrench
Big hammer to help the brake drums off
13mm or 1/2" for Diff cover bolts
8mm or 5/16", 1/4" drive socket or box end wrench for cross pin bolt
Something to pump gear oil with
Misc shop tools
Optional: Air Compressor, Air Impact Wrench, air ratchet
Prep:
The new clutch plates need to soak in friction modifier for at least 12 hours.
Procedures:
Trans in neutral, and 4x4 disengaged, otherwise you can't spin the carrier.
Get the Exp rear in the air, supported by the frame. This allows the diff to drop and improves access. Pull off the rear tires and drums.

Now, slide under with a 1/2" (13mm) socket setup. A universal or wobbler extension helps for the top ones. Don't forget a drain pan, it's gonna get messy! Pry off the cover.

Next, you need to turn the carrier until you can get to the cross pin bolt. If the carrier does not turn, then make sure you are in neutral and not in 4WD mode.
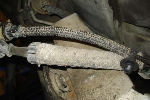
Remove the cross pin bold with 5/16" (8mm) tools. This bolt has a tendency to break. Mine was tight but it came out ok. Be gentle. Here's the problem: The cross pin bolt secures the cross pin, which otherwise floats in the carrier. The cross pin is harder than the bolt, so the bolt ends up with all the wear. Here is my old one:

Now, I have a street truck, it mainly towed a boat and hauled kids to school. So, this is probably not so bad. But you can imagine if conditions were more harsh, this bolt could get mangled and be very hard to get out without breaking.
Here are pictures of the extraction. I did not realise I was aiming down the wrench at the time, but you will get the idea.
(Hey, you can see my original Firestone spare tire!)


Now I need to talk about how I am going to show the rest of this project. Here is the problem: Everything happens inside this dark cavity and it's really difficult to actually indicate something like the C clip when it is all inside the carrier. So, I present to you: The Invisible Carrier. I am going to simulate the action on my bench, where the lighting is good and I can get better angles.

Do you get the concept? I am showing you what is going on in your carrier, on my bench. Those are the axles going out of frame to the sides, and everything is as it should be, roughly, without the carrier or housing. The steps that follow, I am showing on my bench, but you are going to do while it is back in the differential case.
Punch out the cross pin. The bolt is out already so it should slide out with some persuasion. Mine actually gave me a hard time, then I turned the carrier around for the 3rd time and it just started sliding out by gravity. Just play with it until it comes out. Here we are with the cross pin out.

The cross pin actually holds the axles in position axially. So, without the cross pin, the axles are free to float towards the diff housing. Get out from under the truck and push the axles inward. They should go in 1/2" or so. Now, go back under with some needle nose piers, an ice pick, just a handful of tools to help you coax the C clip off the end of the axle.
Looking in, just inside the S spring, you should now see more of the axle end, and the C clip. Just push the clip off. My axle had an rubber o-ring there so it took a little bit of pressure.


Now, get back out from under and slide the axles out. Support the axle and try to keep it centered. If you just drag it out, you can damage the axle seal, which will lead to oil in your brake drum, etc... Gentle please.
ADDED: I repeat - be very careful extracting the axles. A year down the road, I noticed signs of oil in the driver's side rear brake. I cannot attribute this directly to being careless... I may have overfilled the case, or the seal may have just been due. In retrospect, well, I didn't really have the time, but I really should have replaced the axle seals.


Ok, now, pull the S spring out. Grab it with pliers, pry on it, it will come out, but not without a fight.

Now, turn gears until the two pinion gears fall out. They may have metal thrust washers on the back, keep track of those.

Next, remove the gears that were on the axles. Check carefully in the carrier for any plates or shims that did not come out. The last thing out should be a shiny shim. I'm not sure if you have to, but I kept all the plates in order on the gear just like it was in the diff, and made sure I had left and right side noted. The diff is now empty except for the carrier, and ring/pinion gears.
Take the gears and clutch stack intact to your workbench.
Here is the left stack:

And the right:

Now, you may have noticed the tabs are missing on most of my friction plates. Here they are!

Here is some detail and what I am calling things:

The steels have teeth on the inside, the frictions should have tabs on the outside, and the shims are just round washers, usually marked with their thickness. The shims will be noticeably thinner than everything else.
I'm just going to take a minute and talk about how this stuff is supposed to work. The tabs on the frictions engage a slot in the carrier. The teeth on the steels engage the axles via the axle gear. So, this creates a frictional linkage from axle, axle gear, steel, friction, carrier, friction, steel, axle gear, axle. The strength of the linkage is based on the amount of friction between the steels and the frictions.
Now, what affects friction? Two things: First is the fluid this stuff is spinning around in, hence the addition of friction modifier, which reduces friction. The second is pressure between the frictions and steels. This is a function of how thick the stack is, and the force from the S spring. The thicker the stack, the more pressure from the spring. However, if the stack is too thick, you will not be able to fit the pinion gears back in the carrier.
Ok, back to the show. Now, either you are going to get technical at this point and play with the stack for maximum thickness or you are going to just take off the old stuff and install the new stuff. I didn't know for sure what I was doing at this stage, so to be safe I took some measurements like so:
This is my old left stack, 0.636" for whatever it's worth.


I'm moving on to the idea of stack order. This picture shows the old order on top and the order that came with the new parts on the bottom. The bottom frictions are greasy-looking because I just took them out of the friction modifier juice, and being it was about 10 degrees F in my shop, it jelled up a little bit.

You might ask why my factory stack order and my Ford Racing stack order is different. Papers, you want to see my papers? Here is the original order from the 1994 factory manual:

And here is the diagram that came with the parts:

So, what's the deal? I don't really know. I know a part of it, but I don't know if it is significant... others make a big deal out of it. Lets go back to the old stack, and we are going to look at the friction with runs directly on the axle gear. I am showing you the face of the friction that runs against the surface of the gear, so think of it like an open sandwich.

You can see the wear on the friction. See, the area of the gear that touches the friction is smaller diameter than the friction. So, this scheme leaves 1/2 of this friction unused. I don't know. One half of one side, out of 6 total sides is only 5% unused. I'm not sure that really matters. But, whatever the case, the new scheme puts a steel on first, so the entire friction is now used.
Reassembly Notes:
Well, it's all about reassembly now. I ran the new order because... well, it is from Ford Racing after all. My new stack was 0.655". My pinion gears went back in easily. So, that means, if I wanted a high traction effect, I could have added an old shim, friction, or whatever to make the stack thicker. I am interested in traction on ice and snow, which is low torque, so I'm just going to go with the instructions.
The rest of reassembly is simply a reverse of the process.
The S spring was a bit of a challenge. It needs to get a little bit compressed. The ideal tool would seem to be a big set of needle nose vice grips. I used that, a big screwdriver and a 3# hammer, took a while to coax it in.
It bears repeating, you should not reuse a cross pin bolt. It's a really bad deal if it breaks. The bolt in the kit comes with thread-loc already applied.
I used 3 quarts of SuperTech 75W-140 100% synthetic (re-branded stock from Warren Petroleum). It gets fair reviews from Bob the Oil Guy and at $11 each, it's affordable. The frictions brought a lot of friction modifier in. I added a little bit more, I guess there is about 2 ounces of it in there. If you are doing this in cold weather, then keep the oil, and your cover sealant inside overnight. I didn't remember to bring the oil in and it took over an hour to get it all in... on my side, on cardboard on snow. Rookie mistake.
I changed this fluid last spring, and it seems like it took more fluid this time. I have no reason for this other than that the Riddler cover may have added some volume. It took 3 quarts + a little.
The day after this work, we got 2" of snow over old ice, pretty much the exact conditions I needed to test out this rebuild. I could not be happier... it accelerates straight on all surfaces and conditions. Mission Accomplished!
If you find errors or just have comments, feel free.
By: Roadrunner777 (my friends call me Phil)
Parts:
Ford Racing Traction Lok Kit
Ford Racing Friction Modifier Note: Some people using full synthetic gear lube say they can get away without the Friction Modifier. You would then soak your clutches in your gear oil. Do not install dry clutches.
Optional: If you want to replace the plastic factory cover, this is the time. I recommend: Riddler Diff Cover
Also, if you are the least bit suspicious of your rear wheel bearings or seals, this is definitely the time to change them, while the axles are out. Mine are fine, and I was on a little bit of a time crunch, so I didn't do them.
3 Quarts of your favorite 75W-140 gear lube.
Tube of your favorite sealer, I like Ultra-Blue for stuff that doesn't get too hot, that's what I used here.
Tools:
Jack and 2 jackstands
Small parts bowl or baggies.
Lug wrench
Big hammer to help the brake drums off
13mm or 1/2" for Diff cover bolts
8mm or 5/16", 1/4" drive socket or box end wrench for cross pin bolt
Something to pump gear oil with
Misc shop tools
Optional: Air Compressor, Air Impact Wrench, air ratchet
Prep:
The new clutch plates need to soak in friction modifier for at least 12 hours.
Procedures:
Trans in neutral, and 4x4 disengaged, otherwise you can't spin the carrier.
Get the Exp rear in the air, supported by the frame. This allows the diff to drop and improves access. Pull off the rear tires and drums.
Now, slide under with a 1/2" (13mm) socket setup. A universal or wobbler extension helps for the top ones. Don't forget a drain pan, it's gonna get messy! Pry off the cover.
Next, you need to turn the carrier until you can get to the cross pin bolt. If the carrier does not turn, then make sure you are in neutral and not in 4WD mode.
Remove the cross pin bold with 5/16" (8mm) tools. This bolt has a tendency to break. Mine was tight but it came out ok. Be gentle. Here's the problem: The cross pin bolt secures the cross pin, which otherwise floats in the carrier. The cross pin is harder than the bolt, so the bolt ends up with all the wear. Here is my old one:
Now, I have a street truck, it mainly towed a boat and hauled kids to school. So, this is probably not so bad. But you can imagine if conditions were more harsh, this bolt could get mangled and be very hard to get out without breaking.
Here are pictures of the extraction. I did not realise I was aiming down the wrench at the time, but you will get the idea.
(Hey, you can see my original Firestone spare tire!)
Now I need to talk about how I am going to show the rest of this project. Here is the problem: Everything happens inside this dark cavity and it's really difficult to actually indicate something like the C clip when it is all inside the carrier. So, I present to you: The Invisible Carrier. I am going to simulate the action on my bench, where the lighting is good and I can get better angles.
Do you get the concept? I am showing you what is going on in your carrier, on my bench. Those are the axles going out of frame to the sides, and everything is as it should be, roughly, without the carrier or housing. The steps that follow, I am showing on my bench, but you are going to do while it is back in the differential case.
Punch out the cross pin. The bolt is out already so it should slide out with some persuasion. Mine actually gave me a hard time, then I turned the carrier around for the 3rd time and it just started sliding out by gravity. Just play with it until it comes out. Here we are with the cross pin out.
The cross pin actually holds the axles in position axially. So, without the cross pin, the axles are free to float towards the diff housing. Get out from under the truck and push the axles inward. They should go in 1/2" or so. Now, go back under with some needle nose piers, an ice pick, just a handful of tools to help you coax the C clip off the end of the axle.
Looking in, just inside the S spring, you should now see more of the axle end, and the C clip. Just push the clip off. My axle had an rubber o-ring there so it took a little bit of pressure.
Now, get back out from under and slide the axles out. Support the axle and try to keep it centered. If you just drag it out, you can damage the axle seal, which will lead to oil in your brake drum, etc... Gentle please.
ADDED: I repeat - be very careful extracting the axles. A year down the road, I noticed signs of oil in the driver's side rear brake. I cannot attribute this directly to being careless... I may have overfilled the case, or the seal may have just been due. In retrospect, well, I didn't really have the time, but I really should have replaced the axle seals.
Ok, now, pull the S spring out. Grab it with pliers, pry on it, it will come out, but not without a fight.
Now, turn gears until the two pinion gears fall out. They may have metal thrust washers on the back, keep track of those.
Next, remove the gears that were on the axles. Check carefully in the carrier for any plates or shims that did not come out. The last thing out should be a shiny shim. I'm not sure if you have to, but I kept all the plates in order on the gear just like it was in the diff, and made sure I had left and right side noted. The diff is now empty except for the carrier, and ring/pinion gears.
Take the gears and clutch stack intact to your workbench.
Here is the left stack:
And the right:
Now, you may have noticed the tabs are missing on most of my friction plates. Here they are!
Here is some detail and what I am calling things:
The steels have teeth on the inside, the frictions should have tabs on the outside, and the shims are just round washers, usually marked with their thickness. The shims will be noticeably thinner than everything else.
I'm just going to take a minute and talk about how this stuff is supposed to work. The tabs on the frictions engage a slot in the carrier. The teeth on the steels engage the axles via the axle gear. So, this creates a frictional linkage from axle, axle gear, steel, friction, carrier, friction, steel, axle gear, axle. The strength of the linkage is based on the amount of friction between the steels and the frictions.
Now, what affects friction? Two things: First is the fluid this stuff is spinning around in, hence the addition of friction modifier, which reduces friction. The second is pressure between the frictions and steels. This is a function of how thick the stack is, and the force from the S spring. The thicker the stack, the more pressure from the spring. However, if the stack is too thick, you will not be able to fit the pinion gears back in the carrier.
Ok, back to the show. Now, either you are going to get technical at this point and play with the stack for maximum thickness or you are going to just take off the old stuff and install the new stuff. I didn't know for sure what I was doing at this stage, so to be safe I took some measurements like so:
This is my old left stack, 0.636" for whatever it's worth.
I'm moving on to the idea of stack order. This picture shows the old order on top and the order that came with the new parts on the bottom. The bottom frictions are greasy-looking because I just took them out of the friction modifier juice, and being it was about 10 degrees F in my shop, it jelled up a little bit.
You might ask why my factory stack order and my Ford Racing stack order is different. Papers, you want to see my papers? Here is the original order from the 1994 factory manual:
And here is the diagram that came with the parts:
So, what's the deal? I don't really know. I know a part of it, but I don't know if it is significant... others make a big deal out of it. Lets go back to the old stack, and we are going to look at the friction with runs directly on the axle gear. I am showing you the face of the friction that runs against the surface of the gear, so think of it like an open sandwich.
You can see the wear on the friction. See, the area of the gear that touches the friction is smaller diameter than the friction. So, this scheme leaves 1/2 of this friction unused. I don't know. One half of one side, out of 6 total sides is only 5% unused. I'm not sure that really matters. But, whatever the case, the new scheme puts a steel on first, so the entire friction is now used.
Reassembly Notes:
Well, it's all about reassembly now. I ran the new order because... well, it is from Ford Racing after all. My new stack was 0.655". My pinion gears went back in easily. So, that means, if I wanted a high traction effect, I could have added an old shim, friction, or whatever to make the stack thicker. I am interested in traction on ice and snow, which is low torque, so I'm just going to go with the instructions.
The rest of reassembly is simply a reverse of the process.
The S spring was a bit of a challenge. It needs to get a little bit compressed. The ideal tool would seem to be a big set of needle nose vice grips. I used that, a big screwdriver and a 3# hammer, took a while to coax it in.
It bears repeating, you should not reuse a cross pin bolt. It's a really bad deal if it breaks. The bolt in the kit comes with thread-loc already applied.
I used 3 quarts of SuperTech 75W-140 100% synthetic (re-branded stock from Warren Petroleum). It gets fair reviews from Bob the Oil Guy and at $11 each, it's affordable. The frictions brought a lot of friction modifier in. I added a little bit more, I guess there is about 2 ounces of it in there. If you are doing this in cold weather, then keep the oil, and your cover sealant inside overnight. I didn't remember to bring the oil in and it took over an hour to get it all in... on my side, on cardboard on snow. Rookie mistake.
I changed this fluid last spring, and it seems like it took more fluid this time. I have no reason for this other than that the Riddler cover may have added some volume. It took 3 quarts + a little.
The day after this work, we got 2" of snow over old ice, pretty much the exact conditions I needed to test out this rebuild. I could not be happier... it accelerates straight on all surfaces and conditions. Mission Accomplished!
If you find errors or just have comments, feel free.