gijoecam
Village Idiot
- Joined
- May 31, 1999
- Messages
- 8,336
- Reaction score
- 17
- City, State
- Trenton, MI
- Year, Model & Trim Level
- 98 ExSport, '00 F-150
Just thought I'd share my tale with all of you in the hopes it may help someone in the future. It's a 98 Sport with the 4.0 SOHC. The motor is actually a 2000 model year.
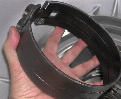
For my last few oil changes, I've noticed that my oil pan was rusty and oily. At first I thought it may have been a leak elsewhere, but upon further inspection, the oil droplets on my garage floor were coming from the oil pan itself; specifically the rust bubbles on it.
Time for a new oil pan.
Here's what the original looked like.

You can see the oily area around the bottom of the sump where the oil pickup sits.
Removal was simple. 14 bolts (which surprisingly weren't corroded in place!!) and the pan dropped off.
WARNING!!!! EVEN AFTER 'DRAINING' THE OIL, THERE WILL STILL BE ABOUT A HALF QUART IN THE PAN. TAKE CARE NOT TO DUMP IT ON THE CATALYTIC CONVERTER, THE GARAGE FLOOR, OR YOURSELF!!! (I managed to hit all three!!)
Here's what you'll see:

There are some differences if you have an older 2nd gen.

The one on the left is the original, the one on the right is the *new* replacement. Obviously the newer one looks and feels cheaper than the original. Notice the stress ripples in the new one from the stamping process.


Notice that the new pan has two significant changes. The channel that leads from the sump to the drain plug is farther forward on the pan. Additionally, the drain plug is angled downwards. I believe they did this purposely. On the original pan, at every oil change, when I removed the plug, the oil shot straight out to the side, hit the head of the rear lower control arm bolt, and fanned out in a pattern somewhat resembling Old Faithful in black crude. There isn't an oil pan big enough to catch it all!! I've been making a mess with my oil changes on this thing for the last 8 years. I believe this slight change should now allow the oil stream to pass forward of and below the level of that bolt, and should make oil changes a much less-loathed affair.")
Installation was just the reverse. Simply hold the pan in place, no sealant needed, and evenly tighten the bolts. Refill and viola. (Don't gorget to check the level... Mine took an extra 1/2 quart this time around)
Hope it helps someone sometime!
-Joe
For my last few oil changes, I've noticed that my oil pan was rusty and oily. At first I thought it may have been a leak elsewhere, but upon further inspection, the oil droplets on my garage floor were coming from the oil pan itself; specifically the rust bubbles on it.
Time for a new oil pan.
Here's what the original looked like.
You can see the oily area around the bottom of the sump where the oil pickup sits.
Removal was simple. 14 bolts (which surprisingly weren't corroded in place!!) and the pan dropped off.
WARNING!!!! EVEN AFTER 'DRAINING' THE OIL, THERE WILL STILL BE ABOUT A HALF QUART IN THE PAN. TAKE CARE NOT TO DUMP IT ON THE CATALYTIC CONVERTER, THE GARAGE FLOOR, OR YOURSELF!!! (I managed to hit all three!!)
Here's what you'll see:
There are some differences if you have an older 2nd gen.
The one on the left is the original, the one on the right is the *new* replacement. Obviously the newer one looks and feels cheaper than the original. Notice the stress ripples in the new one from the stamping process.
Notice that the new pan has two significant changes. The channel that leads from the sump to the drain plug is farther forward on the pan. Additionally, the drain plug is angled downwards. I believe they did this purposely. On the original pan, at every oil change, when I removed the plug, the oil shot straight out to the side, hit the head of the rear lower control arm bolt, and fanned out in a pattern somewhat resembling Old Faithful in black crude. There isn't an oil pan big enough to catch it all!! I've been making a mess with my oil changes on this thing for the last 8 years. I believe this slight change should now allow the oil stream to pass forward of and below the level of that bolt, and should make oil changes a much less-loathed affair.
Installation was just the reverse. Simply hold the pan in place, no sealant needed, and evenly tighten the bolts. Refill and viola.
(Don't gorget to check the level... Mine took an extra 1/2 quart this time around)Hope it helps someone sometime!
-Joe