P0172, P0174, P0300, P0301-3, P0316 after summer vacation | Page 4 | Ford Explorer Forums - Serious Explorations

  • Register Today It's free!

P0172, P0174, P0300, P0301-3, P0316 after summer vacation

Post number 11 has been selected as best answered.

Sorry guys, I had to wait for replacement Cam Shaft / Sprocket bolts to arrive. One of them arrived today, the others are on order. I also ordered the one for the main sprocket on the front.

Here's what I ordered.

fwefww.PNG

I already had the bolt for the jackshaft back sprocket.

I believe this is the proper kit for this particular harmonic balancer, don't get the plates that are conical.


Join the Elite Explorers for $20 each year.
Elite Explorer members see no advertisements, no banner ads, no double underlined links,.
Add an avatar, upload photo attachments, and more!
.


Sorry guys, I had to wait for replacement Cam Shaft / Sprocket bolts to arrive. One of them arrived today, the others are on order. I also ordered the one for the main sprocket on the front.

Here's what I ordered.

View attachment 163675
I already had the bolt for the jackshaft back sprocket.

Tomorrow I'm going to attempt to finish the timing.

Oh BTW, I have now rented three sets of tools to try to get the harmonic balancer off (the idiots at Pep boys lost their tools, and the ultra idiots at O'whatever sent me away with a bearing puller and double charged me and then called me "Chad" when I got short with them, turns out knowing what the **** you need and not relying on these people is good).

I believe this is the proper kit for this particular harmonic balancer, don't get the plates that are conical.
Yep that will work just fine


In the interest of not causing confusion, I was rereading my notes and in this thread (a thread I very much trust), it is mentioned that the camshaft bolts are not TTY.
Notes:

The camshaft sprocket bolts are not torque to yield and may be reused.

The jackshaft front and rear sprocket bolts are torque to yield and may not be reused.

The crankshaft damper bolt is a torque to yield and may not be reused.

Having said that, it looks like those bolts are included in some OEM timing kits.

My general feeling, after having snapped one of those is that even if they aren't TTY, I would recommend replacing them. If that bolt let loose at any speed really you'd be completely SOL. It may have been the case that I screwed something up with the Torque Wrench, but I don't think so. The bolt seemed to stretch and yield and break before reaching 63 ft-lbs.

Still waiting on the RH bolt to arrive. Will probably do next day of work on Monday.


In the interest of not causing confusion, I was rereading my notes and in this thread (a thread I very much trust), it is mentioned that the camshaft bolts are not TTY.


Having said that, it looks like those bolts are included in some OEM timing kits.

My general feeling, after having snapped one of those is that even if they aren't TTY, I would recommend replacing them. If that bolt let loose at any speed really you'd be completely SOL. It may have been the case that I screwed something up with the Torque Wrench, but I don't think so. The bolt seemed to stretch and yield and break before reaching 63 ft-lbs.

Still waiting on the RH bolt to arrive. Will probably do next day of work on Monday.

Cody,
I hope it's all working out okay. Did the toolset from Amazon work on your year of vehicle? Mine is a 2005 Explorer and the kit says goos for up to 2002 I think. What year was yours again? I appreciate your posts. I'm learning a lot from you before I start mine! Only the front is making noise but might as well change it all!


Hey Tom, really glad to hear it. I also have an 2005.

Are you talking about the harmonic balancer puller? I just got done timing the passenger side and will be pulling the balancer soon. I'm fairly sure that kit will work. You need the 2x M8 x 90 mm bolts and the flat puller, not the concaved one. That is assuming your balancer is like mine and isn't hollow.

IMG_20181008_145504 (1).jpg


Not just the puller but the special tools to hold the crankshaft and cams so timing does get off during chain swap. On Amazon it says up to 2002 I think. Thank you!


This? Yeah that's the right tool.

I got mine on eBay for less (I think it was $180).


Alright I finally got the darn Harmonic Balancer off which gave me access to the front timing elements. Pro tip, you have to use the bolt that threads into the crankshaft to push against. But at some point you'll have the balancer so far almost off that the bolt will bottom out. At that point go caveman on it with a deadbolt. It'll come off.

IMG_20181024_191245.jpg


As shown the primary chain is off. And I've since gotten the front cassette off. That thing did not come out easy. Cloyes lied their ***** off about that. I had to mangle the thing to get it out. I really hope the replacement part is a little smarter about that.

I've ran into a new problem. It seems that the balance shaft is also out of time. As shown the engine is TDC which should mean the balance shaft timing indicators should be right where the hole is. As indicated here:

NOT MY ENGINE:
wefewfwf.png


But mine is more or less where the red lines are. Moving it back into time isn't a problem, but if this was / is out of time I have to question why / how. The engine ran great, it didn't really vibrate other than perhaps at idle. I was very surprised to see the balance shaft out of time. I guess all these chains and guides are quite beyond their intended lifespan.

I assume the balance shaft has a ratio to the engine of 2:1?

Edit: NOPE!

I'm starting to get a picture here. I believe someone replaced the engine passenger side valve housing with a new one at some point. This is mostly based on seeing the difference between the two. The entire engine looks a certain color of wear that is consistent except for the passenger side camshaft area. It doesn't make sense unless that side was swapped. I do wonder if there's a way to confirm this, perhaps some numbers on the casting or something? It seems like the OEM timing components were used though. Either that or perhaps the sides wear differently? That would be surprising to me. I'll try to get a picture of this later.

My problem now is getting at the big underside casting just above the oil pan off. The oil pan is off, and there were two tiny bits of timing plastic in there so I'm glad I bothered to crack that open. I do have to wonder how the guys at Wal-Mart who changed the oil after this problem developed didn't catch that, but maybe they just drained the oil and never actually opened the pan. IDK, doesn't really matter. I'll probably be doing my own oil from now on anyway.

There are eight big bolts in there holding that part on. I'm worried they may be TTY bolts. If they are I'm going to have to see what replacements will run me. Thoughts?


Ahhhhhhh I'm wrong.


Balance shaft has an odd ratio, I just need to turn the crank a few times.


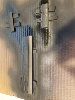
Alright guys, good news. Timing complete.

IMG_20181026_124326.jpg


I did not do the balance shaft chain or balance shaft lower guide because I didn't feel like taking the block cradle off. Don't care enough, hopefully won't regret it.

I have also at this time put the timing cover and water pump back on. I have a few post-job hopefully I didn't royally eff up questions about that though.

IMG_20181026_211342.jpg


I bought this gasket kit on Amazon (not necessarily recommending it, this is just the one I ended up getting) and it included the grey RTV stuff.

I ended up using it on both sides of the timing cover gasket and ONLY the block facing side (or timing cover facing side) of the water pump. I remember someone in some video mentioning not to do both sides for the water pump and my intuition screamed loudly enough that I didn't do both sides on the water pump.

I'm pretty sure I either need to RTV the other side of the water pump or attempt to remove / redo the timing cover gasket. Or just leave it and see what happens.

Did I screw this up? How? Thanks.

Next up are the valve covers, which I have non-OEM replacements of. The mechanic I had do a leak down wrote that the passenger side VC was cracked. After removing the engine I visually inspected the passenger cover and I can't find any cracks, but I had already bought replacement covers before. I'm not sure how a decent shop got that wrong or if maybe I'm just not seeing it, but oh well. Part of me want to put the OEM covers back on TBH, but I'm probably not going to.

Oh I also removed the oil pan and cleaned it. It had a few timing system plastic chunks (very small ones) so I'm glad I did that. However I didn't do anything in terms of resealing the gasket. I just bolted it back on to the proper torque specs. Should I worry about that? RTV it?

The thermostat (I think, thing directly above WP), showed some signs of leaking. One of the three bolt thread area was more rusted than the others. I cleaned it up and put down a small amount of RTV. Hopefully that wasn't stupid. I don't have a replacement gasket for that one ATM. Worst case scenario that can be serviced in the car easily.

So once the harmonic balancer, valve covers, and I want to say the flexplate / flywheel are all back on, I think at that point it's time to put it back in. Oh right, I'm going to check the injectors and put the fuel rails back on too. Any tips on cleaning / inspecting those for debris?

Anything else I should do before switching gears to re-installation?

EDIT: Almost forgot, does the oil seal kind of just sit there? I was mega surprised to not see any kind of machined flat for that thing to sit on. I've replaced it with a new one.


Great work!!!

(You might use a little Vaseline on your o rings when you put the fuel injector rail back.)


EDIT: Almost forgot, does the oil seal kind of just sit there? I was mega surprised to not see any kind of machined flat for that thing to sit on. I've replaced it with a new one.
Yes even my Felpro just sat there but the poem on my new engine looks like a normal old school seal weather leaked


The thermostat (I think, thing directly above WP), showed some signs of leaking. One of the three bolt thread area was more rusted than the others. I cleaned it up and put down a small amount of RTV. Hopefully that wasn't stupid. I don't have a replacement gasket for that one ATM. Worst case scenario that can be serviced in the car easily.
The Felpro gasket for the thermostat housing is cheep like 4$ at auto parts store
I strongly recommend a metal thermostat housing


Next up are the valve covers, which I have non-OEM replacements of. The mechanic I had do a leak down wrote that the passenger side VC was cracked. After removing the engine I visually inspected the passenger cover and I can't find any cracks, but I had already bought replacement covers before. I'm not sure how a decent shop got that wrong or if maybe I'm just not seeing it, but oh well. Part of me want to put the OEM covers back on TBH, but I'm probably not going to.
I would flip over the valve covers on a bench or something and fill them with old engine oil or something see if the crack showed itself
Then make your decision just use new gaskets


Why oil? Why not water?

I'm mostly worried about the RTV on both sides of the timing cover and only one on the water pump. Surely there's no way both of those are correct.

I'll replace the theromstat gasket after I get the car running again for sure.

New VC's have new gaskets.


For now, since I'm a broke ass graduate student (don't worry I just recently interviewed at Google, didn't get the job but a narrow miss means I'm going to land somewhere just fine), anyway since it's a easy to change out later kind of part, for now I'm going to leave it. I'll happily change the plastic housing out once employed.


So I have a dumb question. What the hell holds the front main oil seal in place? There's just a cylindrical hole with no flats on either side that the seal goes in. That's basically it?


Cody it's an interference fit. Lay on the cylindrical hole and lightly tap around the seal. It must go in true. I use to lay a flat a piece of wood an just tap until flush. Also lightly oil the seal or balancer before installing the balancer


So I installed the seal that came with the kit but I'm not happy with it. I went ahead and bought an OEM seal. Thing was expensive, $31.

My next issue are the valve covers. I had bought a replacement set because the garage I had do a leak down test said the RH one was cracked. It probably isn't but I do see some wear near the timing chain area. I have new covers (paid $91 for now OEM ones) and the damn brass heatset inserts on top are not the same thread. They're bigger. So now I'm wondering what to do about that. It seems like the camshaft position sensor can accept a larger bolt, so I guess I just figure out what size I need and order some of McMaster Carr?


Join the Elite Explorers for $20 each year.
Elite Explorer members see no advertisements, no banner ads, no double underlined links,.
Add an avatar, upload photo attachments, and more!
.


VC's & fuel rails installed, I also took the time to clean the injectors.

IMG_20181104_175621.jpg


Sorry for the out of focus picture.

Anyway I launched one of the damn fuel injector O rings and had to go looking for it. I found it! I also spent some time cleaning up the mating surface for the intake. I've got new O rings / gaskets for it.

dad tossed out the oil filter even though it was brand new. He was worried about particulate getting in or whatever, which is fine. I have a new filter and hose clamps on order. I may or may not install the rear part of the fuel system that links the rails soonish. I may wait until engine installation day.

Oh and I bought a transmission jack.

Our newest theory of approach to getting the tranny bolts reinstalled goes something like this.
  1. Put engine back without the engine mounts, lining up the flexplate to the bolts and whatnot
  2. Install lower tranny bolts which are accessible from under car
  3. Also install any of the tranny bolts we actually can get from top behind the engine.
  4. Get the starter and flexplate bolts all taken care of
  5. At this point the tranny and engine are basically together
  6. Disconnect tranny from the car, being really careful to support it with the transmission jack
  7. Push engine / tranny forward a few inches (remember engine is still being supported by the hoist at this point)
  8. Get all the PITA tranny bolts done
  9. Push engine / tarnny back into place taking care to get the wiring harness situated since we have good access back there
  10. Reconnect tranny and engine to car (IE install engine mounts and whatnot)
  11. Vodka, tequila or whisky (pick two) then we get the compressor and intake back on...


Back
Top