Ricks Bronco: 1and 1/2 | Page 154 | Ford Explorer Forums - Serious Explorations

  • Register Today It's free!

Ricks Bronco: 1and 1/2

Sign violation

IMG-20110919-00466-1-1-2.jpg

Oklahoma has laws against shooting deer crossing signs...looks like you just yanked one up with your truck crane lol. Seriously the carrier and crane is a deer hunters solution that works for sure and if anyone thinks you built your rig just to look at & build on ought to think again! I'm not so sure they wouldn't be right about mine though, sure don't wheel as much as I would like to.


Join the Elite Explorers for $20 each year.
Elite Explorer members see no advertisements, no banner ads, no double underlined links,.
Add an avatar, upload photo attachments, and more!
.


How about a travel/luggage deck to slip in the hitch, to haul your trophy back home with? Or is the rack in the back not removable?

cargo-carrier-hitch%20mounted-open.jpg

Yes i incorporated receiver hitch in the back so I can remove the cargo carrier. It's the same receiver that i made to relocate the winch from front to rear.
Really need to make it (cargo carrie) stick out a littler further due to the rear tire carrier mod.

DSC08773-2.jpg


This is how it was before the tire carrier. But glad you mentioned it. Now I'm going to need to make it stick out longer.


do it like they did in the old days man, strapped right to the hood of your cadillac, like in the deer hunter, lol can't see a damn thing but it lets people know what your up to.


Potomac-20110922-00488-1.jpg


Once there was a substantial amount of weight on the crane, I realized that a set of handles would be nice.


Function follows form quite often!
Absolutely, as in this dang auto roll up garage door is going to change form due to it's lousing functioning capabilities, not mentioning the door height of 7 foot is just too short for Samson's growth spurts.
Especially for Samson's new shoes next spring and some more suspension work. My, how fast they grow :p:

Potomac-20110921-00484.jpg


Here I've begun taking down the track that the door slides on. One of the problems is that when the door is fully opened, the very end of it still hangs down a little low like most doors do. Plus the entire door naturally has to be suspended from the ceiling. Then when it's rolled up, it blocks some of the lighting.
You can get an idea of how low by the pic above. The door once rolled up is just under the rod that has the pulley mounted on it. Be nice to have all the ceiling height back in this area.

Potomac-20110925-00504.jpg


My original idea was to remove the sliding door altogether and then install a sliding door on the outside. This would give me the whole 7' from ground to the bottom of the door. There would be no roll up door hanging down a couple inches below this 7' at the very end of the door.

Potomac-20110925-00505.jpg


But once I removed some of the siding for the track, I noticed that the bottom of the header was an additional board turned flat up against the header. Well, this is no concern to me and has no structural support, so off it comes and that nets an additional 1.5" Great.

Potomac-20110921-00486.jpg


Potomac-20110921-00483.jpg


Went to Tractor Supply and priced the sliding door hardware. No way was I gong to pay that kind of money...as in near $60 just for two roller wheels that fit in their overhead track. And I need more then just two.
So after about 2 cups of coffee a bucket of scrap hardware, sliding track that I saved from the original door and some flat metal plate that was on the riding mower where I got the hitch off of for the front mounted crane. Things might just not look so expensive.


Dedication

Rookieshooter you do inspire! Change the garage in order to continue the build, sure to take you to new heights.


Well, let's just say that this is my Man Cave and the opening is just not big enough.

Tuscarora-20110925-00498.jpg


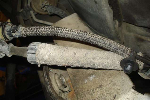
Here's one of the roller brackets and bearing. I think I came up with a with a way to utilize the existing track bar and bearings to save all kinds of money.
These bearings and bracket are made to support the existing door with the bearing in this location.
I need to have turn 90 deg. down.

Potomac-20110925-00495.jpg


Just so happens that the shaft of the bearing is very close to the right size for a 1/2" die. I used a 1/2 x 12 die for this.


Tuscarora-20110925-00496.jpg


Next I took the same flat metal the receiver hitch was originaly mounted to that I used for the front boom support.
I cut out some rectangular pieces, bent them at the correct angles with mounting holes for the bearing and then couple of lower holes to mount the plywood sliding door. Now I think you can see where I'm going with this.
Those holes you see in the bends wont be used, they were already there.

Tuscarora-20110925-00497.jpg


IMG-20110925-00502.jpg


If the flat pieces of metal did not have the off setting angles but were straight down then the track would become the fulcrum point and then the doors would won't to pull out to the side.
5 sets were made.

Tuscarora-20110926-00507-1.jpg


I'm building one 9' wide sliding door to the left of the stud.
The track is now mounted over top the door opening with 2x4 studs between track and garage wall.
Could have easily just put large barn door hinges, but the way the wind blows in Nov. and march it would not last long when trying to open or close the door.
So I need to make a stud at 9' too close off the non sliding part of the garage.
Now instead of buying a couple of two by fours, I'll just utilize the flat 2x6 board that I took off the bottom of the header.
That's the upright that you see.
Now my original plan was to buy some plywood and blank off the right hand side of the stud.
But after looking at my depleting $$ supply in my wallet, I'm going a different direction.
Just slice the garage door in half and nail the right hand side to where it is now. Then trash the left side which is pretty well beat up and do the plywood thing.
Plus the right hand side already is insulated on the back side.
Stange how things just fall into place. Going to be nice to have the full inside roof height and no blocked lights when truck is inside.


Potomac-20110927-00508.jpg


This old 2x4 was bolted onto the bottom of the roll up door to help in trying to straighten it up.
Won't need that any more so off it comes and bolted to the 5 roller bearings. The plywood will need to be bolted to the back side of the 2x4 to keep a straight pull on the roller bearings.
Once the plywood door is rolled to the right all the hardware will be to the right hand side and only the bottom of the header will be exposed. I'm thinking I'll get 5 to 6" increased vertical clearance.


Amazing what we will do to gain 5 or 6 inches of vertical clearence lol.


Amazing what we will do to gain 5 or 6 inches of vertical clearance lol.

You mean I could have just taken a little pill for this? But I needed a garage door built...not a Tent :eek:
Should have the front door done in a few days, can't wait.
I had to run the CO's so there is more Droop to clear the door. Meaning there was less exposed shaft then I would like to see. I like to have more vertical (there's that word again) travel in the tube then what I have now.
Plus I'll be able to raise the cab mounted light higher up.
Just have to remember to take off the crane, don't worry I will forget :p:


Bad news, Good news, Bad news, Good news.

Tuscarora-20110928-00525.jpg


Bad news
Was up at a friends garage when his brother walks up, who I've only spoken to a few times and asks me if I could pull his Chevy out of a ditch after he snapped the steering linkage wheeling on his property.

Good news
No problem, just love pulling chevies out of trouble. Hooked up winch and out he came.

Tuscarora-20110928-00524.jpg


Bad news

I knew my starter was getting bad and as Murphy's Law dictates, of course it's going to brake when I'm out in the boonies after bragging about pulling stuck chevies out.
So both of us walk out and we got into his DD which was a Ford and went to some local auto stores and found one.
He even yanked out the old one and installed the new one for me.
That's him in the pic with new starter.
Then after all that he said "I've got something you may like to see"?
Well I follow him up to his house and sitting under an old oak tree is this 1962 Ford Mustang body, which is not in bad shape. It's been all stripped out, full cage installed and tubbed fender wells on the inside.
He told me someone owed him money and he took this in trade for what he owed him.
Then he shows me an old frame with a solid front axle and a 9" ford rear. It's an early Bronco. Then he says "I love mud racing and I'm going to take the front part of the frame with axle and stick under the Mustang and build a hard core mudder. But my welder has broke.
Then I said, bring that over to my garage and we'll get the welding done.

Good news

I asked him does he hunt his property? And he said no. I noticed it was all posted with no hunting signs. He then he said "why do you like to hunt"?
On occasions I said.
"Well since you were kind enough to help me out, I'll let you hunt all you want, with one condition" he said.
"whats that" I replied.
"Just let me have some of the meat".
"No problem".
But now it even gets better. He says he's got a extra 9" Ford rear axle and I could have it for offering to do some welding. Plus if you need to do some wheeling just come on over and you can wheel on his property which also has some mud holes from 7 artesian springs that contantly flow water out. He even redirected some of the springs to make these mud holes in some of the trails.
So moral of story...Good becomes of good.


Tuscarora-20110929-00526.jpg


Piece by...

Tuscarora-20110929-00527.jpg


peice...
Tuscarora-20110929-00528.jpg


by piece.
This is the left hand side of garage that will be closed off. I have most of the particle board up on the outside. Later I'll put some siding over it. If you look through the top opening you can see part of the sliding door hardware.
Next there will be shelving located in the recessed area.
Plan on putting flammable things like paint thinner and other high volatile stuff on those shelfs.
All the existing door to the right will be taken down later once the sliding door is in place.


Tuscarora-20110930-00530.jpg


Tuscarora-20110930-00531.jpg


Tuscarora-20110930-00535.jpg


Actually the blocking of the left side with shelfing is more time consuming then the building of the sliding door which won't be so involved.
Putting the first coat of paint on.
Also will be installing some more overhead lighting now that it won't be blocked by the old roll up door. That alone will well be worth the work.
Let alone the new suspension mods coming up with the new higher entrance and the fact that Samson did so well this year...He deserves it LOL What an unforgettable year.

Tuscarora-20110930-00534.jpg


Going to build a little eve over the sliding door. Remember the white roll up door that you see will be trashed.


To get back to the truck build. A worth while project that I can do in the garage this winter is going to be an OBA system using a York AC compressor. Preferably the model with the longer stroke. If I can find one that is, if not I use which ever of the 3 models that I can find.
Might even use the side flip out gas door as a compartment for the coiled air hose, don't use it any way since the install of the fuel cell.


Ive planned to have on board air from the beginning of my build, ill probably go with an electric though. Very worthy winter project indeed


I got an 02 explorer sport working on it every sec I can spare I just wonted to tell u that u bilt my dream and then some Mabe one day Myn maybe the new gen of urs congrds interested to see more


Join the Elite Explorers for $20 each year.
Elite Explorer members see no advertisements, no banner ads, no double underlined links,.
Add an avatar, upload photo attachments, and more!
.


Thanks for the compliment UE. Like one of our fine members said,"the Bronco ii has a great platform to start with for building a Trail Rig". and I could not agree more.
I still have most of the B2 sheet metal and frame. From there i just fine tuned it to the types of trails that I do. Getting rid of that TTB with all their quirky steering problems and replacing with one of the strongest axles ever built, especially for rocks and I can say this cause I've had both the TTB (2) and the solid, stretching the wheel base, getting rid of so much high centered weight and a few more things along the way and it's like night and day whether street or rocks. Don't care for mud. Did that enough in my younger days.

Tuscarora-20111003-00539.jpg


New home for Samson is slowing taking shape. I'm like a race horse chomping at the bit to get back at making this B2 an even better Trail Rig.
So far I've been doing trails to get to my hunting spots about every morning. Which are basically forrested, extremely muddy off camber rides. Hey, it's rained about every day for a month straight.
But at least the hubs get a good work out, all the trail lights get used including the rear work light and even the new super bright back up lights come in handy since I'm getting to these spots before the sun up.
You really start getting a feel for the truck, for example, knowing if I don't hear an audible click from each hub when unlocking then all I have to do is to grab the top of the tire, rock it back about an inch and... Click, the hub just got released from the forward thrust on the Assembly.
Not to mention playing with that Atlas is just so fun. Hey, this truck is just a grown man's toy and that's all it is.

And the fact that we really have some Cool B2 builds under way make this site really fun to watch.


Back
Top