Ricks Bronco: 1and 1/2 | Page 92 | Ford Explorer Forums - Serious Explorations

  • Register Today It's free!

Ricks Bronco: 1and 1/2

Your killing me I can't take it no more.

But I do have four of those joints coming just like yours, but only 2.63" not 3". My retirment check could not afford those purdy 3".
Is that some DOM tubing in the upper right hand corner?

Also, I notice some clean fresh metal shavings near a bench top drill press maybe? There is just something really cool about fresh cut metal shavings on a work bench.


Join the Elite Explorers for $20 each year.
Elite Explorer members see no advertisements, no banner ads, no double underlined links,.
Add an avatar, upload photo attachments, and more!
.


There is just something really cool about fresh cut metal shavings on a work bench.

It means you can hold a conversation with that person and there is a good chance they know exactly what you are talking about.... Ever tried talking "car" with a person that hasn't even changed their own oil? May as well be speaking mandarin. :rolleyes:


No, that's not DOM tubing, it's a handle for an angle grinder I think (maybe the one I broke the handle off of and made one out of a bolt and some scrap tubing). I am currently getting some DOM quoted from a couple steel suppliers in the area though for my steering and panhard bars.

The table is 2'x8', I made two of them out of a 4x8 sheet of 10ga steel and some 11ga 2x2 tubing. They are really handy on casters because I can roll them together for a 4x8 table and separate them and roll them against a wall for storage.


Thought I'd pass this along.

After reading more info then I care to on linked front suspensions, I stumbled upon this...had no idea there was even such a product. Read on several sites how good it is so I ordered a tube. Since nasty winter weather is coming along with the road salt. I'll squeeze out the old grease and replace with the new. Now this is on my rear Radius arm suspension which utilizes the poly bushings.

http://www.summitracing.com/parts/PTP-19-1751/

Ordered some DOM from this supplier. It's my first time with them and they deal in mainly small orders. All online.
http://www.allmetalsinc.com/steelroundtubedom.html


Well Ballistic fab e-mailed me and one of my orders that I presumed was shipped the same week was actually shipped the next week, Oh well, just have to wait another week. Really does not matter cause I still need more hardware anyway.

About building my Transformable 4Link/Radius arm. If I can do it, then that means that at the axle end I'll need the Johnny joints for the 4 link which will give me good rotational movement. But won't do a thing for the lateral forces imposed on a radius arm suspension that dictates a bushing with the rubber/poly sides and insides. So this means that I need to have screw in ends not welded so I can change from joints to bushings.
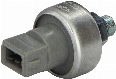
The joints that I should have early next week are these. They will be at axle end.

http://www.ballisticfabrication.com/263quot-Heavy-Duty-Ballistic-Joint_p_1226.html

Instead of welding the tubing straight onto the joint as I would have if not planning on this possible switch thing from linked to radius, I need to get some of these also. Including threadable inserts for tubing. Plus will help in changing caster. These will be welded on joints and bushings.

http://www.ballisticfabrication.com/Billet-threaded-stud_p_1505.html

Whether I can use the upper link of the 4 link for the upper radius arm, by simply disconnecting the frame side and pivoting down to bottom link, remains to be seen. Most likely I'll have to fab up another link.

Why you ask would I even attempt this? Other then the fact that it will be a Blast to try to do. I have read tons and tons of info on about every 4x4 site known to man. Regarding 4link vs radius arm front suspension. And there all hotly debated.
I think it comes down to the man behind the welding shield on a particular truck on a particular suspension system whether linked or radius. One build does not fit for everyone.
As of yet I have no definitive proof on mine which works best for me. But if I can do both, I will have the knowledge and definitive answers as what works best on this truck and on this trail and on this street.
And if one works out so much better under all different circumstances, so be it. Just leave it that way or if both have their advantages fine and switch when the circumstances dictate.


amazing work!

Have you considered a 3 link?

I just don't think I have the room with the V8 and only a few inches of suspension lift via the coilovers cranked down. Now if I do make it so I can run a radius arm then I can wrist one side for trail rides.
But I really like having 4 connection points on the axle no matter which way.


IMG_0056-1.jpg


Received some 1.500 x .250 wall DOM. The 1.750 on left is some small left overs from the rear radius suspension. Need to order some more of that size also for the bottom front arms. The top will be the 1.500 OD size.


IMG_0061-2.jpg


For you guys that like to fab up stuff...It don't get much purdier then this.
Of course it's another Buck and half out of my wallet.
What I got here is hardware from Ballistic Fab. Four of their rebuild-able joints. After they're welded up either fish mouth the tube or weld on studs with tube adapters I'll assemble them. Also a couple of tube adapters for 7/8" studs that will slide into 1" ID. I still need some tube adapters for 1.250" also.
And pack of .250" generic type laser cut brackets that I might use to mount joints to frame. But they will be modified.

IMG_0067-2.jpg


Gotta love working with the tolerances of DOM. Here is the male end of the tube adapter sliding into the 1.000" ID tubing.


IMG_0066-1.jpg


Here are two different style joints. The one on the right has a cast type housing with stud. One on left, no stud and is also about .250" smaller in the outer diameter. This will help in certain applications of this build.

Both widths where they slide into mounting brackets are the same 2.63"

IMG_0064-1.jpg


The 4 link will have this style joint at axle end and the cast type joint at frame end. If I do the Radius arm suspension also it will have the steel/poly bushings at axle end.
Also received 180 degree U-bends to redo the exhaust on driver side. I'll cut the U-bend for the right angle of the bends and then weld um up.


I would caution you on using heims on your trackbar. Unless you don't drive it regularly and store it inside you will get sick of replacing them. I know I am. My current ones have so much slop that they give me minor death wobble.


I feel your pain. That's why I have these custom bushings that are the same width as the heims including spacers at each end which is 1.75", where as normal bushings are 2.63", at least the ones that I use are. This way I can use the same bracket for both heims or bushings. For the nth of flex go heims, for normal DD and most trails go bushings.

IMG_0071-3.jpg


Here is the 1.75" track bar bushing above. I got a little carried away when drilling holes for the track bar adjustment. The bushing/heim will be in one of the lower holes to match as close as I can the all important drag bar angle.
Don't need all that bump steer and death wobble stuff.
On the rear track bar, I have it very close to horizontal. But on the front it's more important to match the drag bar angle. I'll try to get both drag bar and track bar horizontal or at least as close as I can. Now to get the high steer hardware.


IMG_0077-1.jpg


Here is 1.75" heim with spacers. 1.75" is the distance between sides of bracket.


Where did you get those bushings? Poison Spyder Customs used to make some bushings called "boulder bushings" that served the same purpose. I have one, but I got a little carried away on welding in my bungs and I must have some weld in the tube because I can't get the bushing into it enough (the BB have more thread on them then a heim). I need to redo mine. I plan on using a BB on the top and maybe one of those balistic joints on the axle side.

Also, I found a couple local guys with lathes that make all my links now. They can turn them and thread the ends. It comes out a ton cleaner then the weld in bungs and I trust it more. One guy even has a mill and makes wrench flats on them for me. It turned out to be cheaper to have them made that way then buy the bungs and weld them in myself.


Also, I found a couple local guys with lathes that make all my links now. They can turn them and thread the ends. It comes out a ton cleaner then the weld in bungs and I trust it more. One guy even has a mill and makes wrench flats on them for me. It turned out to be cheaper to have them made that way then buy the bungs and weld them in myself.

Thats what i planned on doing for my build. I was short a few of the taps i needed at work, and by the time i purchased the taps, it would have been the same as buying the adapters. 7/8-18 taps are somewhere in the neighborhood of $50 bucks a pop. and you need 2 (l-h and r-h) for adjustability.... I got the tubing and adapters for the what the taps alone would have cost....


Napa sells the taps cheaper than that suprisingly. I had to get one when I moved my sisters tracbar mount and shortened it. I think it was like $15 for the LH. Probably not as good quality, but that is not a tap I use everyday.


IMG_0008.jpg


OK guys, is this what your talking about. Did just what your saying on the rear track bar. I got some .670 +-, forgot actual inside DOM. Then got the right size tap for my .750" heim. Placed tube in my friends lathe and tap in the other end which centers it perfect. And then manually turn lathe. Then after that lathe was turned on to bevel end....Problem friend found a girl friend and that was the end of me using his garage. Just no excuse in that LOL. But yes that is another way to go.

IMG_0072-2.jpg


Here's a hint on the custom bushings. It's whats left over along with some poly bushing left overs :rolleyes:


no no no.... no turning the lathe by hand..... just low speed with a coolant flood. unless you dont have a coolant pump, and then oil and turning by hand is probably the best bet.


My friend Jack who had just got this really really old lathe which neither one of us knew a thing about could get it to turn the tap. We tried all the different belt pulleys but still could not get it to turn. It would start then go no further once it got a few threads into the tubing. Maybe the dia. of the tubing was just too small a dia.? I read on some other sites that you can use several different dia. tubing. Some lose some tight. Also read that others had to turn by hand also.
Like to hear from others on this subject also. Might post on another thread about this problem.
Somewhere I have some pics of us threading the tubing. I'll try and find.


oooo belt driven. that makes a difference. i avoid those lathes at work. i love my gear driven machines. the big mill and the 2 big lathes are both gear driven and they are unstoppable. managed to stall the big mill once... not a pretty sound.


Where did you get those bushings? Poison Spyder Customs used to make some bushings called "boulder bushings" that served the same purpose. I have one, but I got a little carried away on welding in my bungs and I must have some weld in the tube because I can't get the bushing into it enough (the BB have more thread on them then a heim). I need to redo mine. I plan on using a BB on the top and maybe one of those balistic joints on the axle side.
.

I have the same problem after welding a bung in. The male end only goes in so far, getting harder and harder to turn. It's from all the oxidation that takes place on the inside of the bung while welding the outside.
I found that if I take one of those El Cheapo stainless or brass brushes that most auto stores sell and coat it with anti sieze and twist it with the threads that it will remove that crap. Or do it dry first with the tube upright working from bottom up. You will be surprised of all the black crap that comes out. Then put anti seize on the threads.
Before doing this I could not even put an extension on a pipe wrench and turn the bushing into the bung. But aftewards I could turn by hand. Be nice if there was some stuff you could coat the inside with to stop it, but the heat would probably make it null and void. Then again might do as I used to in refregeration work when brazing with silver solder on copper tubing. That was to shoot some nitrogen into the pipe to elimanate the crud. No Ox. no crud.
Hope this helps.


IMG_0079-3.jpg


Had to do one more thing for modified bushing to fit the same bracket for my heims that are 1.750" wide. But first what I did was to cut down the steel barrel of the 2.63" wide bushing including poly inserts. The cut was very close to the grease fitting. The grease fitting was centered in the barrel that is why it's off to one side after cut. The poly inserts are are a two piece affair. I left one side the original length and cut off the difference on the other. Then the steel sleeve that the bolt slides thru was cut to proper length. Next was to bevel the cut off steel barrel to match the other side.
Then I found a grade 8 bolt that was the same size as the stud on the heim. Cut off head and then cope the stud to match the radius of the joint and then weld it on.

But that was not all. The bolt that goes thru the heim is 3/4" and the bolt that goes thru bushing is 9/16". And the bracket on the axle is drilled for 3/4". Of course this would be too much slop. So what I did was to take the left over steel sleeve that was cut off, which has an outer diameter of 3/4" and ID of 9/16".

IMG_0078-2.jpg


IMG_0080.jpg


So took the sleeve and almost had to press it into the 3/4" hole and then cut off flush. Did this twice. So now I can change from heims to bushings for the track bar. Just slide in the adapter or remove.

This sounds like it took a lot of time, but in the words of one of our Native Americans who wiped out Custer at the Little Big Horn, he was asked how long did it take to wipe him out, he replied... It took as long as it takes for a man to eat his evening meal.
OK, that's the history lesson for today.


Join the Elite Explorers for $20 each year.
Elite Explorer members see no advertisements, no banner ads, no double underlined links,.
Add an avatar, upload photo attachments, and more!
.


IMG_0084-1.jpg


Now to weld the stud on the un-assembled joint. I marked an R on the stud, this means it's a right hand thread. The other end of the link will have a left hand thread.

IMG_0085.jpg


I'll place a tack on each side first. This will keep the one side from lifting up while I'm welding the other side. I placed a sleeve around the threads so no splatter gets over the threads.

IMG_0086-1.jpg


One side done.

IMG_0088-1.jpg


These will be the top short link...I hope.


Back
Top