EcoPowerParts
Well-Known Member
- Joined
- March 4, 2013
- Messages
- 343
- Reaction score
- 1
- City, State
- Phoenix, AZ
- Year, Model & Trim Level
- 2011 Flex Ecoboost
From Tracy at RX Performance:
Just finished Patrick's 2011 Flex Ecoboost install, and here is what we found:
The 2011-2014 will not be much different so this guide will help all, but the install will take app. 30-45 minutes if your handy. This syatem entirely reworks the PCV evacuation system as well eliminating the water/oil/unburnt fuel accumulation in the IC as well as trapping the oil and damaging compounds that are part of the blow-by crankcase vapors.
The system now will provide steady evacuation in both non-boost and boost operation unlike the OEM system that only evacuates at idle and part throttle non-boost operation eliminating the reason the crankcase fills with the water and unburnt fuel in the first place.
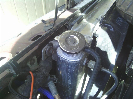
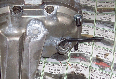
So, what we found righ away when we removed the throttle body and scoped the intake valves is this issue is just as bad as the F150's, and this vehicle with only 30k miles on it already has substantial intake valve coking, so we recommend he do a seafoam treatment (a manual cleaning is far better). The intake charge pipe was soaked in oil as you can see from the pictures below, and so was the IM and throttle body. (Patrick is strapping it to the AWD dyno right now for some runs as well).
So, here is what we found when removing the throttle body:


We could dump oil right out of some of it.
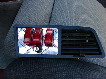
We then snaked the boroscope into the front most ports we could access through the IM snout, and after several attempts where the lens got oil covered, we were able to see the valves. Here are a couple of pictures of the boroscope screen showing, but it is not a real clear picture:


To return the engine to it's efficiency it first had, a manual cleaning is really needed but an upper induction cleaning will help.
As I don't know how many photos per post fit, I will start a second post with the install procedure.
Just finished Patrick's 2011 Flex Ecoboost install, and here is what we found:
The 2011-2014 will not be much different so this guide will help all, but the install will take app. 30-45 minutes if your handy. This syatem entirely reworks the PCV evacuation system as well eliminating the water/oil/unburnt fuel accumulation in the IC as well as trapping the oil and damaging compounds that are part of the blow-by crankcase vapors.
The system now will provide steady evacuation in both non-boost and boost operation unlike the OEM system that only evacuates at idle and part throttle non-boost operation eliminating the reason the crankcase fills with the water and unburnt fuel in the first place.
So, what we found righ away when we removed the throttle body and scoped the intake valves is this issue is just as bad as the F150's, and this vehicle with only 30k miles on it already has substantial intake valve coking, so we recommend he do a seafoam treatment (a manual cleaning is far better). The intake charge pipe was soaked in oil as you can see from the pictures below, and so was the IM and throttle body. (Patrick is strapping it to the AWD dyno right now for some runs as well).
So, here is what we found when removing the throttle body:
We could dump oil right out of some of it.
We then snaked the boroscope into the front most ports we could access through the IM snout, and after several attempts where the lens got oil covered, we were able to see the valves. Here are a couple of pictures of the boroscope screen showing, but it is not a real clear picture:
To return the engine to it's efficiency it first had, a manual cleaning is really needed but an upper induction cleaning will help.
As I don't know how many photos per post fit, I will start a second post with the install procedure.


 Just picked up a 2015 Ingot Silver Sport last Sunday.