Scott B's 93 Ranger XLT V8 | Page 8 | Ford Explorer Forums - Serious Explorations

  • Register Today It's free!

Scott B's 93 Ranger XLT V8

Still wants to touch it! :p:

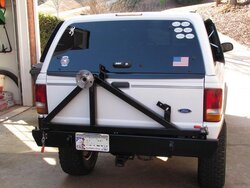
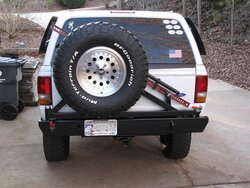
Can't wait to see it all finished and the spare mounted.

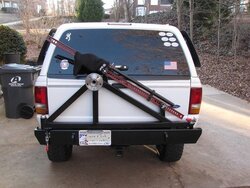
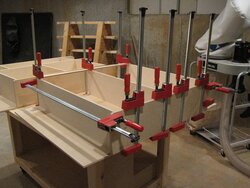
Nice work on the spare carrier, Scott! Mounting it soon?

I'm going to give it a few days to dry - Saturday is installation day!

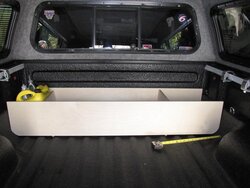
Once the tire gets moved out of the bed, I can start building my sleeping/storage platform...:D


Join the Elite Explorers for $20 each year.
Elite Explorer members see no advertisements, no banner ads, no double underlined links,.
Add an avatar, upload photo attachments, and more!
.


..Man, you need to start hustlin..:p:

...You've got about 7 weeks to get it all together and still head out this way...Are you going to be able to get everything done?


I know - 6 1/2 weeks!

The list of "have to" do items is not very long. There are a few things I would like to do, given time (and weather), but those are not essential.

Have you packed your kitchen yet? I need to tweak mine.

Next week, I will start the "official" who's going list - should be close enough to the trip to see who's serious.


..I haven't done anything yet..

..I have parts coming in late this week that I won't be able to even look at for a couple weeks...:(

...This gives me time to watch your build and get some more ideas...:biggthump


I feel like I need another 6 months to get ready. I know, a truck build is never finished - always something else to add/modify...


Rear Bumper / Tire Carrier Complete!

I installed/attached the swing out to the bumper today, and mounted my Hi-Lift at spare tire.

I had to replace the seal for the swing out - the one that came with the kit was cheap - and I bent it. Fortunately, it needed a standard 1" seal (for a trailer bearing) and I had a spare. I cut rubber pads for the Hi-Lift mount and swing-out lock - something to compress when tightened, to eliminate movement.

Now it is starting to look like an expedition rig. :D
 

Attachments

  • Swingout 4.JPG
    Swingout 4.JPG
    76.5 KB · Views: 1,014
  • Swingout 5.JPG
    Swingout 5.JPG
    90.3 KB · Views: 912
  • Swingout 6.JPG
    Swingout 6.JPG
    93.6 KB · Views: 946


Nice! How does that neoprene(?) cover work for keeping dust out of the hi-lift? I should probably get one...

I don't know - up until now, my Hi-Lift was mounted in the bed (under the shell.) Today is the first use of the cover.


...That looks sharp...:biggthump


New Parts

I've been parts shopping. Unfortunately, I won't have time to get all these installed before the expedition - they will make a good summer project.

Optima battery brackets from RuffStuff - one under the hood, the other in the bed.

Blue Sea fuse blocks - one under the hood, one in the bed. Today, I realized that I need a larger fuse block for my second battery.

F-250 shock towers. (I will increase the front wheel travel yet again!)

Cobra 25 WX NW ST CB radio. It receives NOAA weather, and has an illuminated faceplate - so I can see the controls at night! I will get this installed before the expedition. Unfortunately, it won't fit in the ashtray slot in the dash (where my current one is.) For the moment, I will mount it under the dash, shifted to the right to clear the transfer case shift lever. I plan to build a console (like the one in my other truck) and "move" the transfer case shift lever. Should be interesting...
 

Attachments

  • Battery Brackets.JPG
    Battery Brackets.JPG
    133.4 KB · Views: 809
  • Fuse Blocks.JPG
    Fuse Blocks.JPG
    136.8 KB · Views: 789
  • Shock Mounts.JPG
    Shock Mounts.JPG
    132.4 KB · Views: 767
  • Cobra CB.JPG
    Cobra CB.JPG
    154.4 KB · Views: 804


Sleeping Platform

I've started building a sleeping/storage platform in the bed. Now that the tire and Hi-Lift are on the bumper, I have more room for sleeping/storage.

I am building this as a 2-piece bolt-together unit. The forward section will have access panels (doors?) on the top, allowing access to below-deck storage. The rear section will have 2 drawers, on long slides, and a solid deck. The plan is to bolt the units together, and bolt to the bed floor. I will also have tie-down points on the deck, to secure gear and keep it from moving around.

Start with an empty bed!

Front part of forward section - tall storage in the corner, battery and fuse block in the other corner.

Close-up of tall storage.

Close-up of battery bracket and fuse block.
 

Attachments

  • SP4.JPG
    SP4.JPG
    82.6 KB · Views: 789
  • SP3.JPG
    SP3.JPG
    80.8 KB · Views: 770
  • SP2.JPG
    SP2.JPG
    70.3 KB · Views: 800
  • SP1.JPG
    SP1.JPG
    101.5 KB · Views: 787


Remainder of forward section.

Rear section (without drawers.)

Rear section in glue-up.
 

Attachments

  • SP5.JPG
    SP5.JPG
    57.9 KB · Views: 786
  • SP6.JPG
    SP6.JPG
    68.6 KB · Views: 774
  • SP7.JPG
    SP7.JPG
    74 KB · Views: 791


Nice! :)

May I suggest a breather vent tube for the battery compartment? You most likely know this already, but since you didn't mention it, I figured what the heck, say it anyways. :dunno:

If your sleeping back there and with a battery, the vent to the outside will help from the hydrogen out gassing. Just watching your back Bro!

Not a bad idea. The compartment isn't sealed, however.

Do Optima YellowTops out gas?


Easy way to find out. Learned this in science class.

Place a upside down Styrofoam cup over the posts and place a weight on it. Let sit overnight. In the morning, lift the cup slowly and evenly, slide a playing card under the cup and take to a work bench, table, etc..

Set the cup down at the edge and nudge it so that a little underside is exposed hanging off the edge. Hold a match with a long pair of needle nose or stats, light and stick under the exposed edge of the cup. If it does nothing, no gas. If it explodes violently, lots of gas.

Back when I was in school, the battery used out gassed so much that the cup went off like an M-80.


I remember burning hydrogen in science class! Never thought about doing what you said, though...

Hmmmm.....


Join the Elite Explorers for $20 each year.
Elite Explorer members see no advertisements, no banner ads, no double underlined links,.
Add an avatar, upload photo attachments, and more!
.


I assembled the front cabinet this weekend. Hope to finish the access panels (doors) this week.
 

Attachments

  • Front C 1.JPG
    Front C 1.JPG
    59.8 KB · Views: 718
  • Front C 2.JPG
    Front C 2.JPG
    53.2 KB · Views: 708


Back
Top