Parts needed and cost:
SunPro Water/Oil Temp Guage(Advance Auto) $16.96
3/8 Galvanized Tee $3.50+/-
3/8 Flare(male)/3/8 Pipe Thread(male) Connector $1.49 x2
3/8 Flare Nut $ .79 x2
Wire splice connector
Tools Needed:
Drill
Tubing Cutter
Tubing Flare Tool
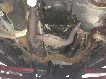
 In this pic I have fittings to connect to the rubber hose coming from secondary cooler. This location did not give very accurate reading so I moved location of sensor to before main radiator.
Remove center console compartment area by just it pulling up. Drill hole in upper compartment large enough to get sending unit threw. Run cable and wires threw hole and mount guage. On '98 XLT there is a wire harness connector behind console compartment. Locate red wire with black strip, this goes to dimmer switch. Use a wire splice connector and attach red wire from guage to the red w/black strip wire. Attach ground wire from guage to metal bracket that holds side of center console. Run cable from guage threw back of console and out by gas pedal.


Run cable up and over brake pedal and steering column. Locate where emergancy brake cable goes threw firewall. Remove rubber gromet from firewall and make a small cut, run sending unit and nut threw gromet.

Locate where cable went threw firewall under the hood. Look directly under brake master cylinder. Pull excess cable threw firewall (you may want help feeding cable from inside so as not to kink line).
Remove tranny lines from radiator, you need to remove both so you can pull upper line up enough to cut. You may want to use a small pan to catch tranny fluid that will leak from lower line. With tubing cutter cut upper line about 3in from lower bend. On lower part of line that was just cut cut again about 2in down.

On both ends of line install Flare Nut and use flare tool for 3/8 tubing and flare ends. Lowe's has flare tool for around $10.
Use pipe tape on all threads. Insert the 3/8 Flare(male)/3/8 Pipe Thread(male) Connector into tee. Insert 3/8 adapter that comes with guage for the sending unit. Install tee on lower line and then install upper part of line onto tee. Reattach tranny lines to radiator. Insert sending unit into tee (be carefull not to overtighten, adapter that comes with guage is very soft brass, I stripped it and had to but another guage just for the adapter). Use wire ties to secure cable from guage.

Go for a short drive to warm transmission and check level of tranny fluid.
Let me know if this is helpfull and if I need to change anything.
SunPro Water/Oil Temp Guage(Advance Auto) $16.96
3/8 Galvanized Tee $3.50+/-
3/8 Flare(male)/3/8 Pipe Thread(male) Connector $1.49 x2
3/8 Flare Nut $ .79 x2
Wire splice connector
Tools Needed:
Drill
Tubing Cutter
Tubing Flare Tool
Remove center console compartment area by just it pulling up. Drill hole in upper compartment large enough to get sending unit threw. Run cable and wires threw hole and mount guage. On '98 XLT there is a wire harness connector behind console compartment. Locate red wire with black strip, this goes to dimmer switch. Use a wire splice connector and attach red wire from guage to the red w/black strip wire. Attach ground wire from guage to metal bracket that holds side of center console. Run cable from guage threw back of console and out by gas pedal.
Run cable up and over brake pedal and steering column. Locate where emergancy brake cable goes threw firewall. Remove rubber gromet from firewall and make a small cut, run sending unit and nut threw gromet.
Locate where cable went threw firewall under the hood. Look directly under brake master cylinder. Pull excess cable threw firewall (you may want help feeding cable from inside so as not to kink line).
Remove tranny lines from radiator, you need to remove both so you can pull upper line up enough to cut. You may want to use a small pan to catch tranny fluid that will leak from lower line. With tubing cutter cut upper line about 3in from lower bend. On lower part of line that was just cut cut again about 2in down.
On both ends of line install Flare Nut and use flare tool for 3/8 tubing and flare ends. Lowe's has flare tool for around $10.
Use pipe tape on all threads. Insert the 3/8 Flare(male)/3/8 Pipe Thread(male) Connector into tee. Insert 3/8 adapter that comes with guage for the sending unit. Install tee on lower line and then install upper part of line onto tee. Reattach tranny lines to radiator. Insert sending unit into tee (be carefull not to overtighten, adapter that comes with guage is very soft brass, I stripped it and had to but another guage just for the adapter). Use wire ties to secure cable from guage.
Go for a short drive to warm transmission and check level of tranny fluid.
Let me know if this is helpfull and if I need to change anything.