'97 high-mount brake lamp LED conversion | Ford Explorer Forums - Serious Explorations

  • Register Today It's free!

'97 high-mount brake lamp LED conversion

This post is compiled from the original thread on this subject:
http://www.explorerforum.com/forums/showthread.php?t=146303

OK, I finally got tired of trying to figure out this stupid 21" neon high-mount brake light problem, and in the process ended up with two lamp assemblies. So, after searching for the best fix, I finally decided to gut one of the assemblies, and build by own LED array to put inside it. Here is what I did ....

  • After removing the assembly from the truck, and the lamp from the assembly, I baked the lamp in the oven at about 200-250 for 15-20 minutes, or just long enough to be able to "peal" off the lens. After doing that, removing the neon lamp, and cleaning it up, here is what I had.
DSCN3595.jpg


  • Next, I had to find some LEDs. I finally found some that would work and purchased them from Super Bright LEDs:
  • I ended up settling on the 8 candella RED (RL5-R8030), but after seeing it all done, I'd probably go with the 12 candella if I did it again (RL5-R12008), as they are brighter, and have a sharper viewing angle. You can always tone down the brightness if it is too bright, and although I could brighten mine up a bit, it would mean less protection for the LEDs.
  • Next I found a piece of breadboard to mount the LEDs to. You can probably find something at Radio Shack, but you might have to make a two piece array, depending on the size you get, and how long you actually want your array to be.
  • I cut the breadboard so that it would fit inside the housing. When doing this, measure carefully so that the breadboard will fit down inside the housing, otherwise the LEDs will touch the lens and you'll have trouble putting it back together. Learn from me - I had to do a lot of fine tuning to get everything assembled.
  • After determining how many LEDs I wanted, and how far apart they should be, I placed the leads through the breadboard and glued them in place. Be sure they are pushed down all the way, and are flat, or your LEDs won't line up perfectly, which is easy to see with these small viewing angle LEDs.
  • Next, I soldered the LEDs and resistors to make the arrays. I have 3 arrays of 5 LEDs each. You can use this link to help determine the resistor size needed for each array:
  • Here is the LED array in progress. This was the dry run, before cutting the breadboard and glueing the LEDs.
DSCN3938.jpg

  • After cutting, glueing, soldering, and wiring up the array, I was ready for the fine tuning, and fitting into the housing. Sorry, I forgot to take a picture of that, but you get the idea.
  • I searched high and low for just the right glue to use, but in the end I just used hot glue on the array, and clear RTV to glue the array into the housing, seal any extra holes (I brought both wires out a single hole), and glue the lens back on. I also used electrical tape to hold stuff together while it was drying. I did it in stages and let everything fully dry before I put the lens back on.
  • Here is a BAD picture of the array finished, and everything dry fit.
DSCN4183.jpg

  • And finally, with everything glued and dry, I took the plug off the old ballast and used that on the new LED array. Make sure you feed the wires through the hole in the tailgate before placing the plug on the wires (I had to go back and cut mine off again :rolleyes: )
  • After reinstalling on my truck, here is what it looks like.
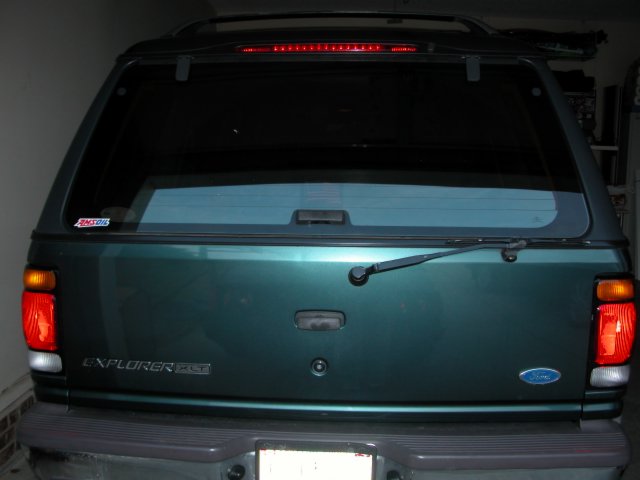
DSCN4356.jpg

DSCN4357.jpg

DSCN4358.jpg


Join the Elite Explorers for $20 each year.
Elite Explorer members see no advertisements, no banner ads, no double underlined links,.
Add an avatar, upload photo attachments, and more!
.


looks great... nice work... im planning on doing my own LED project with my reverse lights... theyre so versatile and make it look much cleaner than reg bulbs... nice work:thumbsup:


LED conversion alternative for '97 Ex

Thanks in large part to the info from this thread, I was able to succesfully replace the neon bulb in my '97 Eddie Bauer's high mount brake light with two waterproof LED bars, available from superbrightleds.com, that nicely fit inside the high mount brake light housing once the neon bulb has been removed.

The LED bars are each a little over 9 inches in length, and the manufacturer indicates that these can be used for exterior vehicle lighting applications. To check them out, click on this link--

http://www.superbrightleds.com/mini_tubes.htm

and scroll on down the page to read the description for the "WFLB series 24-LED Waterproof Flexible Light Bar". The specs for the product are also accessible (via another link) once you do that. At the time I purchased them, they cost about $10 each (excluding shipping), because I purchased the "Cool White" colored ones (other colors cost less).

Here are some pictures of what the high mount brake light on my Ex looks like now, after finishing the mod:

1: At night with flash
Himount_flash.jpg


2. At night, no flash
Himount_dark.jpg


3. Side-on view, no flash
Himount_side.jpg


4. Close-up, no flash (individual LEDs can be seen)
HImount1.gif


Quick question: arent the '98s and up LEDs already?


This is for '97 model year.

Nice job though. Those weren't available when I did mine. Although they look PLENTY bright (even brighter than mine), but do you know what LEDs are in there? I had a hard time getting that type of information when I was looking for a solution, which was another reason why I did it from scratch. I'd still like to angle mine down a little more, so they would be even brighter than what shows in the photos in the first post. I could have gone even one brighter LED though. Your light bar looks real good though! Definitely simpler than a fully custom.

I'll have to go back and add a night shot to this thread sometime, to show how they look at night.


Awesome write up! I'm ordering some. Question- did you have to drill the rivets out of your trim to get your light out? That's the only way I can see to gain access...


Hello again, thought I'd post some follow-ups to posts made by Rizzjc and Joe Dirt:

Rizzjc: Thanks for the compliments on my work. I would not have been able to knowhow to go about getting started if it weren't for your valuable info, though, so thanks again for your write up.
Regarding the type of LEDs that are in the waterproof light bars, the spec sheet for each bar indicates that the "Cool White" colored LEDs that are in it are 1600 millicandela, with a voltage range of 9-14.8 VDC anda viewing angle of 120 degrees. I know that these have a lower luminous intensity than the LEDs you used in your custom array, but since there are a total of 48 of them (24 per bar) in my solution, the sheer numbers probably just overcome that.
FYI, I also tried making my own custom array with a series of 24 superbright white LEDs from the manufacturer (RL-W18015), which were each 18000 mcd (!!), but I didn't get it to work. Not a shocker, though, since I am not very skilled at putting together an array. For me, just wiring the waterproof bars to the power feed formerly going into the silver box that the neon bulb got its power from was a much easier and more practical solution.

Joe Dirt: Yes, you must drill out the rivets to remove the trim bezel that surrounds the high mount brake lamp assembly (this piece also is what the rear window washer spray unit connects to). The entire process you need to go through to get at and remove the high mount brake light assembly, including drilling out the rivets, is as follows:

1) Unscrew 2 phillips-head screws attaching the stirrup handle to the inside of the liftgate trim & set aside;

2) Remove all of the plastic fasteners (6, I think) that attach the rear liftgate trim to the liftgate & set aside;

3) Pry up the oval plastic cover that the liftgate door lock shaft pokes through on the liftgate trim. This will expose a phillips-head screw near the door lock shaft. Unscrew & set aside;

4) Remove the liftgate trim by standing with your back towards the interior of the vehicle and pulling the liftgate trim slightly down and toward you. Take the liftgate trim and set it aside in a safe area;

5) With the rear liftgate open and the liftgate trim removed, you will see a silver metal rectangular shaped panel that says something like "Warning, Shock hazard--Service by trained Ford professionals only". It is held in by 2 screws. Unscrew them and set them aside. On the back side of this panel is a box that converts the 12VDC power to something that the neon bulb can use. On one end of the box, you'll see rubbery white and light blue colored wires(?) coming out, and on the other, regular wiring attached to a wiring harness. Disconnect the wiring harness first, and then disconnect the rubbery white and light blue wires. Clip the wiring harness end and be sure to leave yourself some wire (the colors should be red and black) to use when you wire up your LED arrays. Next to where the silver panel was located, you will also see two circular black rubber caps. Pull these out and set them aside. After you have pulled them out, you will see two of the three hex nuts that connect the high mount brake light assembly to the rear liftgate. Unscrew these hex nuts and set them aside. The third hex nut should be inside of the cavity that the silver panel was covering. Unscrew that and set it aside;

6) Look at the top left and right corners of the inside of the liftgate. You should see two black-colored cap-type hex nuts. These (along with 6 rivets) attach the exterior trim bezel to the liftgate. Unscrew them and set them aside;

7) Shut the liftgate and open the rear window. Look inside the edge where the window hinges are, and you should see 6 rivets that hold the trim bezel onto the liftgate. Carefully drill each of these out. I used 1/4 in sheet metal screws to replace these at the "putting-it-all-back-together" phase.

8) Once the rivets have been drilled out, shut the rear window. Start to remove the trim bezel by first pulling out the left and right ends of the bezel that were held on by the capped hex nuts you removed in step 6. After this, pull the trim bezel slightly outwards and upwards. DO NOT PULL TOO HARD because your rear window fluid sprayer is connected to the trim bezel and pulling too hard could screw it up. I just pulled mine and then let it hang to the side by the rubber hose connected to the fluid sprayer.

9) After removing the trim bezel, the high mount brake light assembly should be fairly easy to remove by just pulling it out towards you. If it does not move, make sure that you unscrewed all of the hex nuts described in step 5.

Hope this helps.


Just did mine

I was getting ready to take my rig out for a state inspection, and the high mount brake light was not working. I unplugged the transformer, and probed the vehicle harness side with my multimeter. I had 11.93 volts with the brake pedal depressed. So after reading a few of these threads, I ordered a red 30 LED waterproof strip from superbrightleds.com. It is a flexible strip with 3M tape on the back, and you can cut it every two inches. I cut two inches off, and ended up with 27 LEDs. Perfect fit. The strip has nice long whips on it, so no extension was required. I just crimped on some standard spade terminals, then cut them about halfway through with my side cutters, then "rolled up" the spades so they would fit into the stock connector. Total cost with shipping about $16.00. Thanks to everybody for sharing their techniques and info.


Would love to see some photos.


Back
Top