Note: I lost my picture server for the following pictures. Original pictures and write ups are available on my Windows Live SkyDrive Here.
See original discussion at:
Auto Hubs working again, cross my fingers. I probably won't have my picture server after 2006, so I recommend you save the pictures now or perhaps a moderator can put this in the tech section and host the pictures on the main server. (Edit: Pictures are rehosted below.)
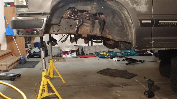
I took some pictures while performing the "Beertime9 Washer Fix" on the automatic hubs of my '97 Ranger.
Many folks have noticed problems with their auto hubs, but upon disassembly they can find nothing blatantly wrong with the hubs. Symptoms include a popping or loud pinging sound while 4x4 is engaged or a grinding sound when you attempt to engage 4x4. The sounds are an indication that the hub will not engage or stay fully engaged.
Don discovered that the pot metal cam on the spline gear and the plastic ring inside the hub that the pot metal cam rubs against can wear over time. As they wear down, the cam can no longer push the internal hub mechanism in far enough to engage the hub gears. Wear seems to be only about 1/32" to 1/16", but it's enough to prevent the internal hub splines from engaging, which are only about 3/8" wide to begin with. Ford will tell you that there are no serviceable parts inside the hub. However, adding a washer between the pot metal cam and the plastic ring seems to replace the worn material and allow the auto hub to engage properly.
Here are a couple schematics of the auto hub, although they don't show the guts of the hub. Notice the "cam assembly". That is not the cam I address below.

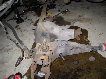
When the hub is off, look at the aluminum cam (with the three fingers on it). Measure how much space there is between the top of the cam and the top of the spline gear (blue circle). It's about 1/16" in this picture. Your objective is to add a thick enough washer to bring the cam just about flush with the top of the spline gear. Obviously, you don't want it tight. Give it a little wiggle room so that it won't be under pressure when you reinstall the hub. (The picture below shows this same space circled in blue so that you can more easily see what I'm talking about. Of course, you can only take this measurement while the cam and spline gear are installed.) Start by removing the snap ring. You'll see it at the bottom. It's the only thing holding the spline gear and pot metal cam in. Once you have the snap ring off, turn the hub over and thump it on a wooden or padded surface. The only thing holding the spline gear in now is friction with the center post and crud, so sooner or later, it'll fall out.

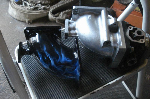
This is the internal spline with the cam on top. The screwdriver is pointing to little nubs on the tops of the splines. The nubs prevent the cam from coming off the top. It has to slide off the bottom. The blue circle is to exaggerate the gap you'll be measuring while the cam and spline gear are installed.

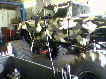
If you look down inside the hub with the spline gear removed, you'll see the plastic ring. It is held in place by a round metal snap ring (red circle). This is as far as you can disassemble the hub without a press. To disassemble it further, you have to compress the plastic ring (and subsequently the huge spring at the bottom of the hub) far enough to get the round metal snap ring out. The screwdriver is pointing to the wear on the plastic ring. Can you say "planned obsolescence"??!!. What numbskull at Ford decided to use plastic instead of metal? The blue circle indicates the two sets of teeth that engage the outer teeth on the spline gear. When these two sets of teeth mesh, you're in 4x4. See below for a deeper explanation.

On the bottom surface of the cam, you can see the rounded spot that wore into the plastic ring (blue circle). Although I asked some questions in the original thread about whether or not the little teeth sticking up (red circle) were the result of wear, I'm now convinced that the cam was manufactured this way. I can see no way that a plastic ring wore away 1/4" of metal on the cam.

This is the Euclid E-2411A air brake cam bushing that I purchased from a local diesel repair shop for 26 cents. The outer diameter was still a little too wide, so I had to grind it down. It should be no wider than the width of the cam. Preferrably, it should be a smidge smaller so that it doesn't catch on the round metal snap ring. On the left is the original size and on the right is the washer after it was ground down. This washer is about 1/16" thick. I put two of these on each cam. A thickness of 1/8" is what I needed to just about make the top of the cam flush with the top of the spline gear but still allow for some wiggle room (maybe 1/32"). That may be too much or not enough for your situation. I recommend starting with a 1/16" thick washer. If that doesn't work, try different washers. The good news is that if you put a washer on that is too thick, you won't be able to seat the spline gear deep enough in the hub to get the snap ring back on.

The washer takes up the space left by that little bit of wear in the plastic piece. Clean up the inside of of the hub as much as possible and make sure everything has only a LIGHT coating of grease. Put it all back together, making sure that the new washer fits securely between the bottom of the cam and the plastic ring. The cam, new washer, and plastic ring have to move in and out of the hub, so make sure that the washer is not going to catch on anything.
Put the hub on the axle. It should sit flush against the rotor. If it doesn't (screwdriver pointing to gap), rotate the axle to allow all the hub guts to settle together. I incorrectly stated before that there should be a gap here and that the cam is under pressure when installed. Not true. Once everything settles together, you should not have to push against the force of the large hub spring in order to make the hub touch the rotor. Put the tire back on and torque the lug nuts.
With both front tires off the ground, turn the front driveshaft to see if the hubs engage properly. If they do, take it out for a drive to see how they perform under load. Go easy and go slow to start with. Test it in drive and reverse. Listen for the auto hubs engaging and disengaging. If they don't engage--and assuming you don't have other problems--your new washer may be too thick or too thin. Try a different washer.
EXTRA STUFF ON HOW THE HUBS WORK
If you're curious about how the auto hubs work, put the internal spline gear and cam on the axle, making sure that the cam fingers fit into the pockets on the cam assembly. This is the disengaged position. The blue circle shows the finger on the cam sitting in the pocket of the cam assembly.
Turn the front axle to simulate going into 4x4. As you turn the axle, you'll notice that the cam rides up on the cam assembly (blue circle). This is the action that compresses the huge spring inside the hubs and makes the inner teeth inside the hub engage the outer teeth on the spline gear (additional blue circles). This is the engaged position.
I hope that helps. Feel free to add your own thoughts or questions.
Bob
")