bats 88 Bronco II Build Up aka Project Second Chance | Page 18 | Ford Explorer Forums - Serious Explorations

  • Register Today It's free!

bats 88 Bronco II Build Up aka Project Second Chance

First up is the tab I welded on. The soft lines follow a similar route as a stock one. The wetness is spray paint. It's straighter once it was all finalized.
full


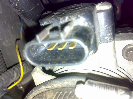
Wheel side of e-brake cable. I was tired last night, okay?
full


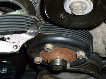
The tension bracket I made years ago. Just bent flat stock with two holes in it.
full


The cable clamps serving as the intermediate e-brake cable. Nothing more permanent than a temporary fix.
full


Progress! The e-brake cables DID fit in the slot. I just had to bend the tabs a little and wiggle it just right. Re-used those torpedo looking things that the axle side cables clip into and took up the slack in the steel cables. Those little clamps were still nice and tight after all these years and unbolted nicely. Need to adjust the e-brake shoes but I didn't feel like taking the calipers off tonight.

Parts list so far:
East Coast Gear Supply Right Backing Plate 96-01 Explorer
East Coast Gear Supply Left Backing Plate 96-01 Explorer
East Coast Gear Supply 8.8 Brake Line Kit

I used a 99 Ford Explorer as the reference vehicle on Rock Auto. Standard brake hardware and e-brake cables. Make sure you get the ones with the slot on the end as shown, not the knob. From what I can tell, the axle side cables are the same on the two door and four door but the intermediate parking brake cable is what's different. (Not that it mattered here.)


Join the Elite Explorers for $20 each year.
Elite Explorer members see no advertisements, no banner ads, no double underlined links,.
Add an avatar, upload photo attachments, and more!
.


Just fyi when removing the old cables a 13mm 12 point fits right over those metal press in brackets making it much easier to remove the old ones.

Good work! Rear discs give you way more control over the back tires when wheeling and much better braking on the street especially in a bronco ii on wet ground
You must match them to the correct master cylinder however, otherwise the rear discs will drag
Sorry I missed that. Something tells me it's a MC for a 95 or 97 Explorer currently in there. Not sure what my logic was but I went through several different ones when messing with the D44 stuff up front.


Good news bad news time. Again.

I was impatient and took the Bastrd for a romp around the compound. I can really tell the difference with the rear disks. Totally worth it. Even with a spongy pedal. Can't get the parking brake to work even though it feels like levers ARE being pulled. Problem for another day.

Bad news. Needs a head gasket.
This motor always smoked a little since I put it in. Figured it was seating the rings in or what not because it was a fresh build. Fast forward a few years and roughly a thousand miles and it's still smoking. Bad. And coolant is disappearing much faster.

Under a load today it smoked out my yard with sweet white smoke, not the Cheech and Chong kind either. Checked the coolant level and the coolant was smoking too. Pulled the plugs and passenger side middle was absolutely clean. Played around with a borescope and ultimately made the decision to pull the heads.

Fast forward a few hours and this is what we have:
full

Spark plugs
full

Passenger side cylinders
full

Drivers side cylinders

Luckily someone had the foresight to anti-seize the exhaust bolts.

Passenger rear cylinder is absolutely clean. Passenger middle had a clean spot a little bigger than the others. Normal amount of carbon build up otherwise? Cross hatching looked good on all of them too.

I am by no means a real mechanic but the rust spots on the head gasket seem like the culprit? Going to order some parts and get the heads to a machine shop on Monday to be checked.


hate to say it dan, but the gaskets look ok. you might have a cracked head. the good news was you had one cylinder that was good......if that helps.


Were the heads rebuilt? New head bolts used? The heads and lower intake get torqued together in sequence, but we should know this the instructions literally come with the felpro gaskets

Glad you got the heads off you need to inspect them closely!


According to the guy that rebuilt the engine they're reman 95TM heads. Not sure what the condition of the block he started with or if he ever ran this engine. As far as I can remember it was a fresh, zero miles rebuilt. Lost the guy's contact info.

Two things stand out about this disassembly. The head bolts were tight as a muthafcker. It took a foot and a half extension and my 200 lbs to crack some of them loose. They seemed consistent though.The lower intake bolts were loosey goosey. Just a hair tighter than finger tight. Was mulling it over with one of the other north east Explorer friends and that's our working theory. I looked over the lower intake with a fresh cuppa coffee today and did notice the rear passenger side water inlet port (?) DID indeed have residue as if it leaked. No visible cracks but still getting the heads checked.

Will use some loctite on the intake bolts when it all goes back together as a precaution.

While pondering my situation I noticed my headers were looking a little rusty. The engine came with some pace setter headers. Hit them with Rustoleum high temp and then the burnzomatic to heat cure. (My oven was occupied by a nice roast.) They look slightly less sh!tty now.
full


Ordered some fancy double band clamps and a new exhaust gasket. The catalytic converter had a random rust hole in it since way back when it was under the green Explorer. Needed something to keep me occupied this afternoon so I cut and welded a patch in. Other than surface rust the cat is still in good condition otherwise.
full


Already heard back from the machine shop. Heads checked out okay. No cracks. Said there was a low spot somewhere likely from reman process so being resurfaced. Should have them back in the next day or two.

Taking my time cleaning everything really good and tidying up the engine bay. Goal is to have it at least running before Halloween.


It lives, it dies, it lives again and boy does it sound mean with open headers!

Was feeling ambitious when I got home tonight and finished putting most everything back together. Didn't feel like laying on my back so I'll connect the y-pipes later. Don't think the O2 sensors make a difference with the earlier ECU I'm running anyways. For a V6, it's not the worst sounding thing.

Topped off the antifreeze and pulled the dipstick. Oil didn't look contaminated from pulling everything apart but it'll get an oil change this weekend. Only leak was a loose clamp on the upper intake inlet. After priming the oil and fuel, it started right up! Ran it for less than ten minutes but no white smoke, no drips, no burning. By all accounts seems healthy. That cam does give it the littlest tinge of chop.

I brought all the gaskets to the machine shop when I picked up the heads and they couldn't come up with a smoking gun either. They did suggest swapping the heads side to side for sh!ts and giggles and see if I hopefully (don't) have anymore issues. I figured why not.

So that brings me just about back to square one. Noticed a few little things I want to tidy up or zip tie out of the way. Need to do a proper bleed on the brakes and see if the master cylinder jives with the new rears and re-bleed the clutch using the suggested method.


This will probably be my last big post for a bit. Other (fun) obligations require me for a while.

Who's ready for another round of good news, bad news?

One of the things on my todo list was take care of the firewall leak on the drivers side. Whenever it rained there would be a waterfall down the firewall. The culprit turned out to be the cowl drainage trough got blocked with leaves and rusted right where the trough meets the firewall. I'm an idiot and should have addressed it years ago because it's pretty bad now. I cleaned half a forest of debris out of there and floated Rustoleum in everywhere I could reach. I'm going to 'fix' the rust hole with some kind of seam sealer putty.

full

Here's the drivers side drainage behind where the clutch master reservoir mounts.

full

Here's inside of the firewall by the pedals. That orange Rustoleum rust converter has served me well. The truck sat outside uncovered the past bunch of years so lots of time for rain to erode that away. It's been spoiled lately, spending so much time in the garage.

If I had the time, I'd cut the section of firewall out and remake it. One thing I had wanted to do was eliminate that circular white wiring harness connector and repin everything with a different connector. I think that bolt is pretty stripped in there.

The other thing that I wanted to address was the hole in the cowl from when I had that ridiculous snorkel setup.
full

I cut that hole into a square and spent an embarrassing amount of time welding in a patch. It's sloppy at best but at least it's got some extra protection. It annoys me enough that I think I'm going to rivet a bigger patch over the area whenever I get back to aesthetic stuff.

So now the bad news time. Started playing with the clutch. Pulled the snap ring on the clutch master cylinder and let the juice flow. Pedal seems a little better? But honestly it felt pretty good all along. I had a thought that I had before. That the clutch is fine and that it's the rear locker just doing it's thing. The Spartan locker is way noisier and more aggressive than the Powertrax I had in there initially. Pulled the rear driveshaft and decided to play around.

I think I was right that the low speed engage/disengage/chatter issue is the locker. Shift into first, bring the revs up, slam the clutch in and it disengages nicely. No stuttering or clattering. Smooth. The problem is when I get to 4th and 5th gears. (Wasn't noticeable with the driveshaft attached.) There's a different sort of rattling when they're engaged. Goes away immediately when you push the clutch in so either trans or transfer case. I did notice that when the trans is in neutral and I rotate the t-case output flange it sounds like there's something rattling in there. Stretched chain from doing too many neutral drops?

I planned to rebuild the manual t-case that I cracked the housing on over the winter anyways so that moved up the projects list. I'll see what the trans on it's own sounds like too. Hopefully that's not the issue.


Had some time today to play with the B_astard. Dropped the t-case which is probably okay. I do remember every 1354 I've had making a little slap when you spin it by hand so probably normal. I really do want a manual t-case back in there because I don't feel like crawling under the truck in the snow again to shift into 4WD.

Running the truck with out the t-case...trans itself seems fine. There's still the chattering coming from the front of it so I'm thinking slave cylinder/bearing. Also noticed the teeth on the flywheel are getting a smidge worn. Looked up the part number of the starter I'm using, BOSCH SR7545N, which comes with the footnote From 06/1997 OHV. When I look up a 97 SOHC starter I don't see the Bosch PN listed. I don't know why I bought an OHV starter because I have a note to use a 97 SOCH as my lookup vehicle for tranny stuff. Not sure, finding conflicting information on compatibility. Might just chuck a different starter in there and send it.

**Edited


You can convert an electric case to manual by using a cable. One of our members had done this to his 1354 and it worked great. He had a knob mounted to the transmission tunnel to select the range and had attached an adapter to engage the shifter shaft in the transfercase at the other end. Not too much of a fabrication job.


They even sell a e shift t case cable shifter these days, unfortunately they are $$$$
But the design could be copied quite easily

We found one of these in the junk yard recently

I have also used the stand alone 4x4 control module from 02-05 fords, we call it the Motorola box, this can be used to shift the e shift t case and wired in quite easily, it works with the factory dash switch, wiring harness, and factory motor. Pretty easy to wire in too


I had that thread bookmarked. Looks like their solution was essentially a tail with a handle that goes on the shifter. Brilliantly simple. Converting the Electric Transfer Case Shift Motor to Manual

I butchered the dash wiring for the push button 4WD so I'd have to run some new wiring if I did anything electric. Again, lots of regret of younger me's lack of planning and experience on this truck.

Someone tried a 90* drill chuck but it didn't have enough torque. Had an idea and searched right angle gear boxes and came up with some promising results. Cheap enough to throw a few $$ at to play around with. The engineer in me just loves to over complicate things.


Think rack and pinion and keep it simple


Still plenty of 1354 M t cases out there also, just sayin


So this happened:
full


Then this:
full


And finally this:
full


Gonna start calling this truck Second Chance because I'm getting a second (or tenth) chance to redo the stupid stuff I did when I was just learning how to wrench.

Original manual T-Case rebuild was still complete, sans cracked housing. Really a wonder how I effed that one up. Cleaned everything up and then used a back housing from an e-shift 1354 and it all went together nicely. I just left the shift motor on the back because that sealed it up good enough. No need to JB weld anything.

Mounted it all up and tested it out around the compound. No weird crunches or bangs or whatnot. Just gonna send it on the slave cylinder being chattery.

I got some of that POR15 Industrial Epoxy putty for the firewall. Will have to report back if I patched the right spot. Product itself seems legit.

Still need to bleed the brakes and also need a new battery. Then I should be able to get it to pass state inspection.


Well done!


This week I decided to pick up a new battery. Old one wasn't holding a charge and then it finally boiled itself on the charger. For once I didn't have anything else on the property I could steal a battery from.

As always, this turned into a small project but ultimately I got something else crossed off my list. Guidebook says Group Size 65 battery which almost fits in the BII battery tray. I very very carefully ground off the 'feet' at the bottom of the battery so it would sit in the tray instead of sitting on a plank of wood like the previously one did. The battery hold down strap I was using disintegrated so picked up a nice j-hook one to replace it.

Since the B_astard tends to sit for long periods of time I wanted to wire a battery isolation switch. Picked one up and wired it on the negative terminal side. While I had the battery out, I went through the engine wiring harness and cleaned up and redid all the grounds. Even found a few more of those pesky grey/red stripe wires than need to be grounded. Tedious but again, refining stuff that I rushed years ago. I can slip my hand in between the grill and twist it without needing to open the hood.

full


Did a temporary fix on the brake lines which like to route themselves in between the coils. Simple solution was to slip some hose over them so they were too fat to slip in between the coils. Simple problem, simple solution for now.
full


The coils are super stiff and barely flex so this is just a little extra insurance policy. I only net about 3 inches travel in the front so I'm on the hunt for something flexier.


Join the Elite Explorers for $20 each year.
Elite Explorer members see no advertisements, no banner ads, no double underlined links,.
Add an avatar, upload photo attachments, and more!
.


3”!!! Ttb should be more
Like 8-16” of travel lol


Back
Top