-
Performance Upgrades - Maintenance - Modifications - Problem Solving - Off-Road - Street Trucks.
Covering the Explorer, ST, Sport, Lincoln Aviator, Sport Trac,
Mercury Mountaineer, Mazda Navajo, Ford Ranger, Mazda Pickups, and the Aerostar.
Featuring H.I. - Human Intelligence.
Register Today It's free!
You are using an out of date browser. It may not display this or other websites correctly.
You should upgrade or use an alternative browser.
You should upgrade or use an alternative browser.
Donate to Save Dannyboy's life...cage time
- Thread starter Dannyboy
- Start date
Elite Explorer members see no advertisements, no banner ads, no double underlined links,.
Add an avatar, upload photo attachments, and more!.
- Joined
- February 16, 2001
- Messages
- 5,418
- Reaction score
- 25
- City, State
- 43°48′48″N 91°13′59″W
- Year, Model & Trim Level
- 91 4 do'
LOL, that IS the John swift fiberglass. It's not being used in this buildup, but there is a bedside that has been lying on top of the truck this entire time.
If I were to use that glass it would eliminate the rear doors. Picture trying to get into the backseats with no rear doors...it's not happening.
I'm realizing that the Whiplash racing series is probably more like doing drugs. It will be a quick rush of fun but take all my money and keep wanting more meanwhile destroying what is important in life. So no glass bedsides for quite a while.
- Joined
- February 16, 2001
- Messages
- 5,418
- Reaction score
- 25
- City, State
- 43°48′48″N 91°13′59″W
- Year, Model & Trim Level
- 91 4 do'
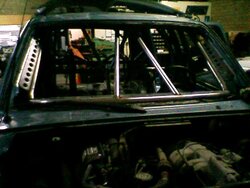
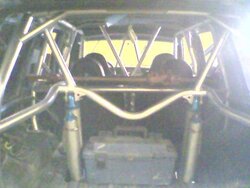
Okay, one more lousy pic from the camera phone, the a-pillar supports are looking sexy. I also cycled the rear suspenion, I have 8.5" of uptravel before my axle is into the frame (on my old worn out springs I was ripping my fuel filler hose off sitting 3-4" lower so I'm thinking usable travel will be at least 5-6"). Downtravel before rear wheels lift off the ground is at about 6" and there is still a little slack left in the limiting straps.
So I'm thinking if my springs break in a little bit (they only have about 300 miles on them) I will cycle both up and down a little more, then maybe investigate a shackle that may allow more travel) but 14-14.5" of travel on a leaf spring rear axle is great for me. It leaves just enough room to not worry about bottoming out a $1100 shock.
Gladly I cycled the suspension because the mounting bar for the shocks needed to move back 2" to allow the axle to cycle without hitting the shocks into the existing holes in the floor.
Attachments
- Joined
- February 16, 2001
- Messages
- 5,418
- Reaction score
- 25
- City, State
- 43°48′48″N 91°13′59″W
- Year, Model & Trim Level
- 91 4 do'
Yeah digging that A pillar support.
Is the paint going to change at all? Or you keeping the medium blue?
Thanks, I'm trying to get the same supports on the rear hatch as well, kinda bling, but why not, more supports to the body, less chance of the body getting shifted in a crash. Just keep changing windows and rolling. Cage is tied to the frame in 6 points and tied to the body(welded or bolted) in at least 16 places I can think of. My hopes are if I roll, cut at the door line and roofline and weld in new panel (or go glass). I'm hoping 18" of plate tying my a-pillar into the cage will eliminate any crunched windshields.
Now Paint...
tough question, it's still quite a sleeper of a truck being baby blue and not sitting ridiculously high. I'm not going to do many drastic changes to make the front end look much different at this point so, I'm not sure/ I certainly need at the very least some clearcoat on my roof. I'm not going to repaint the entre interior so changing the entire truck is out of the question.
I am trying to see if I want to go crazy or if it would be too wannnabe race truck if I did a custom paint job. It would only be paint (probably pick stic-o's brain on making a cheap paint job look really good) and not a bunch of dudebro stickers.
Here are a few ideas of some simple lines I liked. I love the silver truck and could do without the racing stripes. Maybe even Krylon Chrome.
I really liked some of the Trucks R.J. showed us too from Mexico. The 2 and 3 tones look great in my opinion, and I hate trucks with flames and tribals so I won't ever be doing that. The one unique wrap I've always wanted to do on our promo boats when I was in the wakeboarding industry and kinda sketched up on the truck was a rivet look, like a battleship or bomber plane. It sat bored sketching on a photo to see what it might look like. That would probably be in like a Navy gray if I could pull that off.
Attachments


- Joined
- February 16, 2001
- Messages
- 5,418
- Reaction score
- 25
- City, State
- 43°48′48″N 91°13′59″W
- Year, Model & Trim Level
- 91 4 do'
oh yeah and again my digi camera was dead when I got to the shop, but the door skins turned out awesome. Black and simple, cutouts for manual windows, door latch and 6" speaker and thats it, a new grab handle will be welded in place. This gave me at least another 3" clearance to widen out the cage. The skins were already in the works, but the stock panels were too big and the door wouldn't close with them on.
- Joined
- February 16, 2001
- Messages
- 5,418
- Reaction score
- 25
- City, State
- 43°48′48″N 91°13′59″W
- Year, Model & Trim Level
- 91 4 do'
ummm yeah, my cell phone is waterproof which I have tested out about a dozen times but the camera on it sucks. I cracked the screen on my digi cam so I can't see the display and therefore it drains the battery if I leave it on.
Fear not, it was a costco purchase prior to the 90 day electronics guarantee, therefore I will return and get a new digi cam.
Fear not, it was a costco purchase prior to the 90 day electronics guarantee, therefore I will return and get a new digi cam.
- Joined
- February 16, 2001
- Messages
- 5,418
- Reaction score
- 25
- City, State
- 43°48′48″N 91°13′59″W
- Year, Model & Trim Level
- 91 4 do'
So today i saw a cellphone pic of your truck on RJ's phone...so where's the update??")
I'm heading out the door to work on the truck some more. I returned my digital camera to Costco because the display went out, so I've only had bad pics, but new camera is on the way and I'm going to need to take all new pics.
Shocks are in, still haven't driven the truck. I purchased one harness and one gauge last night, I'm going to see what I can get done today and I'll have an update. Here is the pic you saw.
Attachments
- Joined
- February 16, 2001
- Messages
- 5,418
- Reaction score
- 25
- City, State
- 43°48′48″N 91°13′59″W
- Year, Model & Trim Level
- 91 4 do'
The Truck is HOME!
I've got less than 4 weeks until Moab and my girlfriend is moving here from San Diego on Friday so I'm going to have a lot going on.
I couldn't get the tire carrier built in time and we're having issues with my rear bumper staying where it should so that was put on the back burner.
cage is fully painted, seats are ready to bolt in, just waiting on 4 crow 5 points to get here before I do that deed, new low profile door panels are built, need to be fastened somehow (self tapping screws), and a handle needs to be fabricated (probably going to be post Moab), all factory wiring was secured to the firewall and no clipping of wires (that way nothing can be damaged if I didn't cut anything), autometer gauges are going in and I will get a full writeup on that install since I can't find anything with current photos on any forum out there for a 4.0.
In addition, my secondary fuse pane that used to reside under my passenger seat has been moved to in front of my art carr shifter. it's visable, but out of harms way and very easy to access.
Shocks are very very stiff, I can jump up and down on my rear bumper and there is no movement, probably a little on the stiff side so I need to learn how to adjust those. I did "rti" my truck on my trailer and did get the shocks to cycle so they may work out alright once I load it down.
The biggest hurdles I still have from this project will be to wire in the aftermarket gauges, but it's looking like I've got that under control. I could care less if I don't have a speedo or tach by moab, but I'd like my other gauges functional.
Also dash related, I'm seeing that this thing will be very bright in the sun. My experience from the marine business is that a textured dark surface works best to knock down glare, I may need to rig up a dash cover of some sort.
I still have to address my front axle as it is due for a comple overhaul but if I'm anything like RJ.. that should only take a evening or two after work.
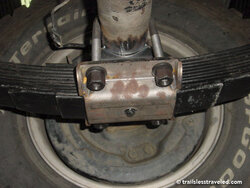
Lastly the rear shocks required rather large holes in my floor. I'm trying to design a neoprane "trampoline" style boot that will fasten around my floor to keep dirt from entering the cab, in addition my exhaust needed to be chopped right before those holes so if I want to drive this car and not die from CO poisoning I need to get that to the rear of the vehicle. This will be trick in itself because my shocks, frame, axle truss and suspension movement limit placement of tubework. I wish I had the ability to dump it before the rear wheel, but I am adding sliders and being a 4-door I cannot pull it through the body. And my factory u-bolt plates will be replaced with the ones in the last photo from total chaos. They should help my ground clearance due to the fact that my school bus leaf springs tend to hang low.
and...a new digital camera is being selected, just can't decide which one, so for now, the shots at home are from the lousy cell cam.
I've got less than 4 weeks until Moab and my girlfriend is moving here from San Diego on Friday so I'm going to have a lot going on.
I couldn't get the tire carrier built in time and we're having issues with my rear bumper staying where it should so that was put on the back burner.
cage is fully painted, seats are ready to bolt in, just waiting on 4 crow 5 points to get here before I do that deed, new low profile door panels are built, need to be fastened somehow (self tapping screws), and a handle needs to be fabricated (probably going to be post Moab), all factory wiring was secured to the firewall and no clipping of wires (that way nothing can be damaged if I didn't cut anything), autometer gauges are going in and I will get a full writeup on that install since I can't find anything with current photos on any forum out there for a 4.0.
In addition, my secondary fuse pane that used to reside under my passenger seat has been moved to in front of my art carr shifter. it's visable, but out of harms way and very easy to access.
Shocks are very very stiff, I can jump up and down on my rear bumper and there is no movement, probably a little on the stiff side so I need to learn how to adjust those. I did "rti" my truck on my trailer and did get the shocks to cycle so they may work out alright once I load it down.
The biggest hurdles I still have from this project will be to wire in the aftermarket gauges, but it's looking like I've got that under control. I could care less if I don't have a speedo or tach by moab, but I'd like my other gauges functional.
Also dash related, I'm seeing that this thing will be very bright in the sun. My experience from the marine business is that a textured dark surface works best to knock down glare, I may need to rig up a dash cover of some sort.
I still have to address my front axle as it is due for a comple overhaul but if I'm anything like RJ.. that should only take a evening or two after work.
Lastly the rear shocks required rather large holes in my floor. I'm trying to design a neoprane "trampoline" style boot that will fasten around my floor to keep dirt from entering the cab, in addition my exhaust needed to be chopped right before those holes so if I want to drive this car and not die from CO poisoning I need to get that to the rear of the vehicle. This will be trick in itself because my shocks, frame, axle truss and suspension movement limit placement of tubework. I wish I had the ability to dump it before the rear wheel, but I am adding sliders and being a 4-door I cannot pull it through the body. And my factory u-bolt plates will be replaced with the ones in the last photo from total chaos. They should help my ground clearance due to the fact that my school bus leaf springs tend to hang low.
and...a new digital camera is being selected, just can't decide which one, so for now, the shots at home are from the lousy cell cam.
Attachments


- Joined
- August 3, 2000
- Messages
- 31,704
- Reaction score
- 8,365
- City, State
- NORTH IDAHO, 7B
- Year, Model & Trim Level
- B2 "Slightly" Modified
- Callsign
- FOURTEN
wow
Needs a V8
*****in work Danny
Needs a V8
*****in work Danny
- Joined
- February 16, 2001
- Messages
- 5,418
- Reaction score
- 25
- City, State
- 43°48′48″N 91°13′59″W
- Year, Model & Trim Level
- 91 4 do'
if you look at the drivers side you can see that I already cut the hole for factory the head light switch and installed it. Also just above the art carr shifter I mounted my heater controls with a pair of Lowe's corner brackest slightly modified. It bolts up under the dash, leaving room for my stereo, 6 gauges, electric 4wd button etc.
Now is a good time to evaluate what else I'd like to have on my dash of a hard-core wheeler. Do I go GPS? Do I use my E-trex legend and get a nice solid dash mount? Do I link that to an old laptop stashed under my seat with a remote screen on the dash for a bigger display and color? Also I would like find a rattle free not bouncing around home for my sirius stiletto and maybe even my ipod. Also thinking about a set of these in the rear since I used to rep this company, just need a bombproof sub mounted, perhaps between the rear seats.

heater vents will probably be flex hose and a few of these on the dash for defrost. I'm very familiar with the heatercraft style vents as I have installed these on several wakeboard boats.

Still trying to decide if it's worth it to relocate the battery to the rear. It would make additional room for my intake, but that is about it.
Now is a good time to evaluate what else I'd like to have on my dash of a hard-core wheeler. Do I go GPS? Do I use my E-trex legend and get a nice solid dash mount? Do I link that to an old laptop stashed under my seat with a remote screen on the dash for a bigger display and color? Also I would like find a rattle free not bouncing around home for my sirius stiletto and maybe even my ipod. Also thinking about a set of these in the rear since I used to rep this company, just need a bombproof sub mounted, perhaps between the rear seats.
heater vents will probably be flex hose and a few of these on the dash for defrost. I'm very familiar with the heatercraft style vents as I have installed these on several wakeboard boats.
Still trying to decide if it's worth it to relocate the battery to the rear. It would make additional room for my intake, but that is about it.
IZwack
Moderator Emeritus
- Joined
- February 5, 2003
- Messages
- 21,675
- Reaction score
- 49
- City, State
- Germantown, MD
- Year, Model & Trim Level
- 1998 Ford Explorer
Weight distribution -- move whatever you can to the backStill trying to decide if it's worth it to relocate the battery to the rear. It would make additional room for my intake, but that is about it.
- Joined
- February 16, 2001
- Messages
- 5,418
- Reaction score
- 25
- City, State
- 43°48′48″N 91°13′59″W
- Year, Model & Trim Level
- 91 4 do'
Weight distribution -- move whatever you can to the back
Okay, my passenger seat has been moved behind the bypass shocks, my girlfriend will now sit there, that will shift 118 lbs directly over the rear bumper. Hope she doesn't mind.
Elite Explorer members see no advertisements, no banner ads, no double underlined links,.
Add an avatar, upload photo attachments, and more!.
- Joined
- September 1, 2002
- Messages
- 14,245
- Reaction score
- 1,434
- City, State
- Lake View Terrace, CA
- Year, Model & Trim Level
- '91 Navajo '99 X '19 Rngr
"cough" spare tire...or tires back there Just lose the rear gate and make them hang part way out. Then install a bulkhead right in front of the rear wells with a big power window
Just lose the rear gate and make them hang part way out. Then install a bulkhead right in front of the rear wells with a big power windowFeatured images


Featured images
Similar Threads
- Replies
- 2
- Views
- 1,750
- Replies
- 42
- Views
- 5,779
- Poll
- Replies
- 44
- Views
- 9,741
- Replies
- 3
- Views
- 2,452
- Replies
- 4
- Views
- 2,101
- Replies
- 1
- Views
- 3,111