Charlie
Explorer Addict
- Joined
- August 10, 2006
- Messages
- 4,296
- Reaction score
- 5
- City, State
- Wisconsin
- Year, Model & Trim Level
- 2000 Limited
Installing A Mountaineer Roof Rack
Procedure performed and written up by Charlie Larrabee “webmastercharli”
Disclaimer: I am not responsible to any damages you may cause to persons, property or pets while attempting this procedure. You, the reader are responsible. Note: Installing roof rack will require drilling in roof.
This procedure should work for installing either an Explorer or Mountaineer roof rack, but since I only have installed and worked with the Mountaineer, there may be differences in the installations of more than I am aware. This procedure can be done by anybody, just so long you have time and patience. This will work on second Gen Explorers, and possibly other generations also. Please also note that you cannot swap your Explorer roof rack for a Mountaineer rack, because they do not have the same mounting holes.
Please read through the whole write-up before you begin.
Since I am writing this 8 months after installing my roof rack, I will be using computer models in addition to photos, since I did not take photos during the installation.
First, you will need to acquire a roof rack. I purchased mine from Jon Smith “jtsmith,” who was a top rate person to deal with, with a reasonable cost and fast shipping.
Materials that will be needed for this are:
-Roof rack (both side rails, and 2 crossbars)
-Mounting bolts with locknuts/washers (either stock, or substitutes can be purchased at any hardware store)
-Silicone sealant
-A buddy (to help with alignment, ect)
Now, it is time to begin. Pull your vehicle into a clean work area, with good lighting. Take your roof rack out, and place crossbars in sidebars. It is important that these are assembled, so that when you are putting the sidebars on they will be aligned properly so the crossbars fit.
You should now be looking at this

The time has come to set it up on your roof. Set it up, and align it as best you can. Now you should be noticing that it is not sitting flush on your roof. This is because there are four bumps on the bottom of the side rails, that will aid in holding it in place and keep it aligned. Now, making sure the back is in the back of the roof (the back is the taller end) stand up on one side of your Explorer, and have your buddy on the other side. Measure from the side of the roof rack at two points on the side, front and back, and move it until your roof rack is centered on the roof.
I measured here:

And here:

The rails should NOT be in the outside slots on the roof. This is the main difference between the mountaineer and explorer roof racks.
Now, your roof rack may be aligned like this in the back. This is too far away from the back of the roof. It will need to be moved back more, but carefully as to not throw it out of center.

I measured mine from the rear tip of the rack, to the crack for the hatch. MAKE SURE IT IS IN FRONT OF THIS GAP! I measured a Mountaineer at the Ford dealership to get this distance. From back tip to groove, I have it at ¾” space. This is enough so the hatch can open and have clearance.
Now, make sure you have everything aligned, re measure twice, and then go get your favorite marking device. Draw a circle around each of the four “alignment tabs” on the bottom of the rack.
After marking the tabs, remove the roof rack, and take one last look at your solid, one piece, no holes roof. It should look something like this with the marks:

Now find the nearest size drill bit that is bigger than the mounting tabs, and can work on metal. Carefully drill through at each mark.
Note: If you drill through very carefully, with light pressure, the drill bit will probably still go through your headliner, as it is close to the roof. You can avoid this by either removing the headliner now, or you can do what I did. My drill bit was approx. 4” long sticking out of the drill, so I took a piece of 1x2 wood, and drilled a hole through the center of it, and cut it at 3½” long. Then, I placed it over the drill bit while drilling, that way when the bit went through the roof, it would drop only slightly below roof level, and did not affect headliner.
After drilling holes, place roof rack in these holes. It should now be perfectly aligned on your roof, and should be flush.
Now take your handy marking device, and mark each mounting hole. Again, take your drill and drill holes (being very careful with headliner again) big enough for your mounting bolts to go through.
Roof with alignment holes drilled and mounting holes marked:

Once you have those holes drilled, take your silicone sealant and put a small amount in each of the four alignment holes. Then, place your roof rack on, setting it in the alignment holes. Make sure all of the mounting holes are lined up properly. Now, go into your car, and remove the top part of your plastic panels enough so you can pull down the headliner a little. It only has to get down far enough for you to hold the bolt in place while attaching it. Now, have your buddy drop the bolts through the holes. I recommend that you place a little silicone on the bottom of each bolt, to help seal it.
Now, with a lock washer and nut, reach up under your headliner and put it on the bolt, holding it while your buddy tightens it down from up top. Repeat this for all of the bolts. I also recommend that coat the nuts with silicone where they touch the roof after they are tightened, once again to help seal it in.
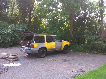
Now, re-raise your headliner, and re-secure your panels. You have now installed the roof rack successfully. Your Explorer should look something like this:


A Mountaineer roof rack will give your Explorer, XLT or Sport, a subtly unique look.
Mine has been on for 8 months, and has not leaked in rain, or high pressure car washes. I have safely used it to haul, and it works well, along with looking good.
Good luck with your install!
Procedure performed and written up by Charlie Larrabee “webmastercharli”
Disclaimer: I am not responsible to any damages you may cause to persons, property or pets while attempting this procedure. You, the reader are responsible. Note: Installing roof rack will require drilling in roof.
This procedure should work for installing either an Explorer or Mountaineer roof rack, but since I only have installed and worked with the Mountaineer, there may be differences in the installations of more than I am aware. This procedure can be done by anybody, just so long you have time and patience. This will work on second Gen Explorers, and possibly other generations also. Please also note that you cannot swap your Explorer roof rack for a Mountaineer rack, because they do not have the same mounting holes.
Please read through the whole write-up before you begin.
Since I am writing this 8 months after installing my roof rack, I will be using computer models in addition to photos, since I did not take photos during the installation.
First, you will need to acquire a roof rack. I purchased mine from Jon Smith “jtsmith,” who was a top rate person to deal with, with a reasonable cost and fast shipping.
Materials that will be needed for this are:
-Roof rack (both side rails, and 2 crossbars)
-Mounting bolts with locknuts/washers (either stock, or substitutes can be purchased at any hardware store)
-Silicone sealant
-A buddy (to help with alignment, ect)
Now, it is time to begin. Pull your vehicle into a clean work area, with good lighting. Take your roof rack out, and place crossbars in sidebars. It is important that these are assembled, so that when you are putting the sidebars on they will be aligned properly so the crossbars fit.
You should now be looking at this
The time has come to set it up on your roof. Set it up, and align it as best you can. Now you should be noticing that it is not sitting flush on your roof. This is because there are four bumps on the bottom of the side rails, that will aid in holding it in place and keep it aligned. Now, making sure the back is in the back of the roof (the back is the taller end) stand up on one side of your Explorer, and have your buddy on the other side. Measure from the side of the roof rack at two points on the side, front and back, and move it until your roof rack is centered on the roof.
I measured here:
And here:
The rails should NOT be in the outside slots on the roof. This is the main difference between the mountaineer and explorer roof racks.
Now, your roof rack may be aligned like this in the back. This is too far away from the back of the roof. It will need to be moved back more, but carefully as to not throw it out of center.
I measured mine from the rear tip of the rack, to the crack for the hatch. MAKE SURE IT IS IN FRONT OF THIS GAP! I measured a Mountaineer at the Ford dealership to get this distance. From back tip to groove, I have it at ¾” space. This is enough so the hatch can open and have clearance.
Now, make sure you have everything aligned, re measure twice, and then go get your favorite marking device. Draw a circle around each of the four “alignment tabs” on the bottom of the rack.
After marking the tabs, remove the roof rack, and take one last look at your solid, one piece, no holes roof. It should look something like this with the marks:
Now find the nearest size drill bit that is bigger than the mounting tabs, and can work on metal. Carefully drill through at each mark.
Note: If you drill through very carefully, with light pressure, the drill bit will probably still go through your headliner, as it is close to the roof. You can avoid this by either removing the headliner now, or you can do what I did. My drill bit was approx. 4” long sticking out of the drill, so I took a piece of 1x2 wood, and drilled a hole through the center of it, and cut it at 3½” long. Then, I placed it over the drill bit while drilling, that way when the bit went through the roof, it would drop only slightly below roof level, and did not affect headliner.
After drilling holes, place roof rack in these holes. It should now be perfectly aligned on your roof, and should be flush.
Now take your handy marking device, and mark each mounting hole. Again, take your drill and drill holes (being very careful with headliner again) big enough for your mounting bolts to go through.
Roof with alignment holes drilled and mounting holes marked:
Once you have those holes drilled, take your silicone sealant and put a small amount in each of the four alignment holes. Then, place your roof rack on, setting it in the alignment holes. Make sure all of the mounting holes are lined up properly. Now, go into your car, and remove the top part of your plastic panels enough so you can pull down the headliner a little. It only has to get down far enough for you to hold the bolt in place while attaching it. Now, have your buddy drop the bolts through the holes. I recommend that you place a little silicone on the bottom of each bolt, to help seal it.
Now, with a lock washer and nut, reach up under your headliner and put it on the bolt, holding it while your buddy tightens it down from up top. Repeat this for all of the bolts. I also recommend that coat the nuts with silicone where they touch the roof after they are tightened, once again to help seal it in.
Now, re-raise your headliner, and re-secure your panels. You have now installed the roof rack successfully. Your Explorer should look something like this:
A Mountaineer roof rack will give your Explorer, XLT or Sport, a subtly unique look.
Mine has been on for 8 months, and has not leaked in rain, or high pressure car washes. I have safely used it to haul, and it works well, along with looking good.
Good luck with your install!